What Is Crawl Budget?
Crawl budget is the number of URLs on your website that search engines like Google will crawl (discover) in a given time period. And after that, they’ll move on.
Here’s the thing:
There are billions of websites in the world. And search engines have limited resources—they can’t check every single site every day. So, they have to prioritize what and when to crawl.
Before we talk about how they do that, we need to discuss why this matters for your site’s SEO.
Why Is Crawl Budget Important for SEO?
Google first needs to crawl and then index your pages before they can rank. And everything needs to go smoothly with those processes for your content to show in search results.
That can significantly impact your organic traffic. And your overall business goals.
Most website owners don’t need to worry too much about crawl budget. Because Google is quite efficient at crawling websites.
But there are a few specific situations when Google’s crawl budget is especially important for SEO:
- Your site is very large: If your website is large and complex (10K+ pages), Google might not find new pages right away or recrawl all of your pages very often
- You add lots of new pages: If you frequently add lots of new pages, your crawl budget can impact the visibility of those pages
- Your site has technical issues: If crawlability issues prevent search engines from efficiently crawling your website, your content may not show up in search results
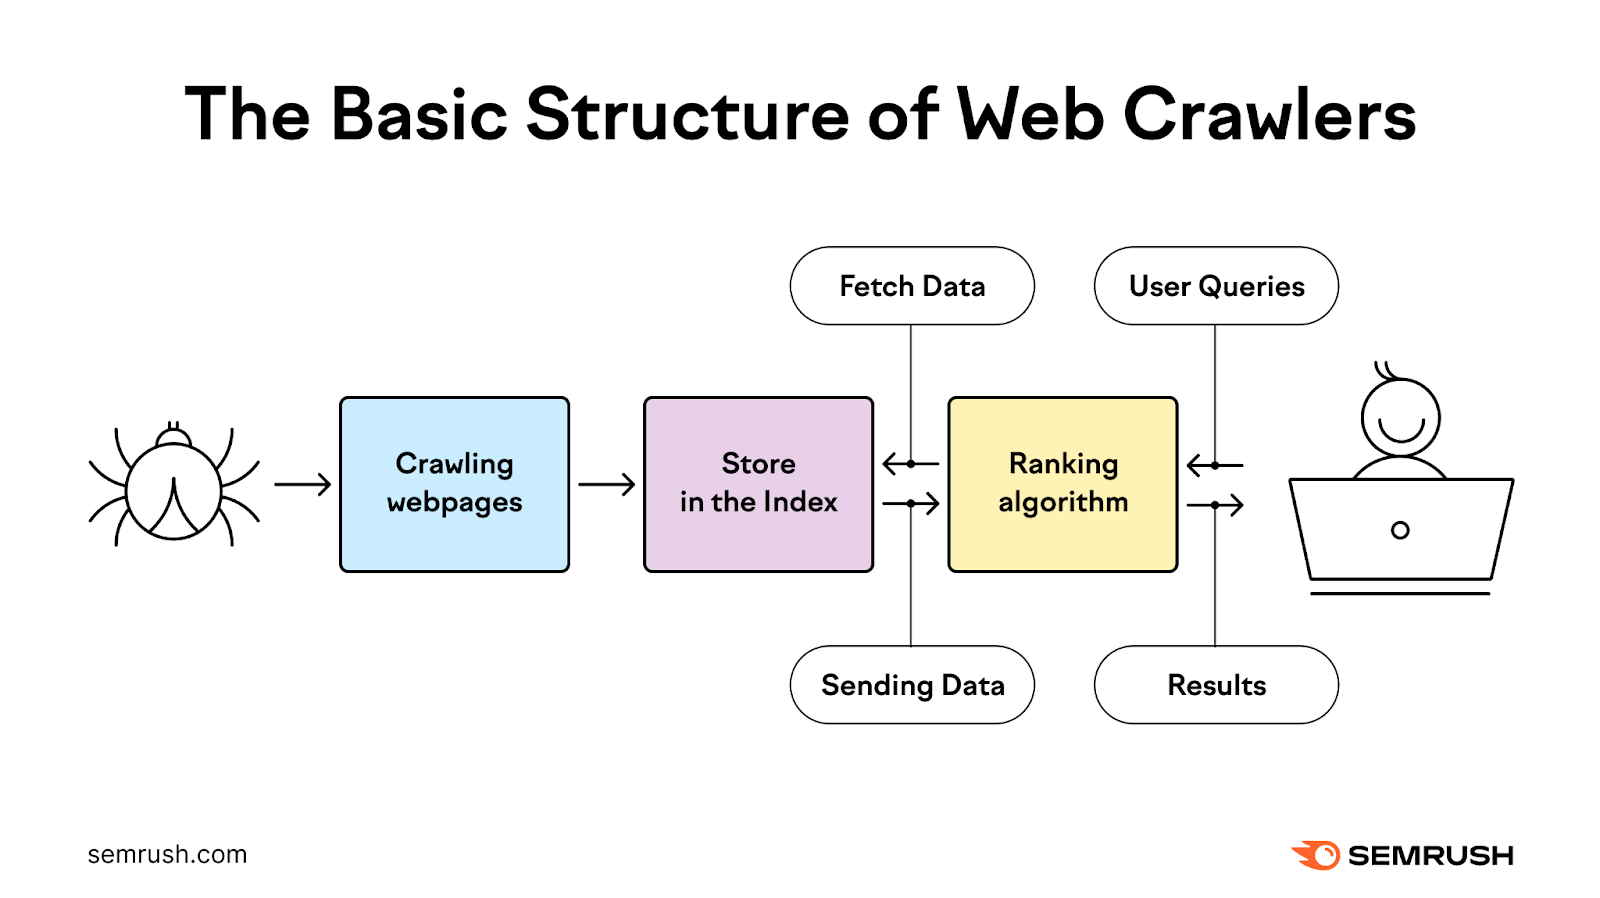
How Does Google Determine Crawl Budget?
Your crawl budget is determined by two main elements:
Crawl Demand
Crawl demand is how often Google crawls your site based on perceived importance. And there are three factors that affect your site’s crawl demand:
Perceived Inventory
Google will usually try to crawl all or most of the pages that it knows about on your site. Unless you instruct Google not to.
This means Googlebot may still try to crawl duplicate pages and pages you’ve removed if you don’t tell it to skip them. Such as through your robots.txt file (more on that later) or 404/410 HTTP status codes.
Popularity
Google generally prioritizes pages with more backlinks (links from other websites) and those that attract higher traffic when it comes to crawling. Which can both signal to Google’s algorithm that your website is important and worth crawling more frequently.
Note the number of backlinks alone doesn’t matter—backlinks should be relevant and from authoritative sources.
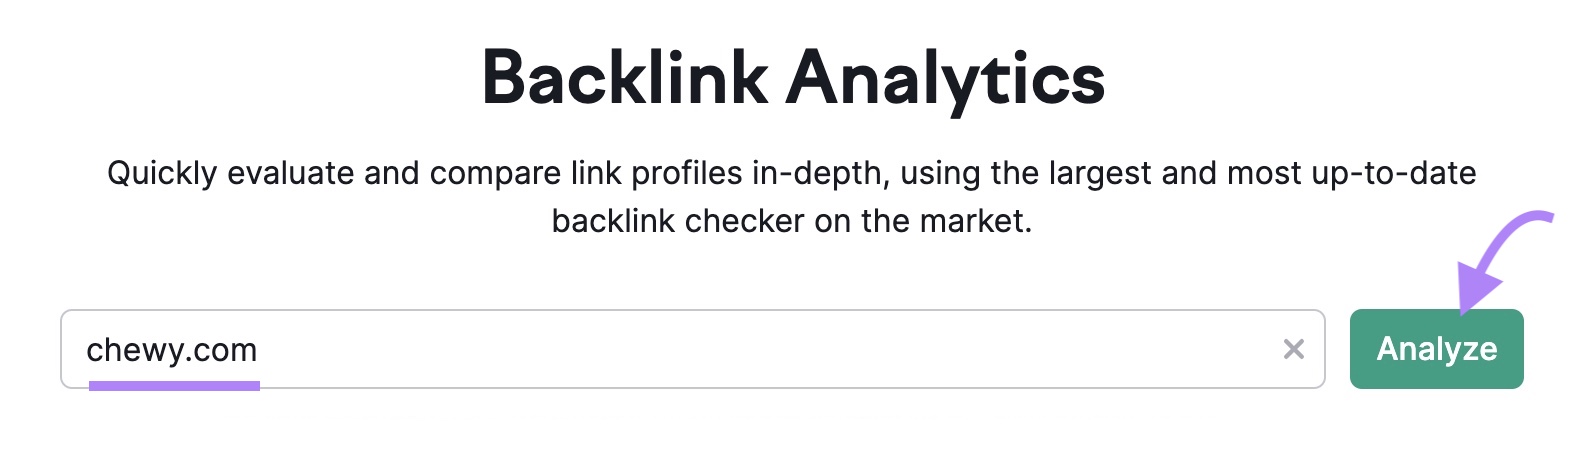
Use Semrush’s Backlink Analytics tool to see which of your pages attract the most backlinks and may attract Google’s attention.
Just enter your domain and click “Analyze.”
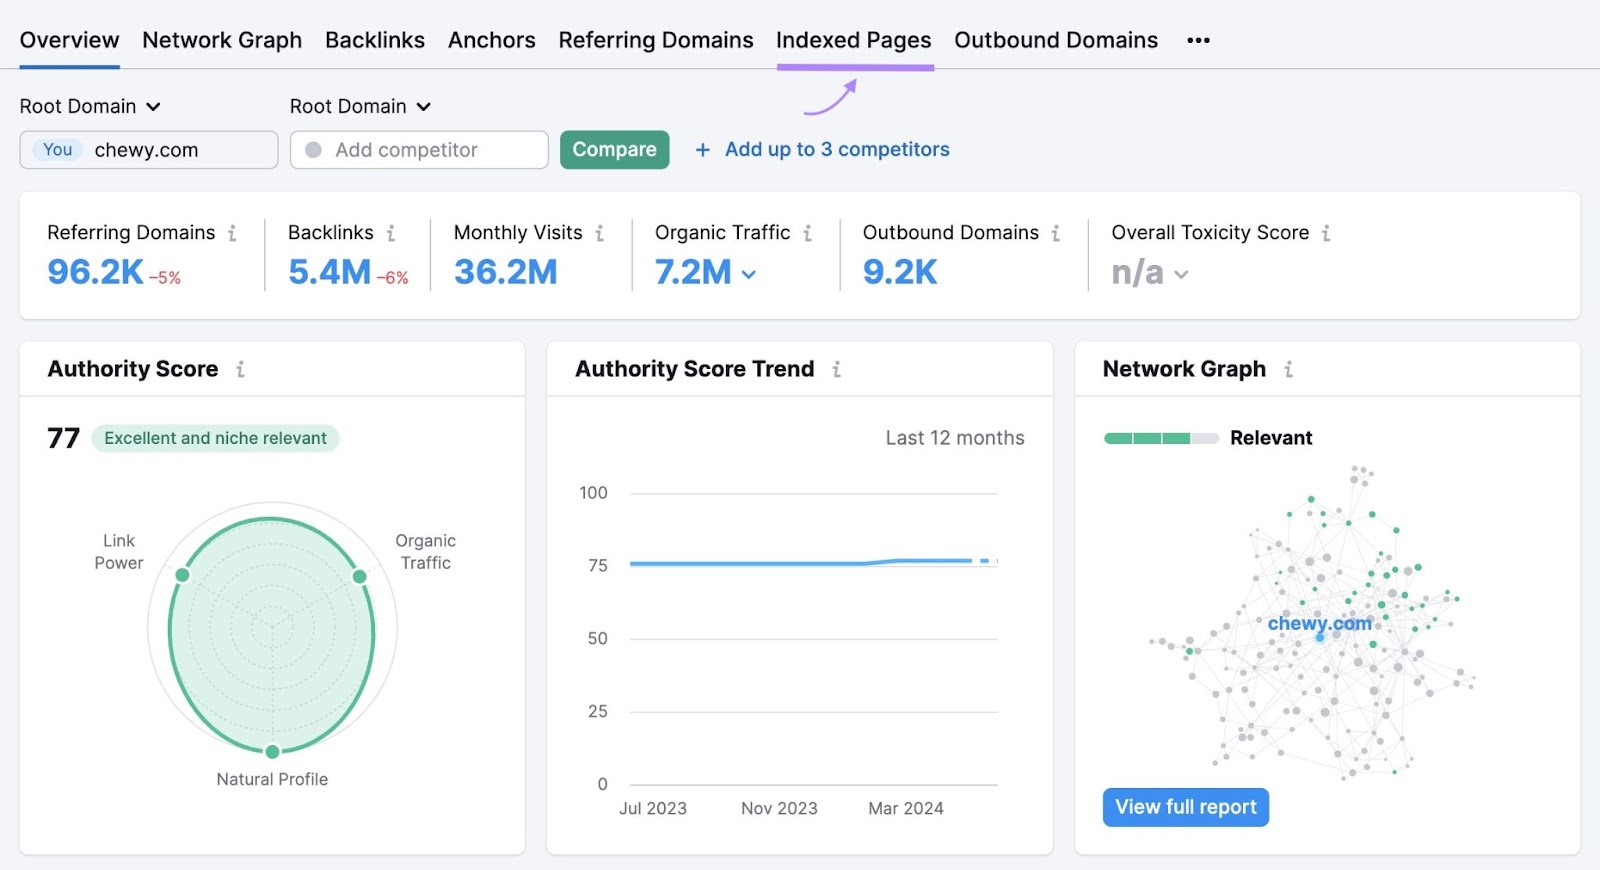
You’ll see an overview of your site’s backlink profile. But to see backlinks by page, click the “Indexed Pages” tab.
Click the “Backlinks” column to sort by the pages with the most backlinks.
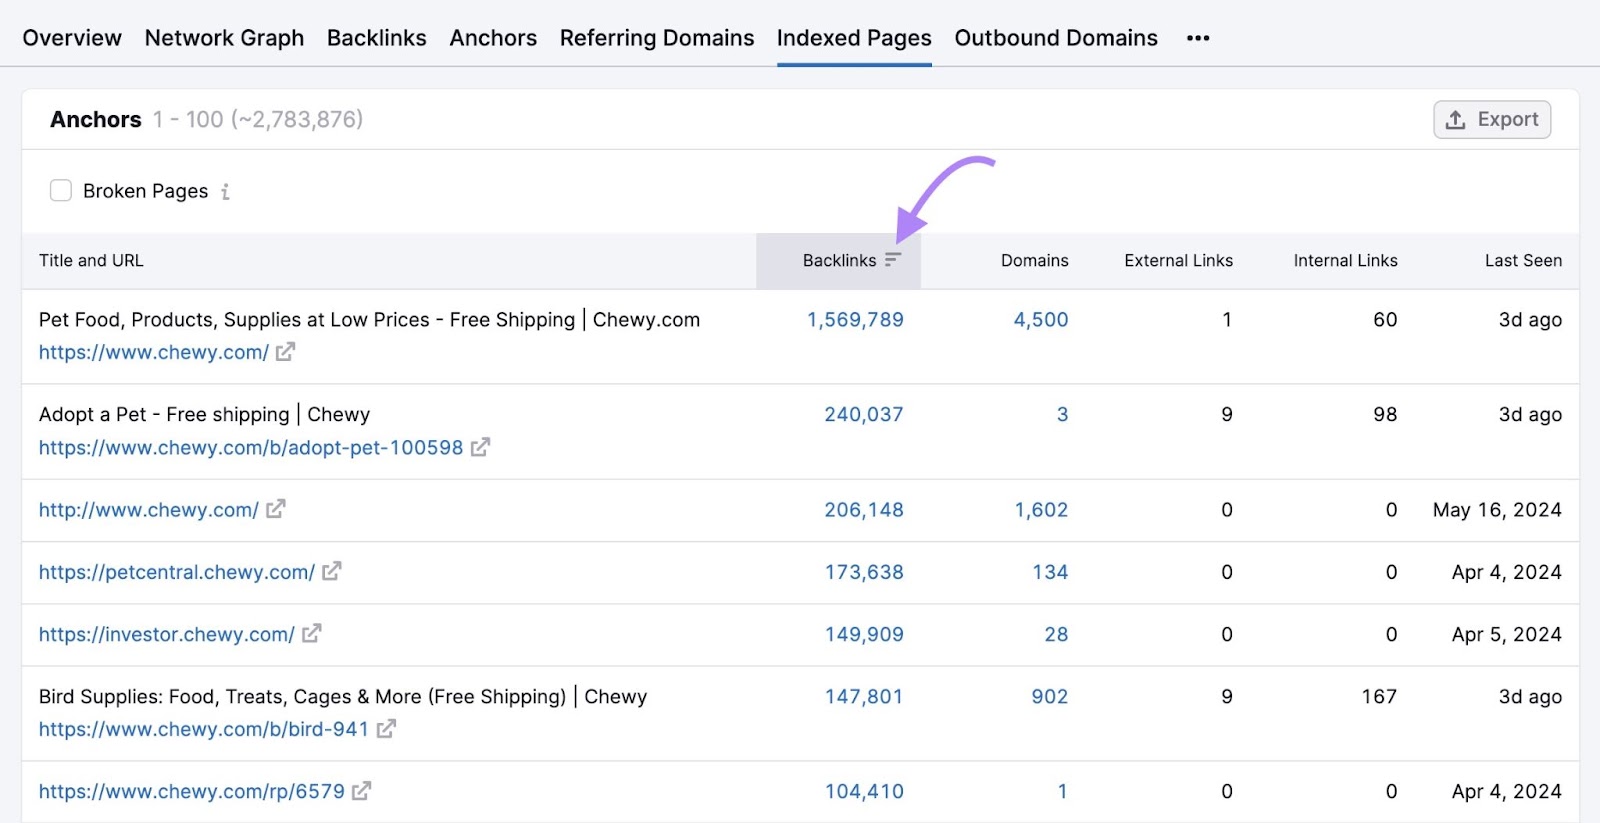
These are likely the pages on your site that Google crawls most frequently (although that’s not guaranteed).
So, look out for important pages with few backlinks—they may be crawled less often. And consider implementing a backlinking strategy to get more sites to link to your important pages.
Staleness
Search engines aim to crawl content frequently enough to pick up any changes. But if your content doesn’t change much over time, Google may start crawling it less frequently.
For example, Google typically crawls news websites a lot because they often publish new content several times a day. In this case, the website has high crawl demand.
This doesn’t mean you need to update your content every day just to try to get Google to crawl your site more often. Google’s own guidance says it only wants to crawl high-quality content.
So prioritize content quality over making frequent, irrelevant changes in an attempt to boost crawl frequency.
Crawl Capacity Limit
The crawl capacity limit prevents Google’s bots from slowing down your website with too many requests, which can cause performance issues.
It’s primarily affected by your site’s overall health and Google’s own crawling limits.
Your Site’s Crawl Health
How fast your website responds to Google’s requests can affect your crawl budget.
If your site responds quickly, your crawl capacity limit can increase. And Google may crawl your pages faster.
But if your site slows down, your crawl capacity limit may decrease.
If your site responds with server errors, this can also reduce the limit. And Google may crawl your website less often.
Google’s Crawling Limits
Google doesn’t have unlimited resources to spend crawling websites. That’s why there are crawl budgets in the first place.
Basically, it’s a way for Google to prioritize which pages to crawl most often.
If Google’s resources are limited for one reason or another, this can affect your website’s crawl capacity limit.
How to Check Your Crawl Activity
Google Search Console (GSC) provides complete information about how Google crawls your website. Along with any issues there may be and any major changes in crawling behavior over time.
This can help you understand if there may be issues impacting your crawl budget that you can fix.
To find this information, access your GSC property and click “Settings.”
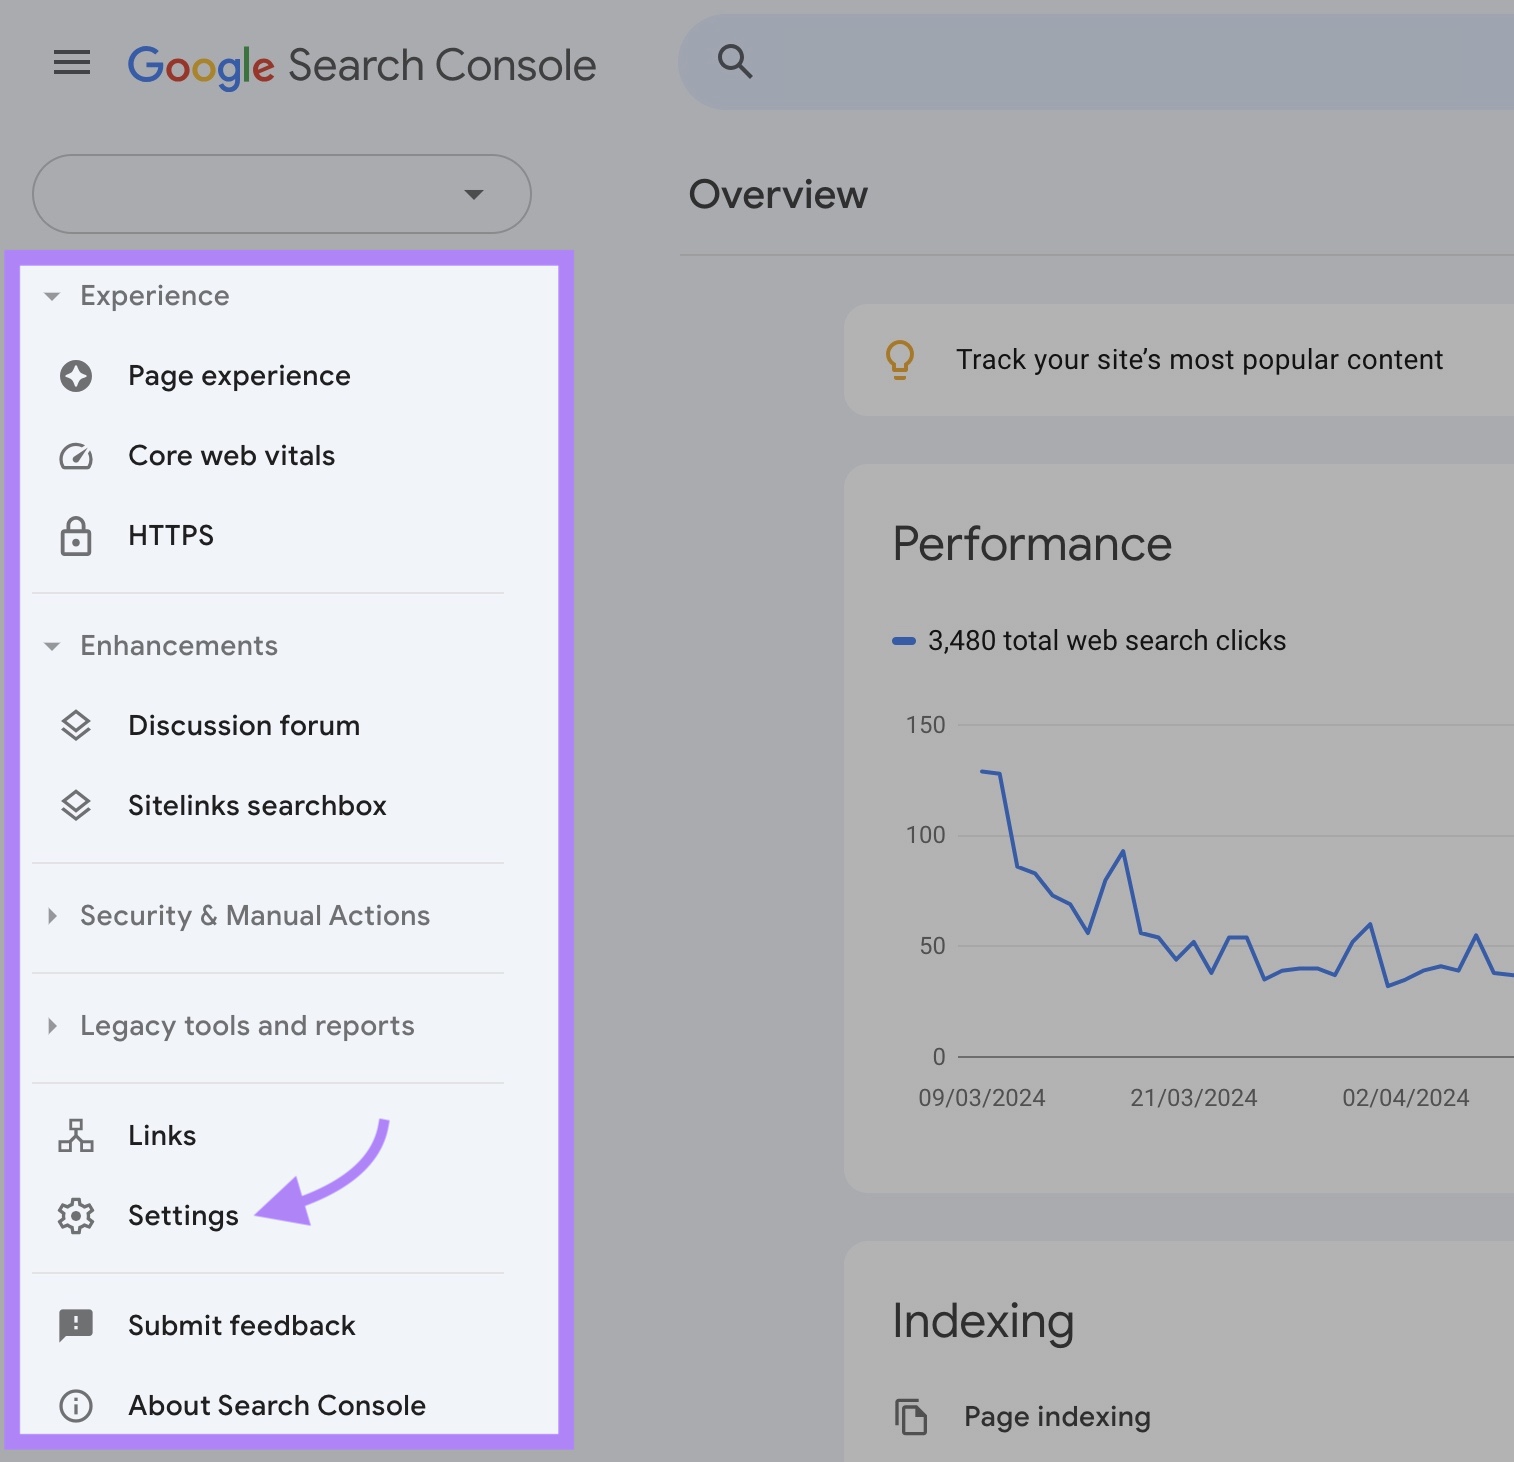
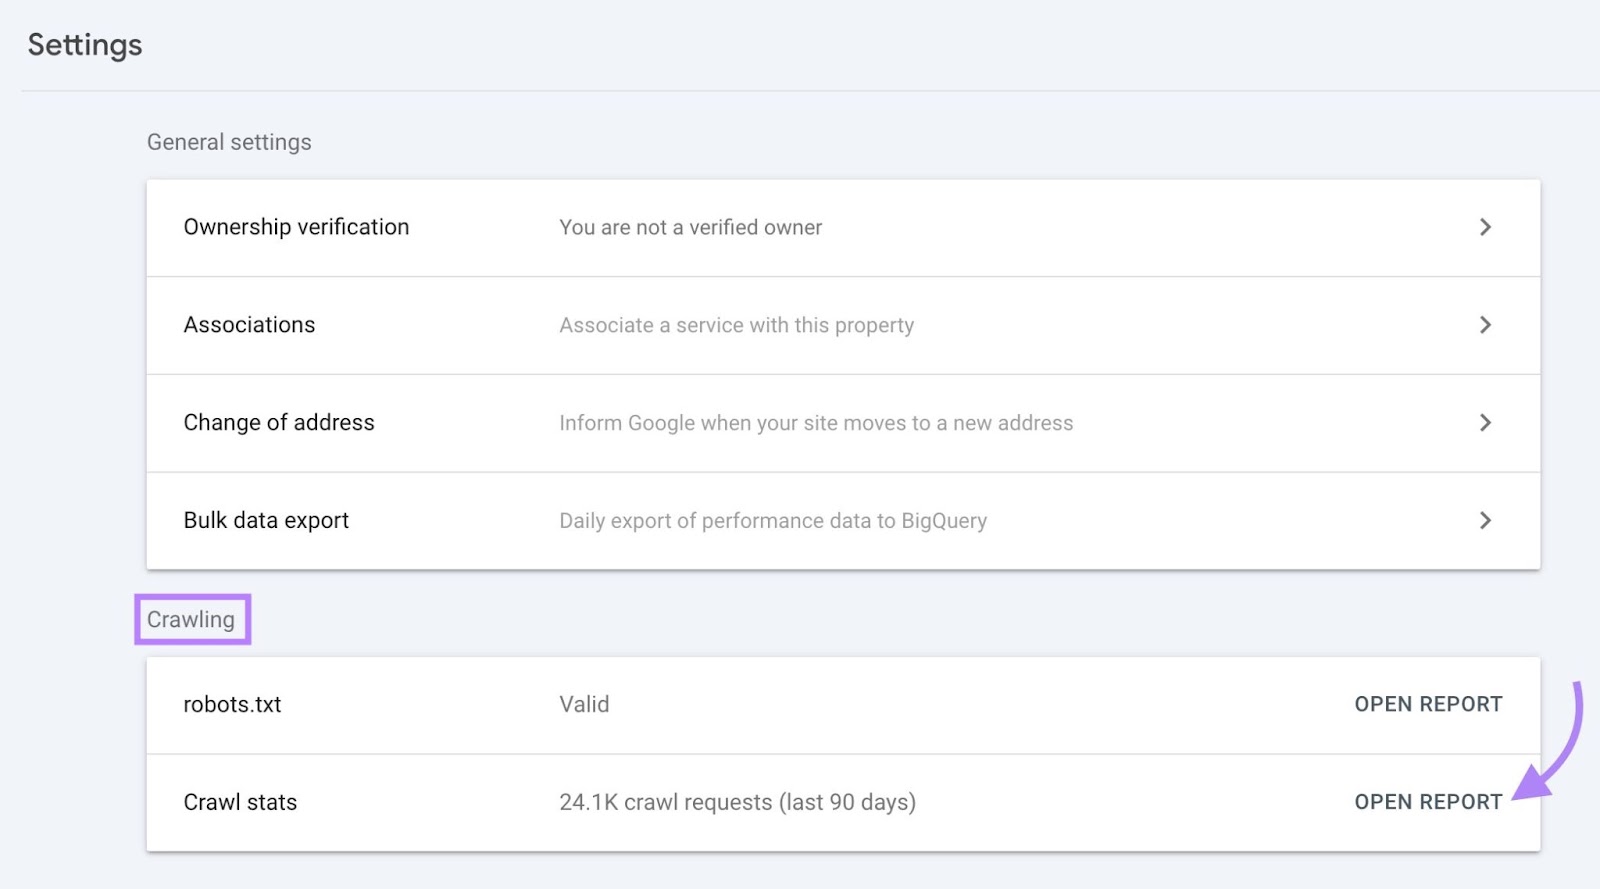
In the “Crawling” section, you’ll see the number of crawl requests in the past 90 days.
Click “Open Report” to get more detailed insights.
The “Crawl stats” page shows you various widgets with data:
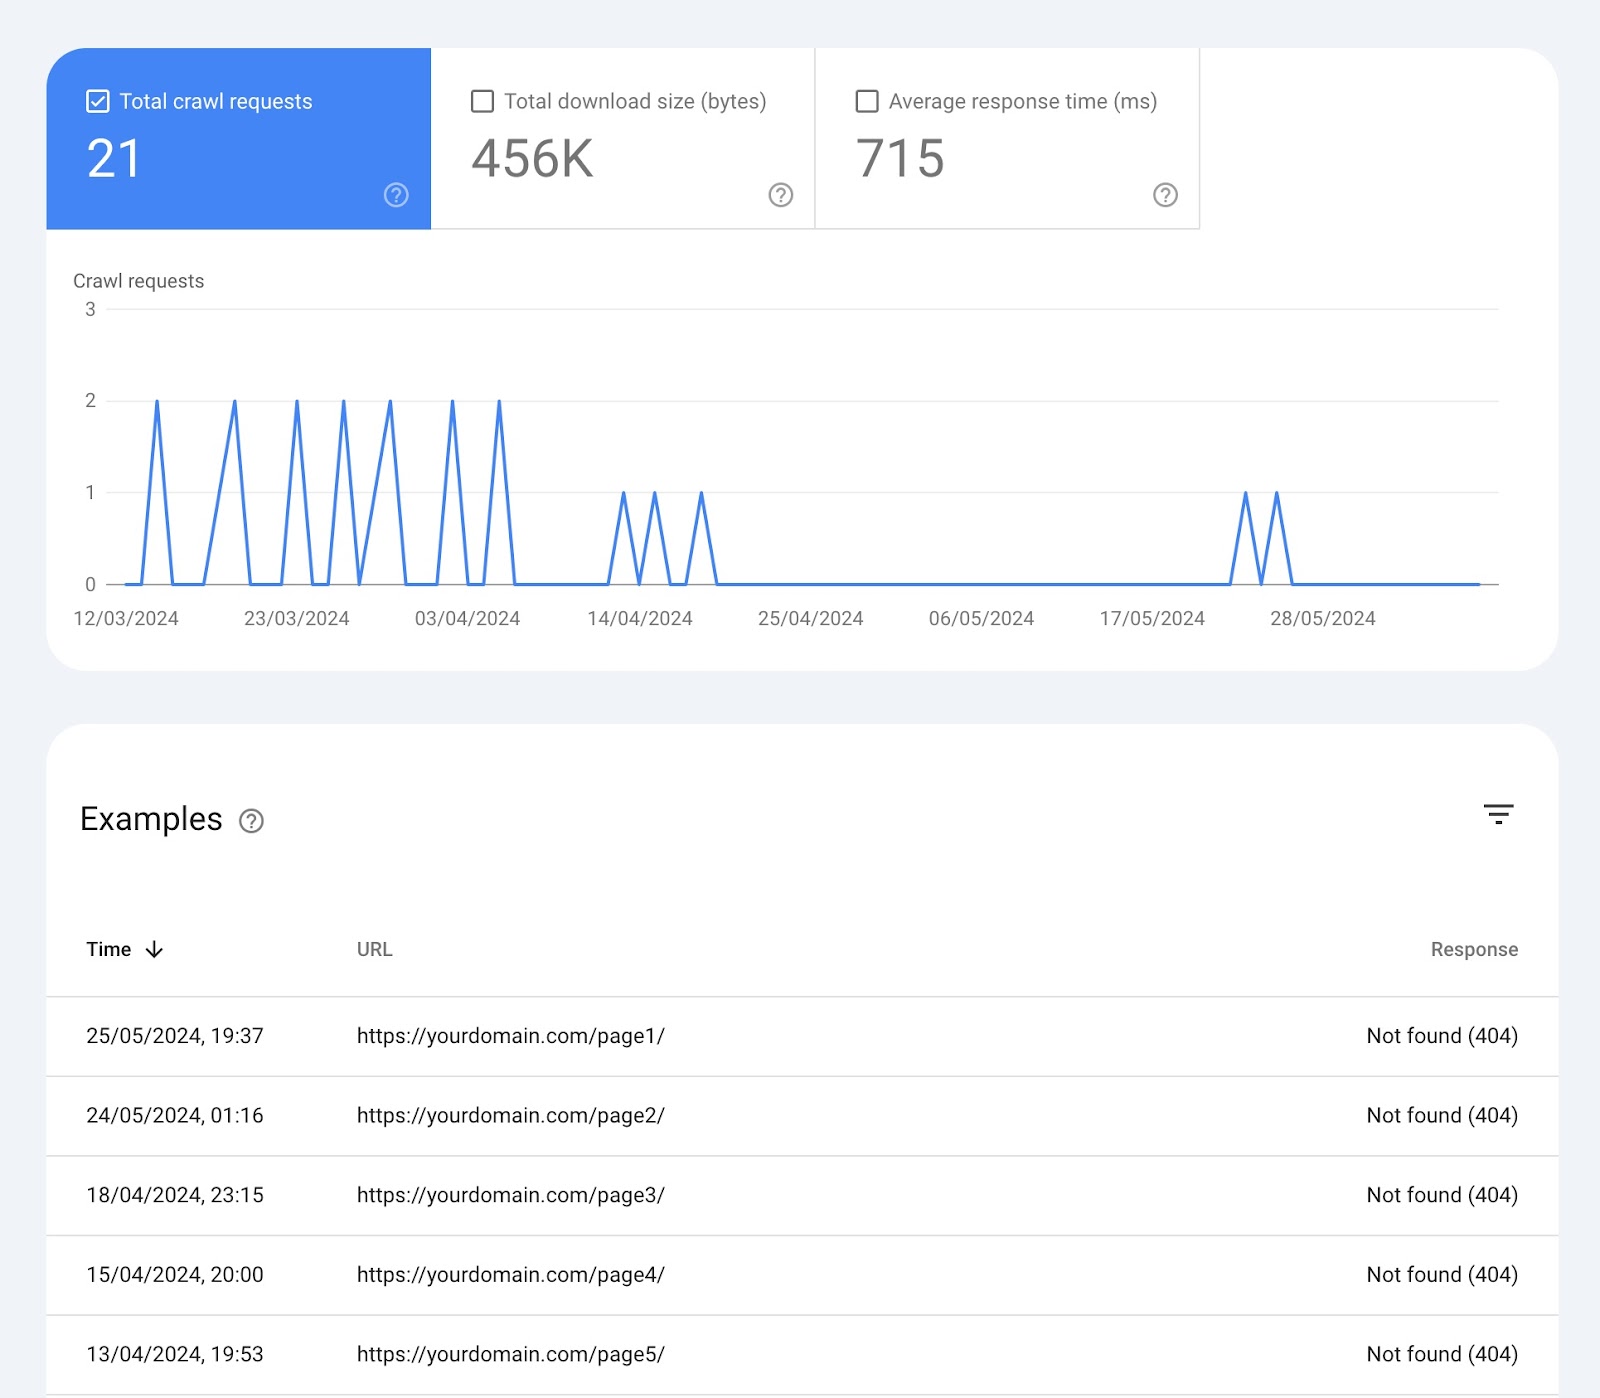
Over-Time Charts
At the top, there’s a chart of crawl requests Google has made to your site in the past 90 days.
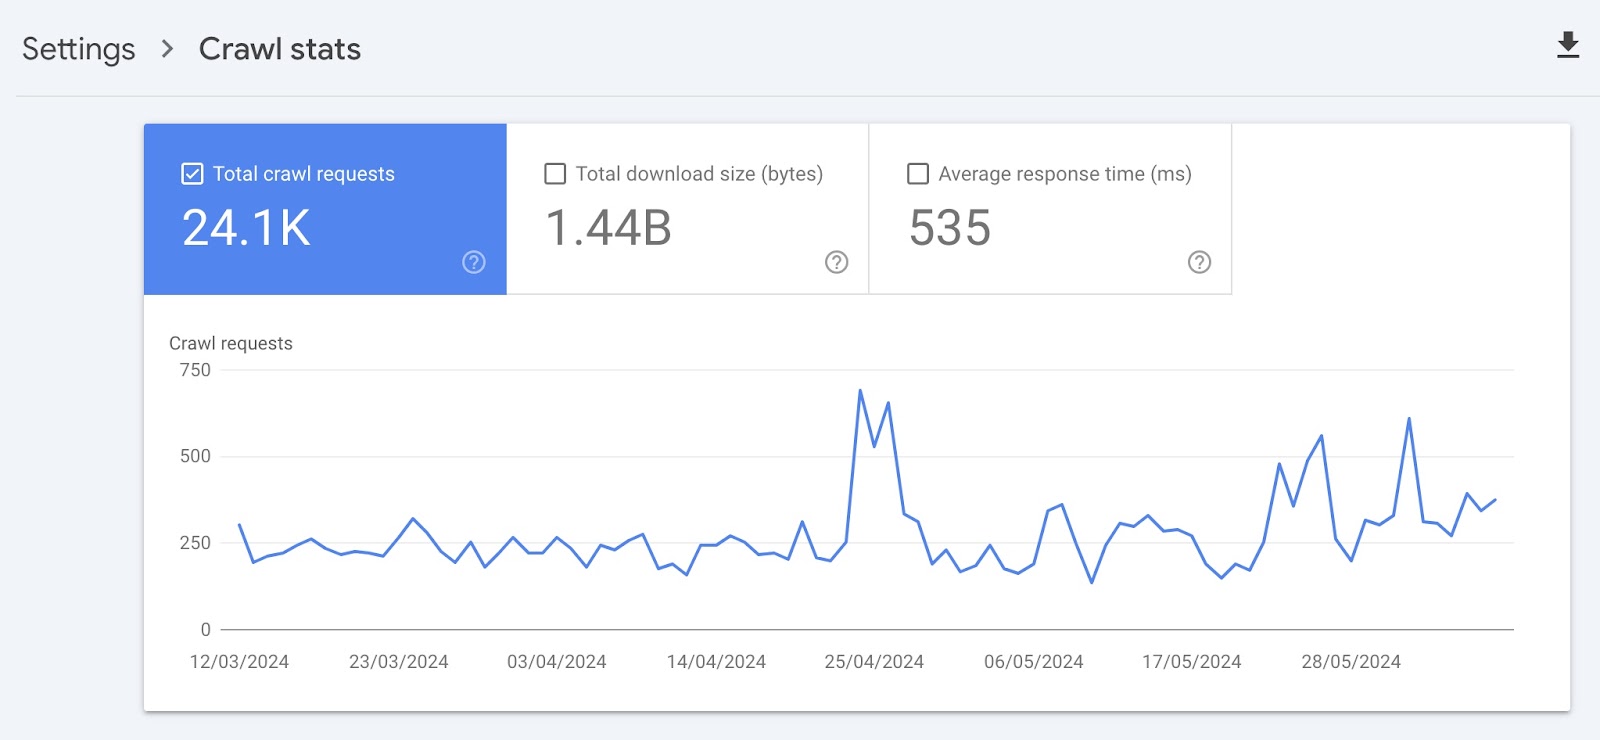
Here’s what each box at the top means:
- Total crawl requests: The number of crawl requests Google made in the past 90 days
- Total download size: The total amount of data Google’s crawlers downloaded when accessing your website over a specific period
- Average response time: The average amount of time it took for your website’s server to respond to a request from the crawler (in milliseconds)
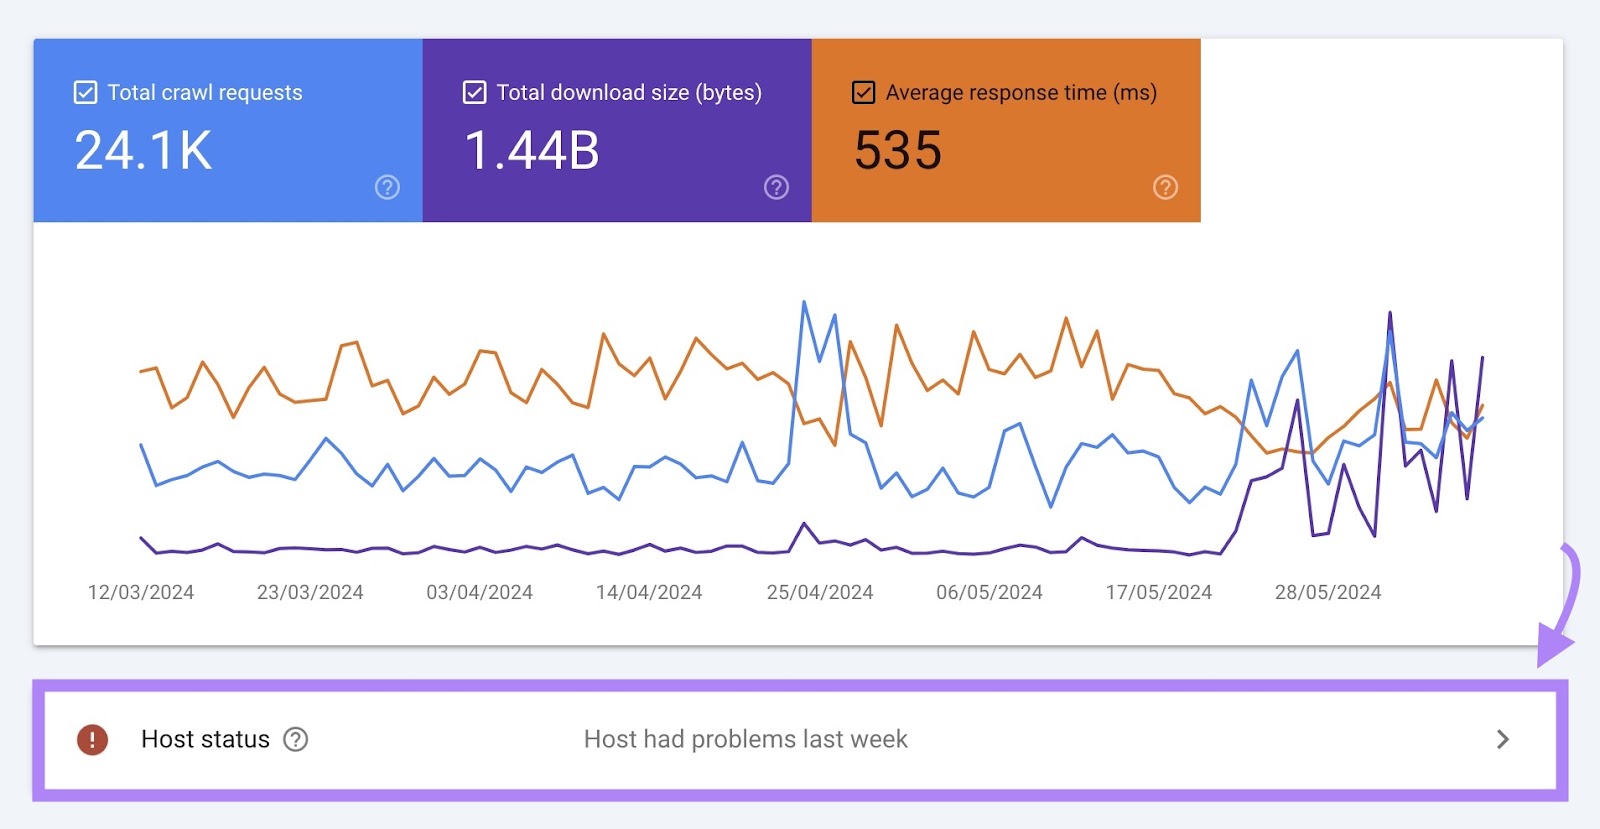
Host Status
Host status shows how easily Google can crawl your site.
For example, if your site wasn’t always able to meet Google’s crawl demands, you might see the message “Host had problems in the past.”
If there are any problems, you can see more details by clicking this box.
Under “Details” you’ll find more information about why the issues occurred.
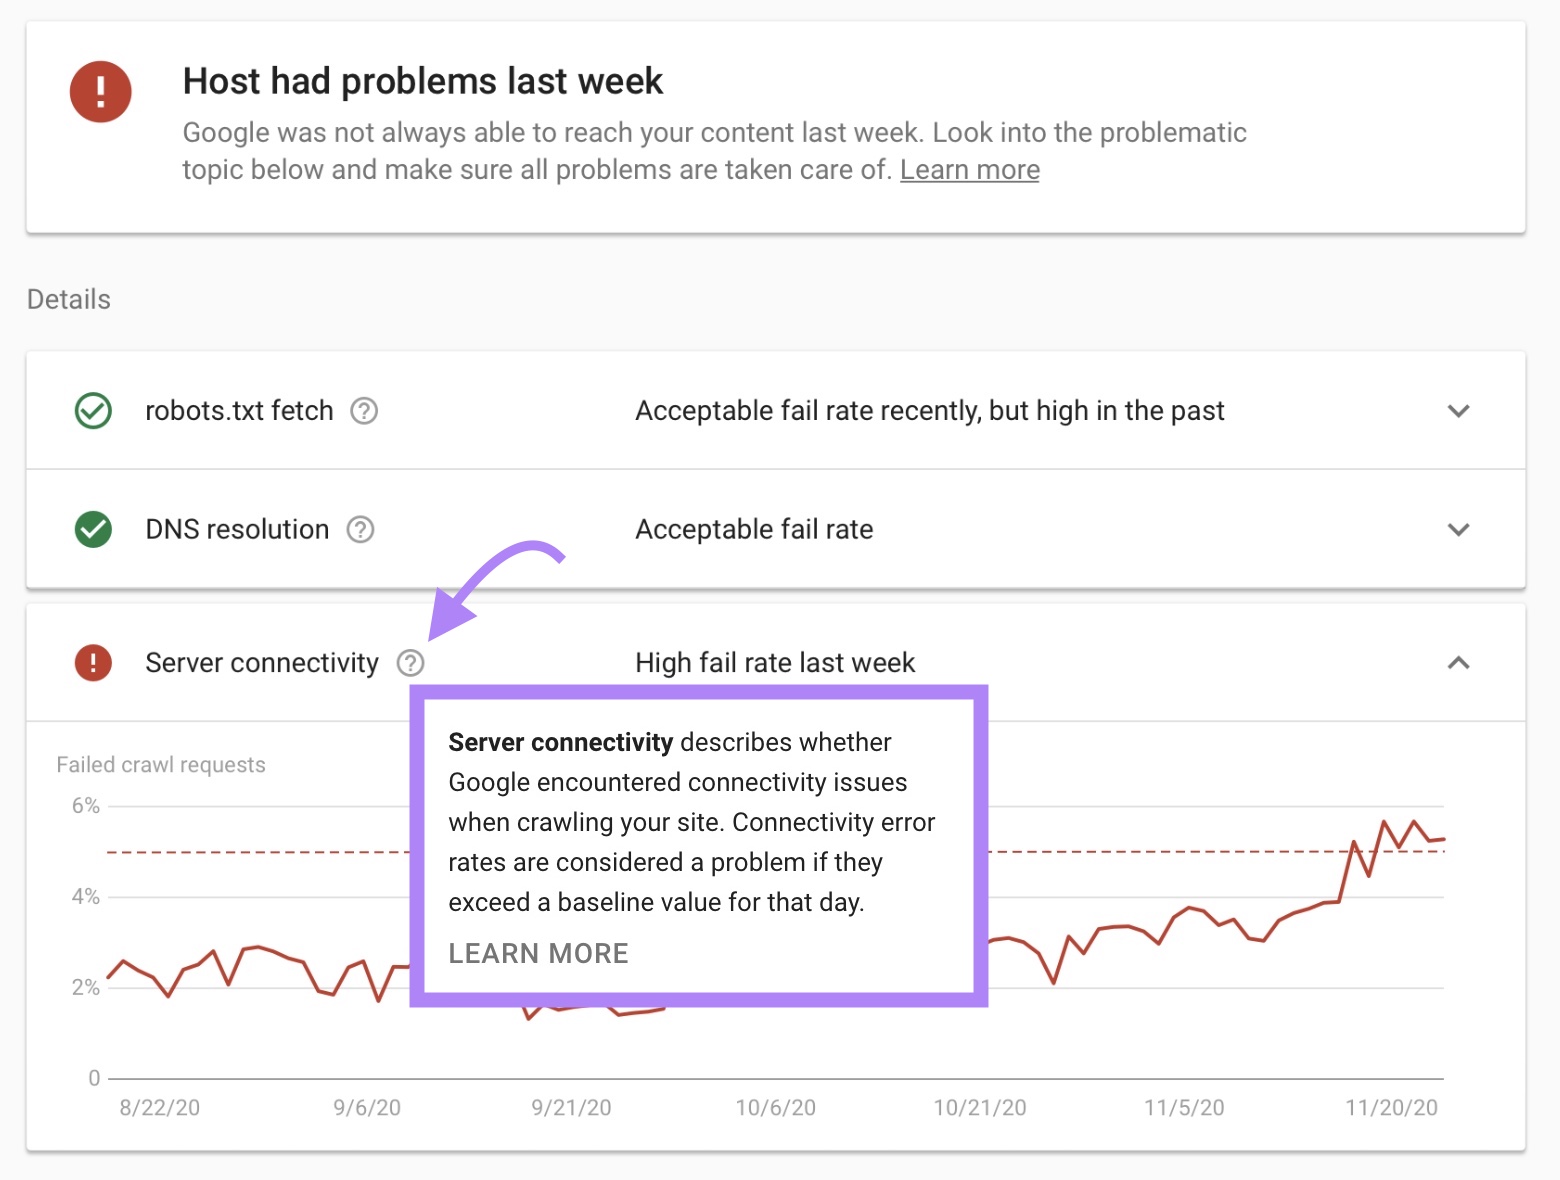
This will show you if there are any issues with:
- Fetching your robots.txt file
- Your domain name system (DNS)
- Server connectivity
Crawl Requests Breakdown
This section of the report provides information on crawl requests and groups them according to:
- Response (e.g., “OK (200)” or “Not found (404)”
- URL file type (e.g., HTML or image)
- Purpose of the request (“Discovery” for a new page or “Refresh” for an existing page)
- Googlebot type (e.g., smartphone or desktop)
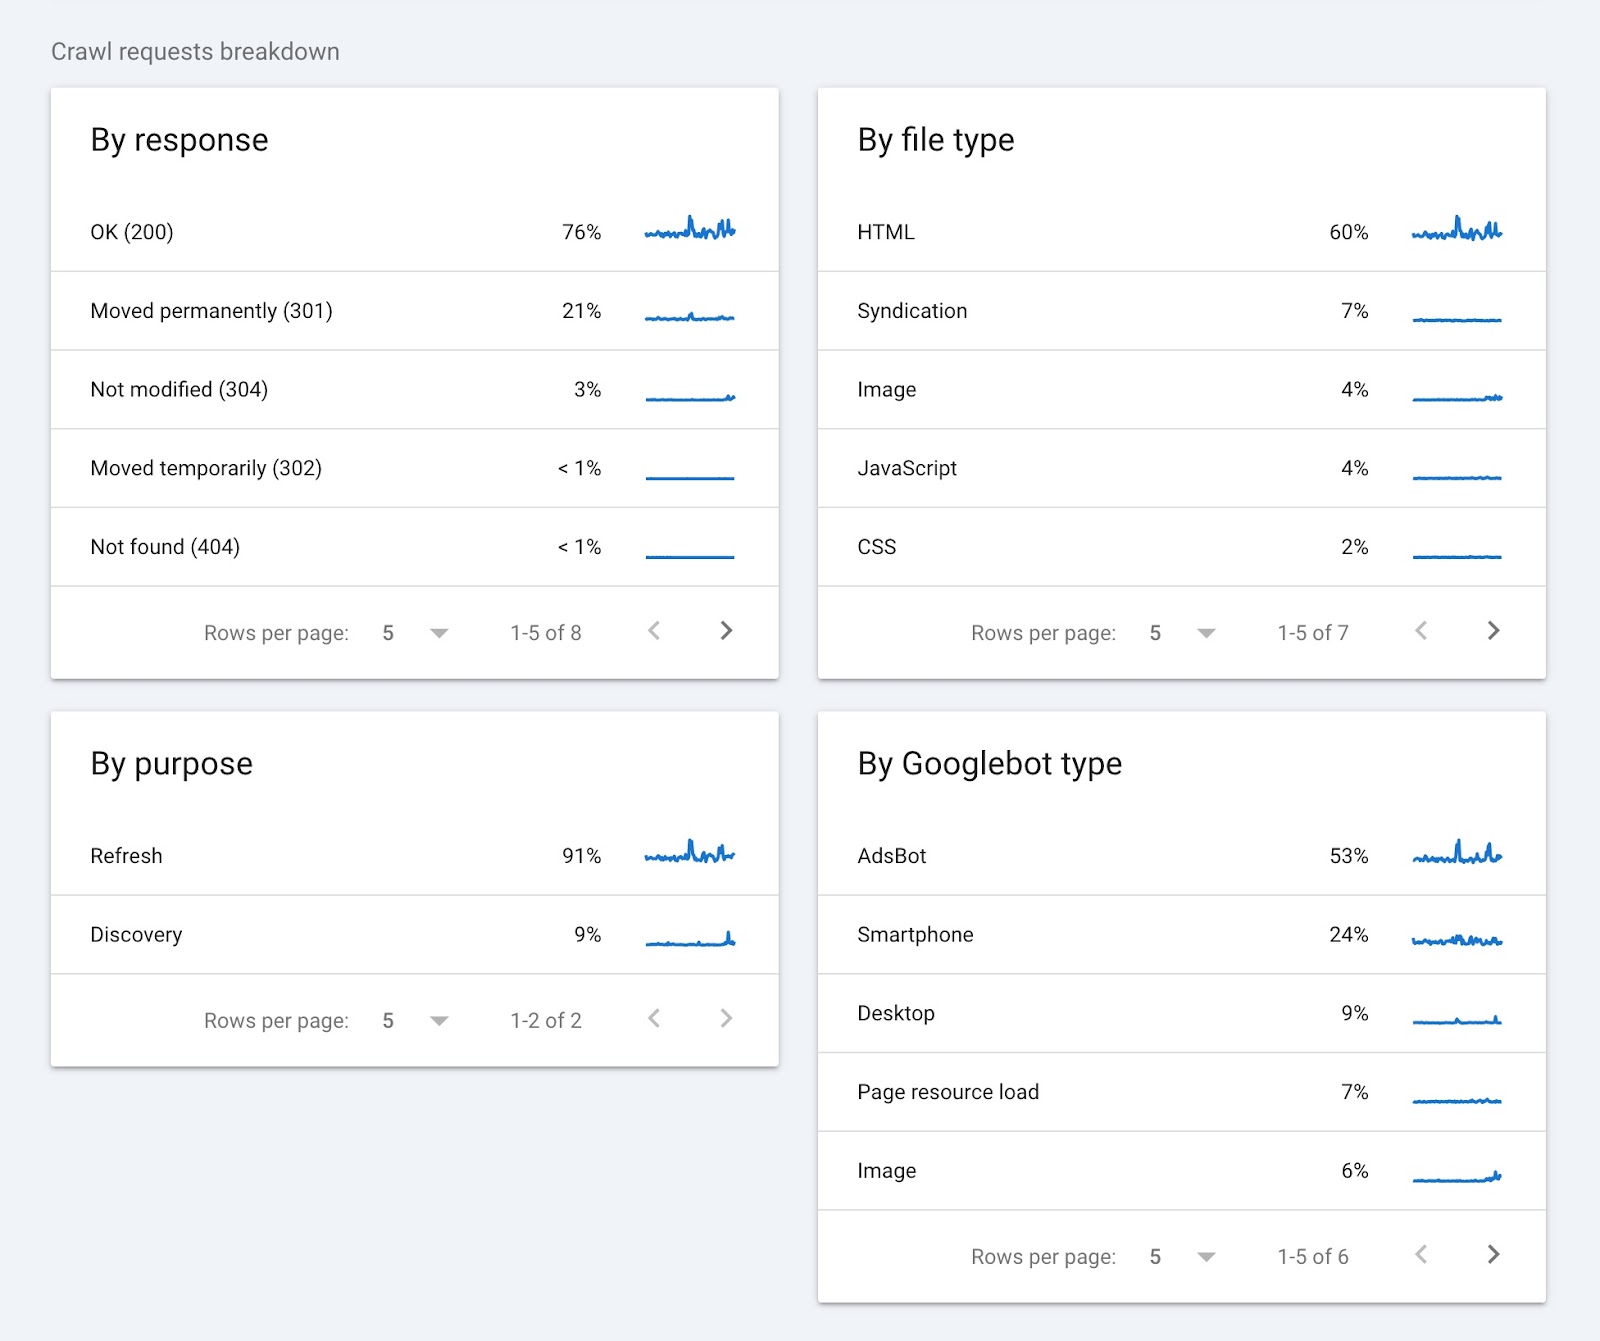
Clicking on any of the items in each widget will show you more details. Such as the pages that returned a specific status code.
Google Search Console can provide useful information about your crawl budget straight from the source. But other tools can provide more detailed insights you need to improve your website’s crawlability.
How to Analyze Your Website’s Crawlability
Semrush’s Site Audit tool shows you where your crawl budget is being wasted and can help you optimize your website for crawling.
Here’s how to get started:
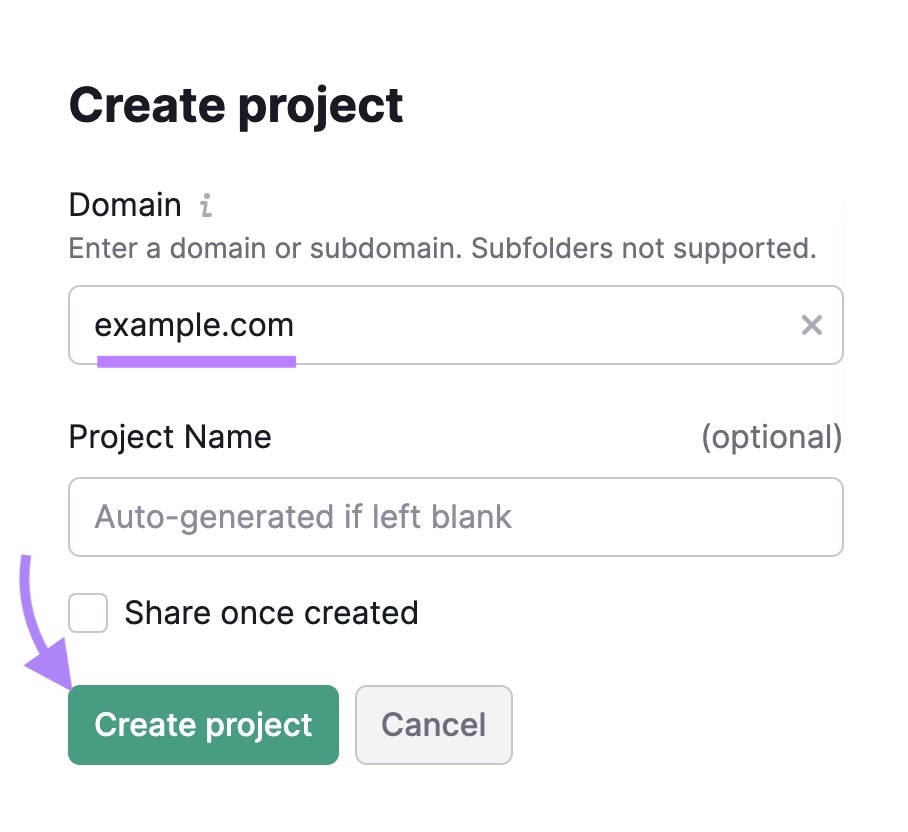
Open the Site Audit tool. If this is your first audit, you’ll need to create a new project.
Just enter your domain, give the project a name, and click “Create project.”
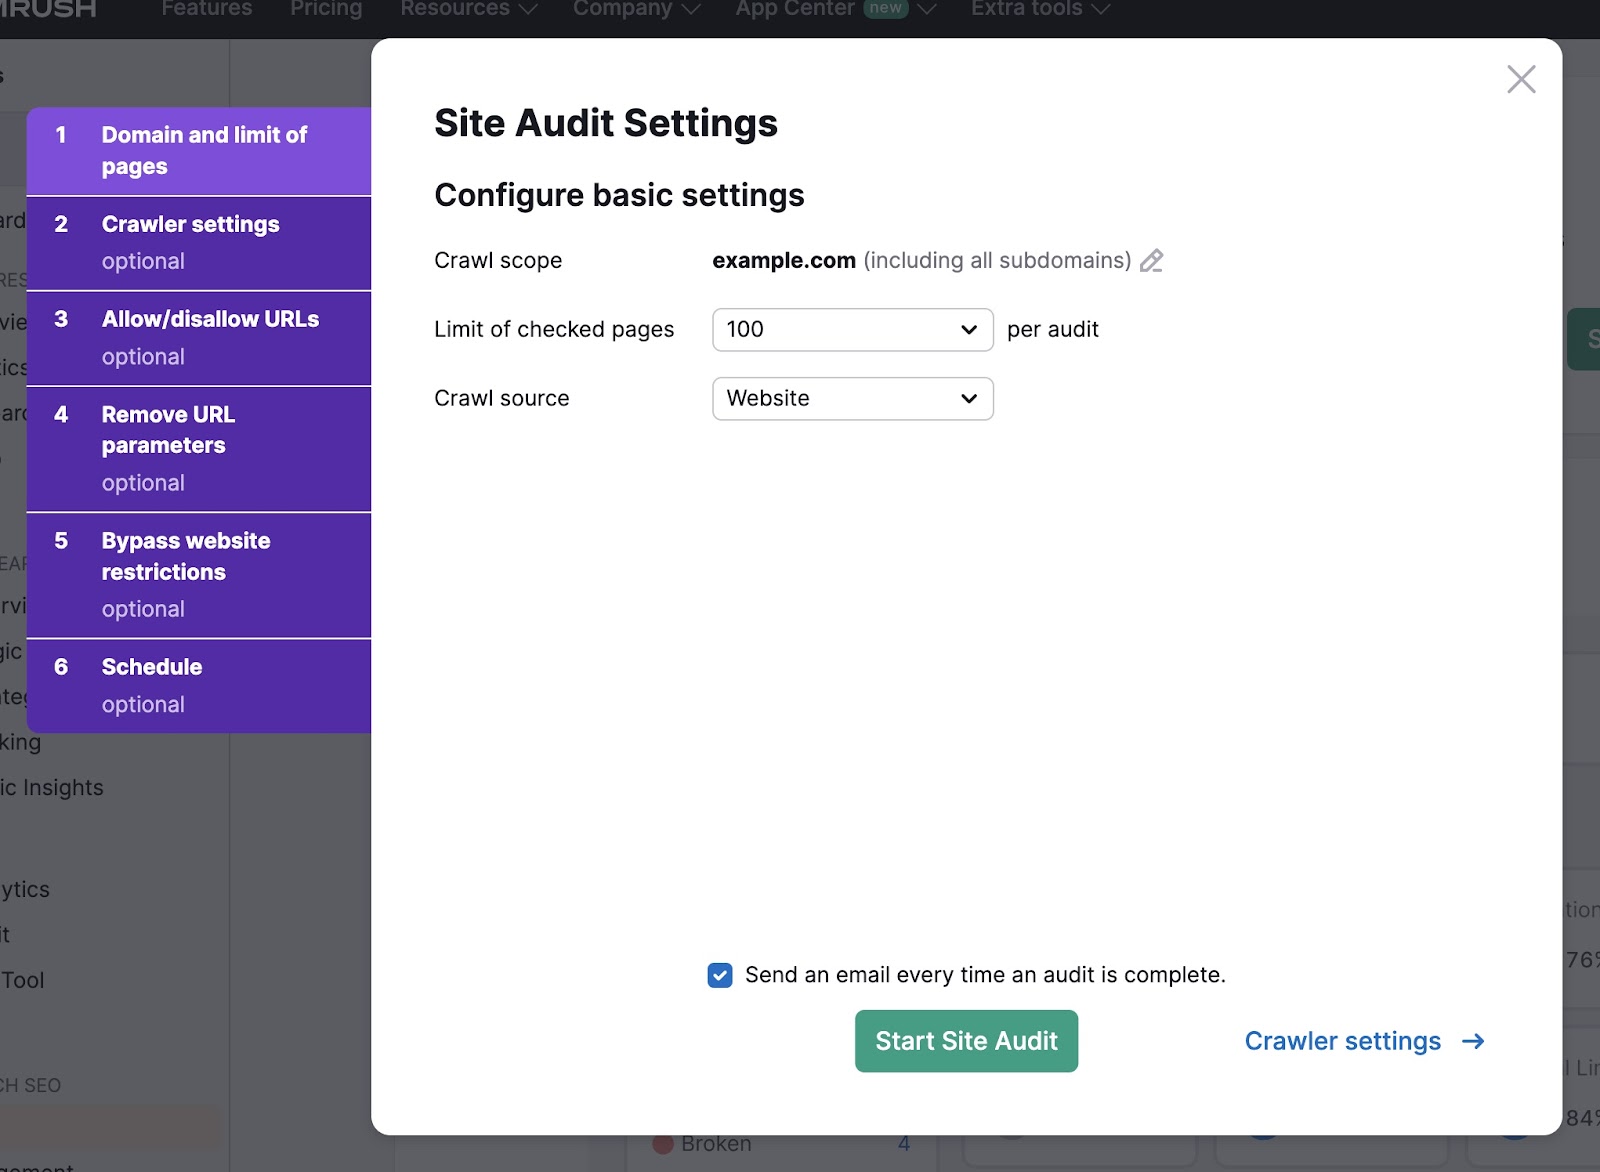
Next, select the number of pages to check and the crawl source.
If you want the tool to crawl your website directly, select “Website” as the crawl source. Alternatively, you can upload a sitemap or a file of URLs.
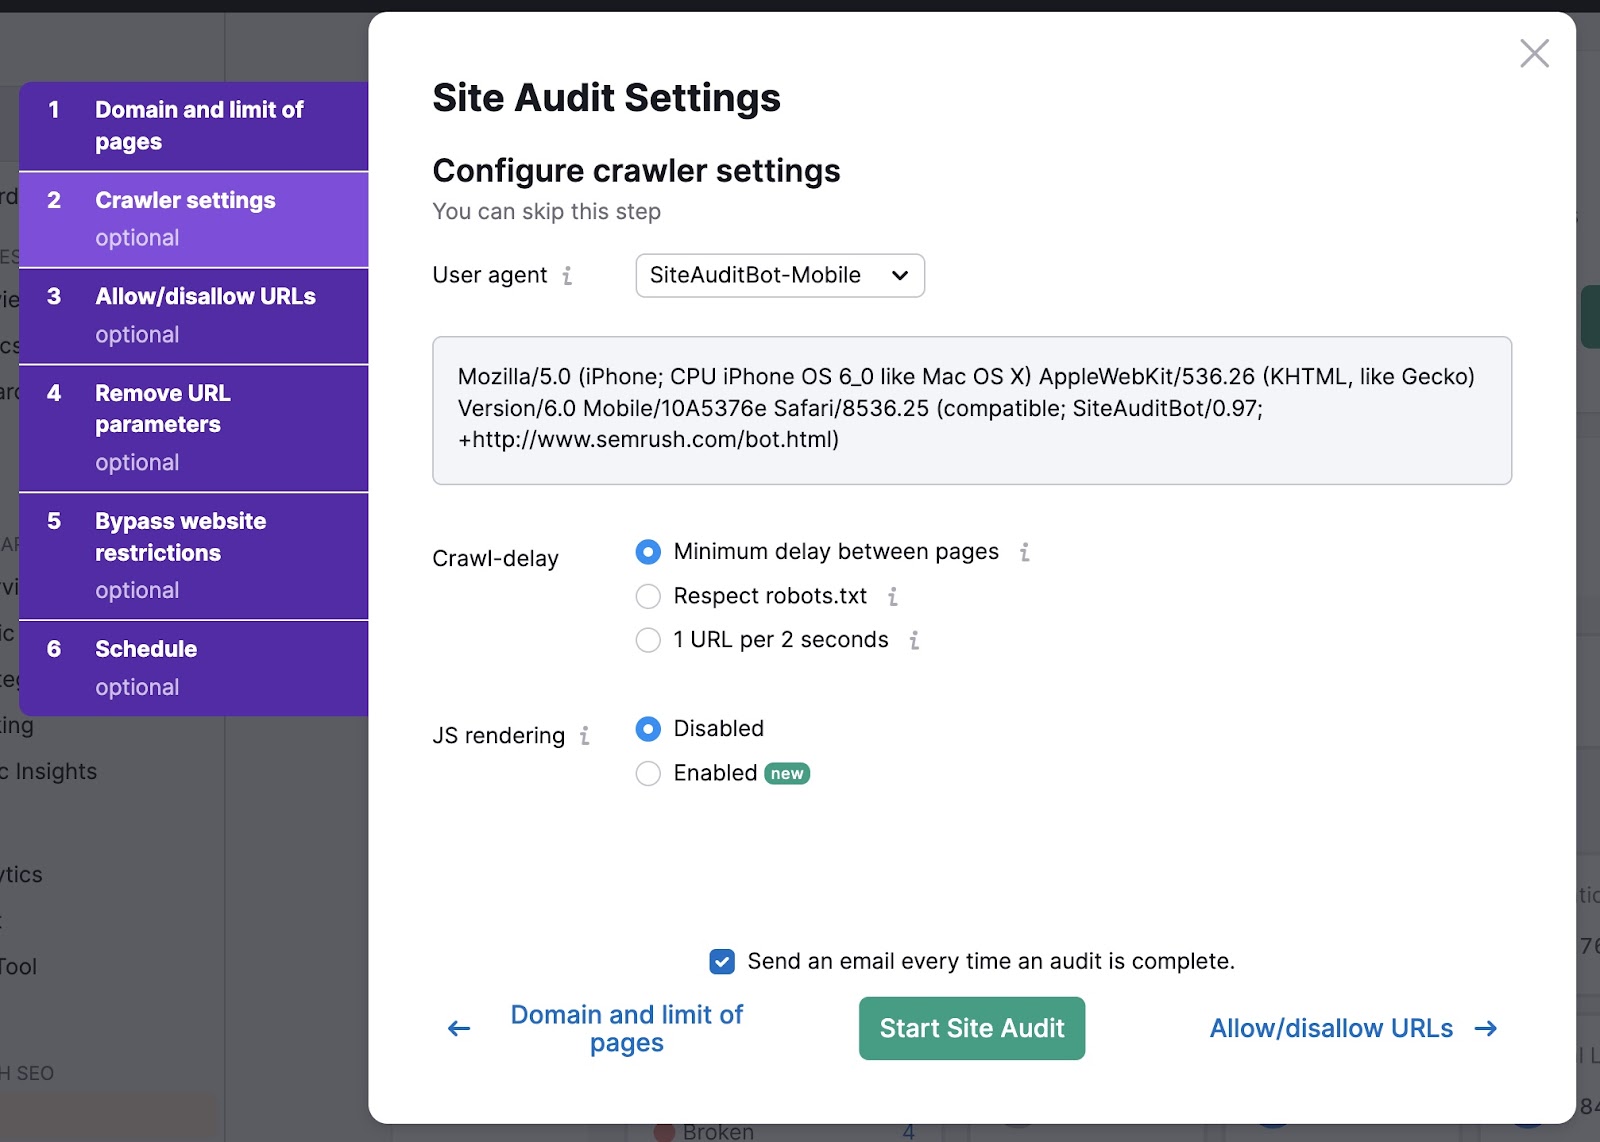
In the “Crawler settings” tab, use the drop-down to select a user agent. Choose between GoogleBot and SiteAuditBot. And mobile and desktop versions of each.
Then select your crawl-delay settings. The “Minimum delay between pages” option is usually recommended—it’s the fastest way to audit your site.
Finally, decide if you want to enable JavaScript (JS) rendering. JavaScript rendering allows the crawler to see the same content your site visitors do.
This provides more accurate results but can take longer to complete.
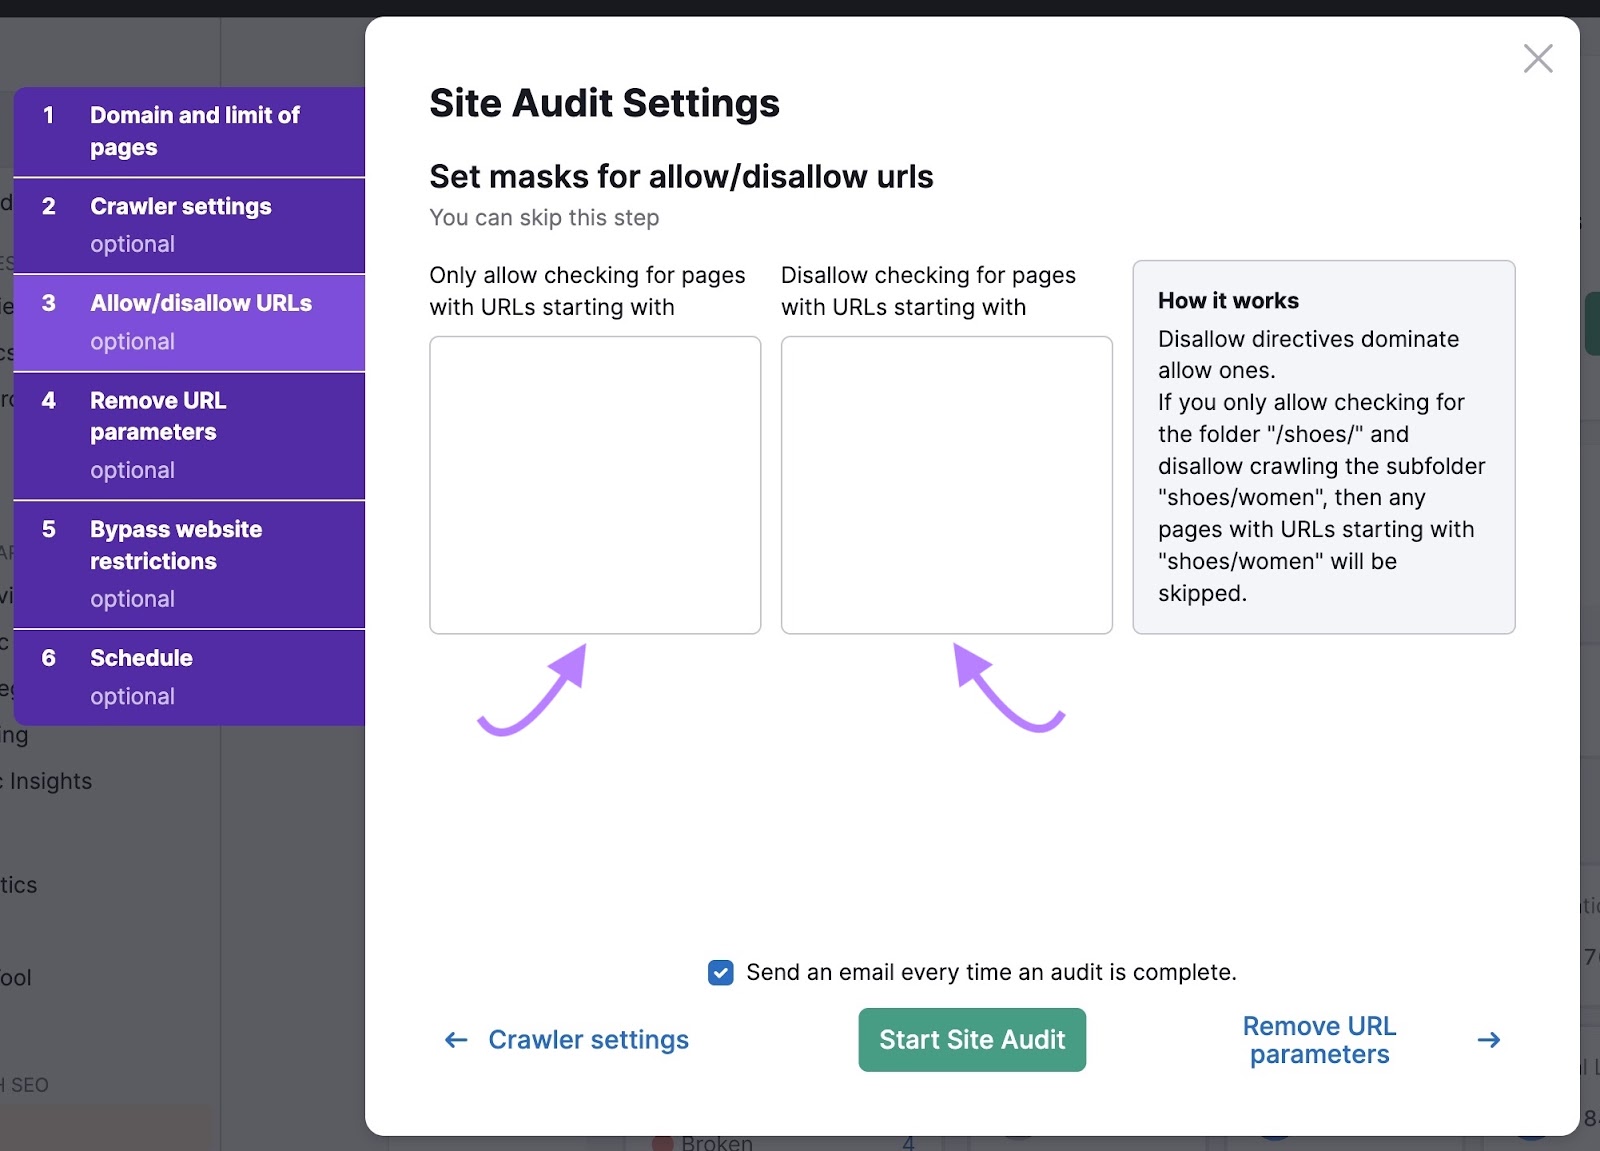
Then, click “Allow-disallow URLs.”
If you want the crawler to only check certain URLs, you can enter them here. You can also disallow URLs to instruct the crawler to ignore them.
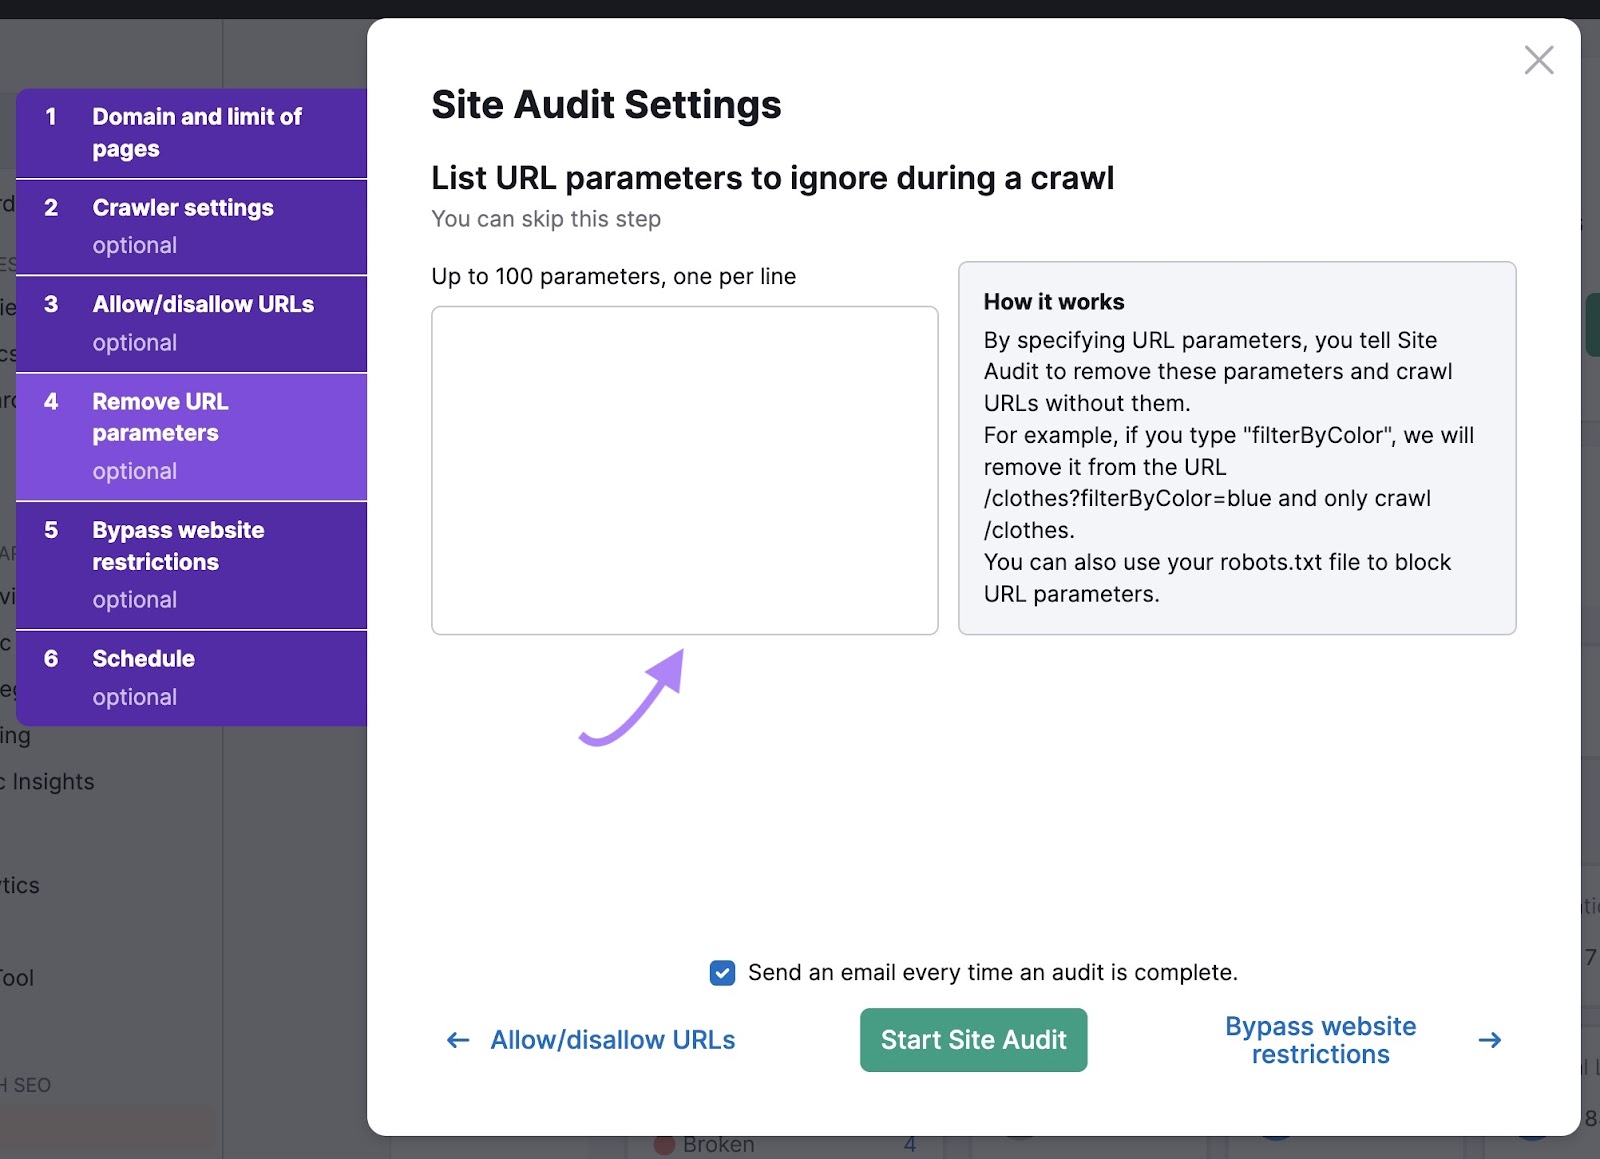
Next, list URL parameters to tell the bots to ignore variations of the same page.
If your website is still under development, you can use “Bypass website restrictions” settings to run an audit.

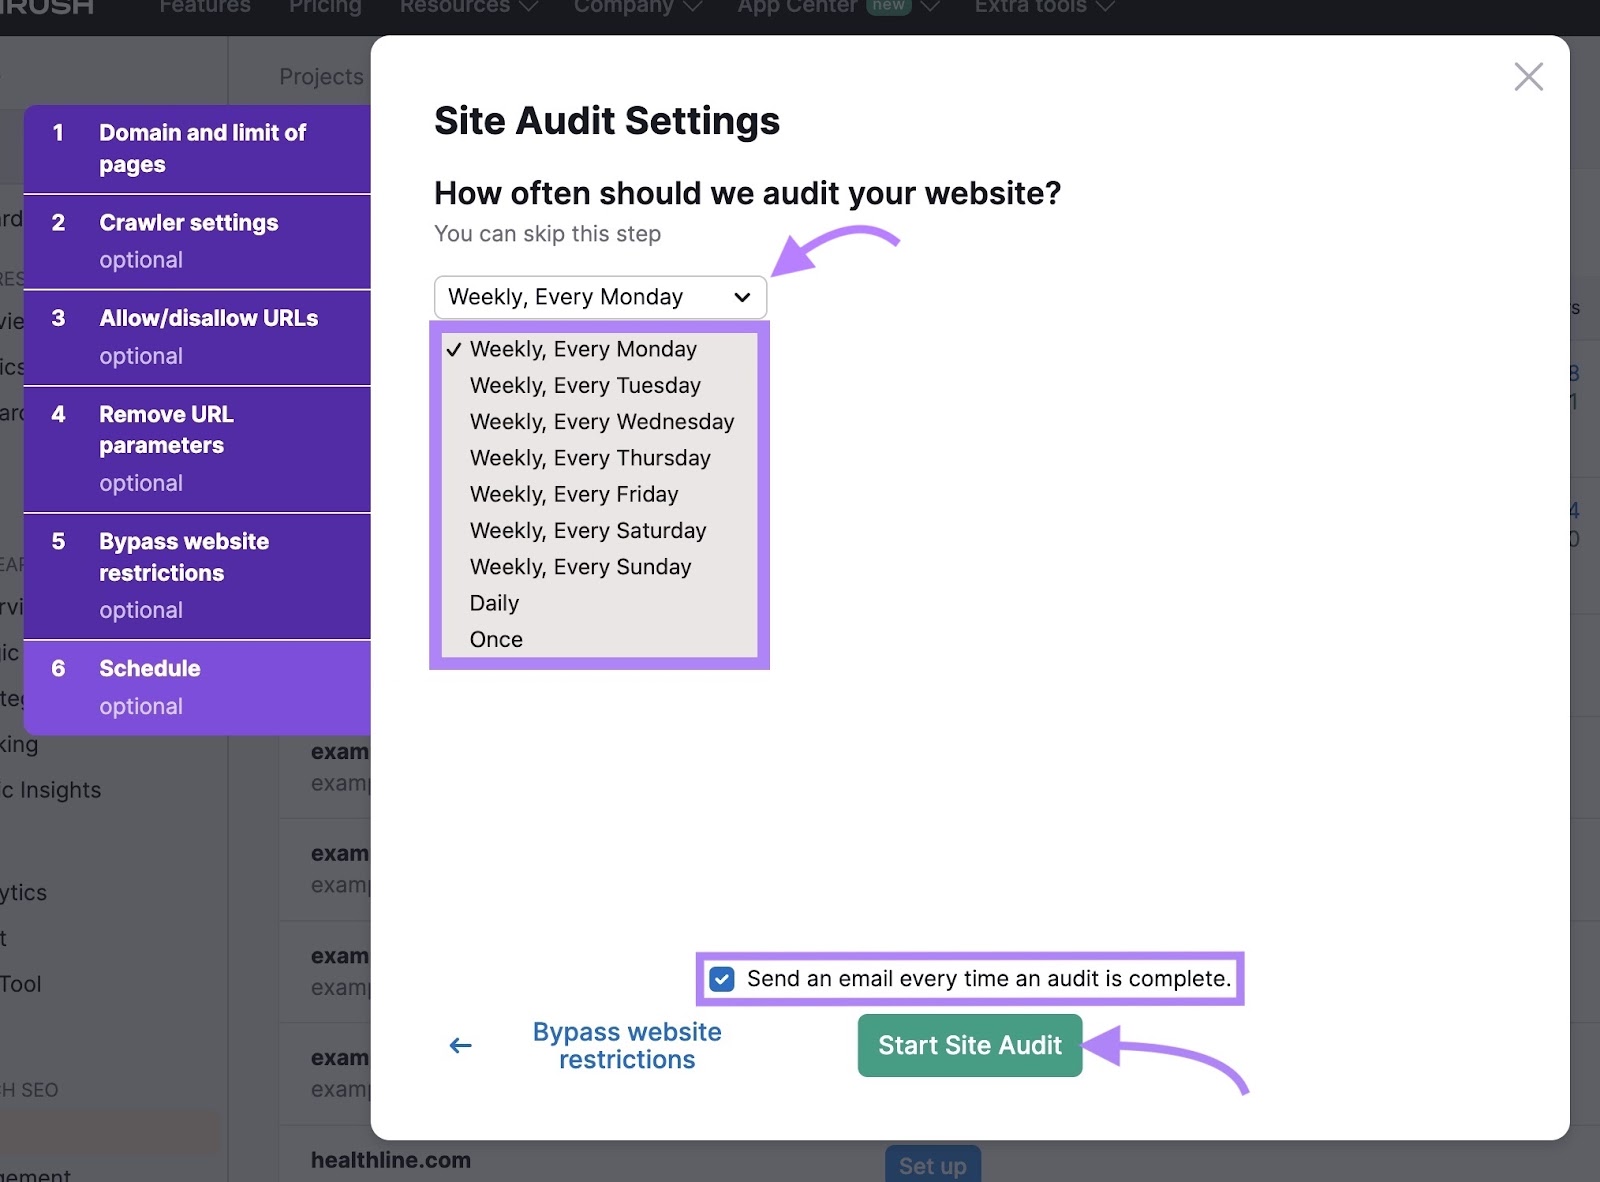
Finally, schedule how often you want the tool to audit your website. Regular audits are a good idea to keep an eye on your website’s health. And flag any crawlability issues early on.
Check the box to be notified via email once the audit is complete.
When you’re ready, click “Start Site Audit.”
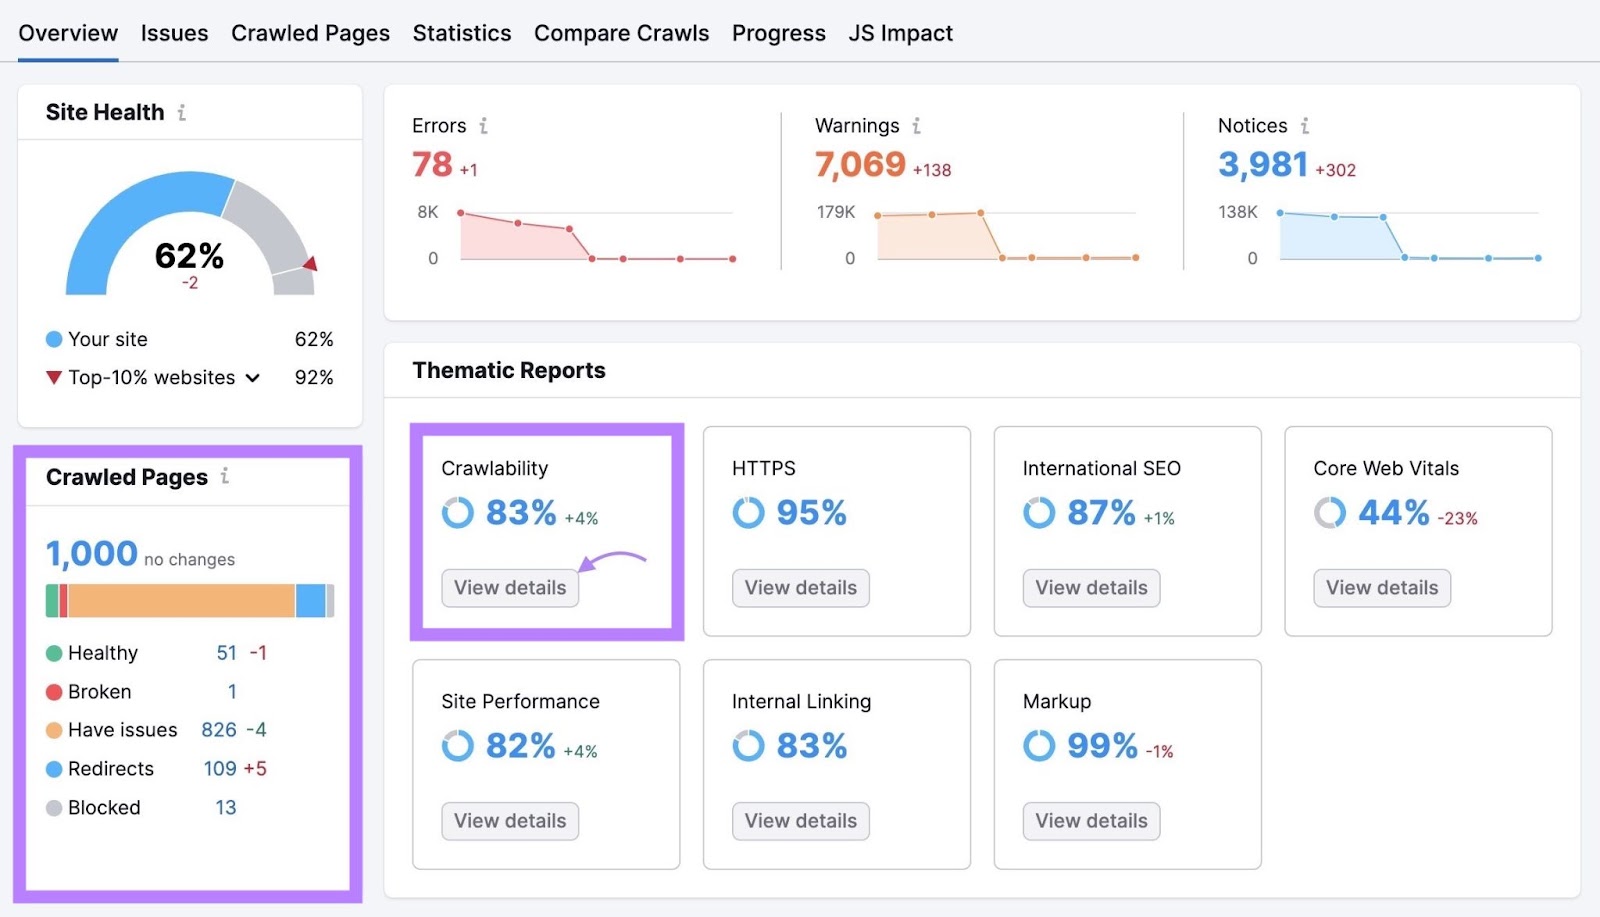
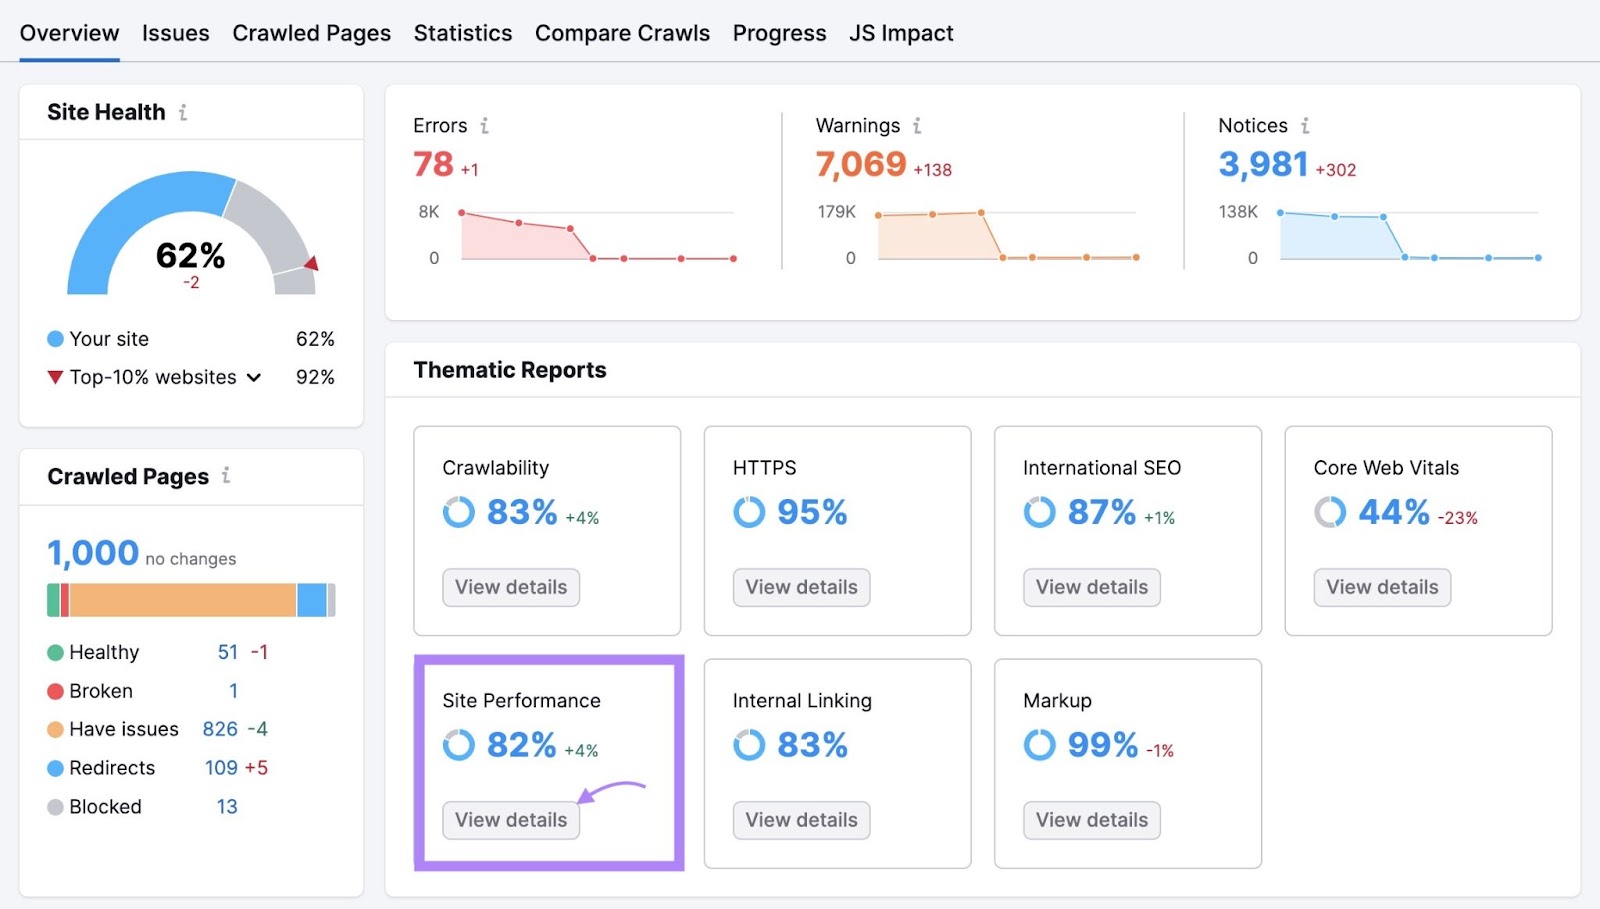
The Site Audit “Overview” report summarizes all the data the bots collected during the crawl. And gives you valuable information about your website’s overall health.
The “Crawled Pages” widget tells you how many pages the tool crawled. And gives a breakdown of how many pages are healthy and how many have issues.
To get more in-depth insights, navigate to the “Crawlability” section and click “View details.”
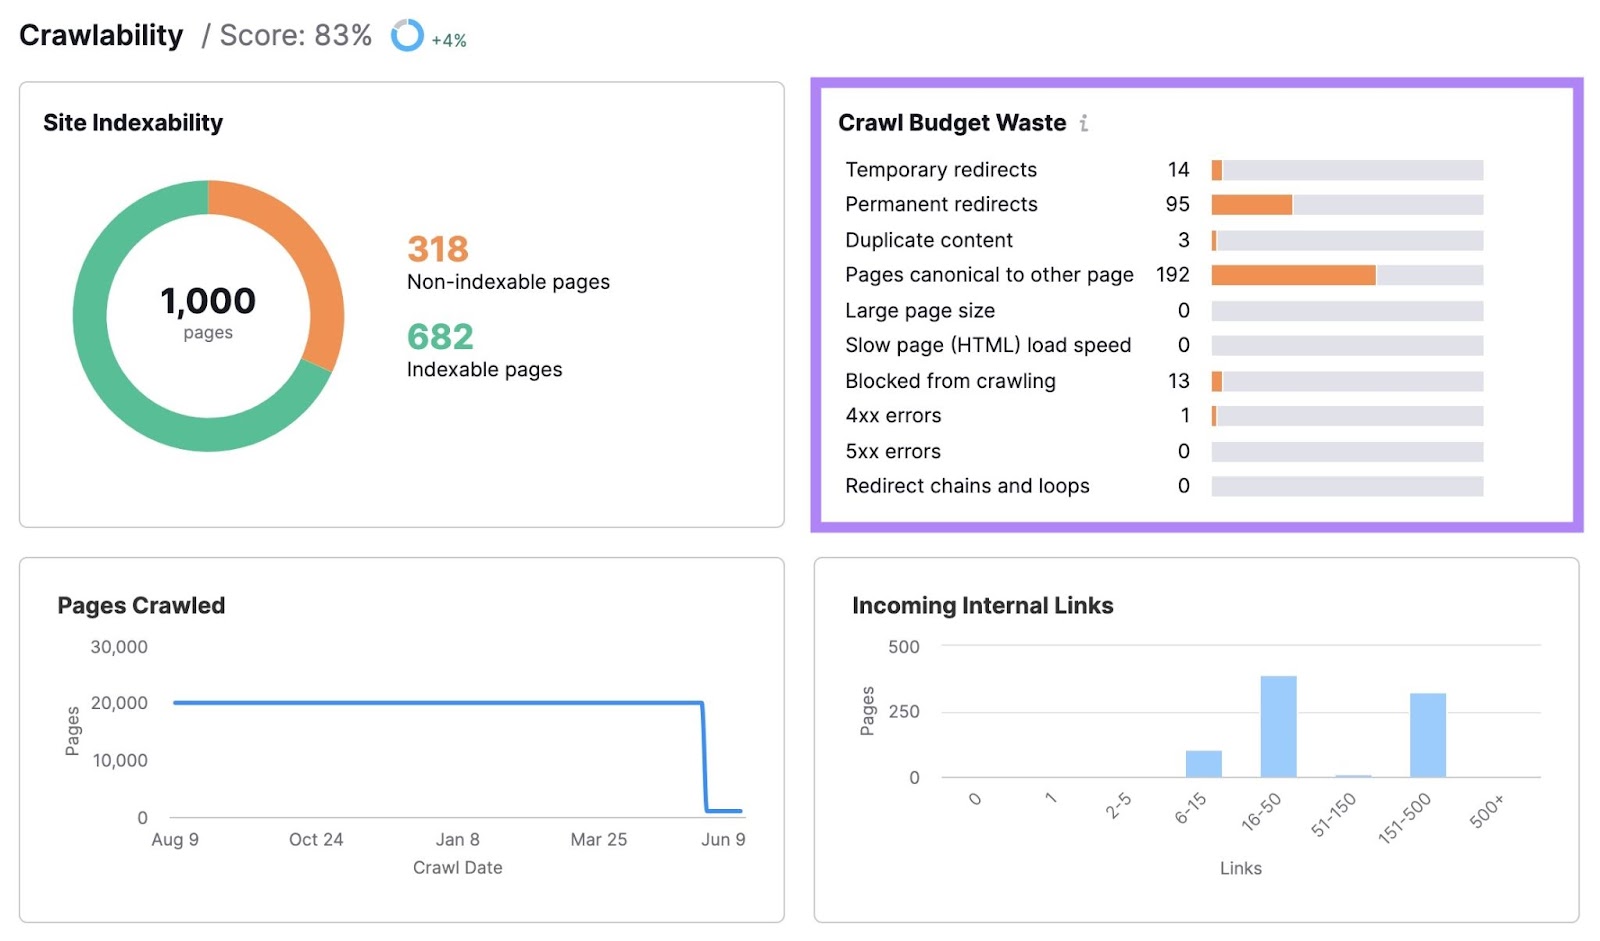
Here, you’ll find how much of your site’s crawl budget was wasted and what issues got in the way. Such as temporary redirects, permanent redirects, duplicate content, and slow load speed.
Clicking any of the bars will show you a list of the pages with that issue.
Depending on the issue, you’ll see information in various columns for each affected page.
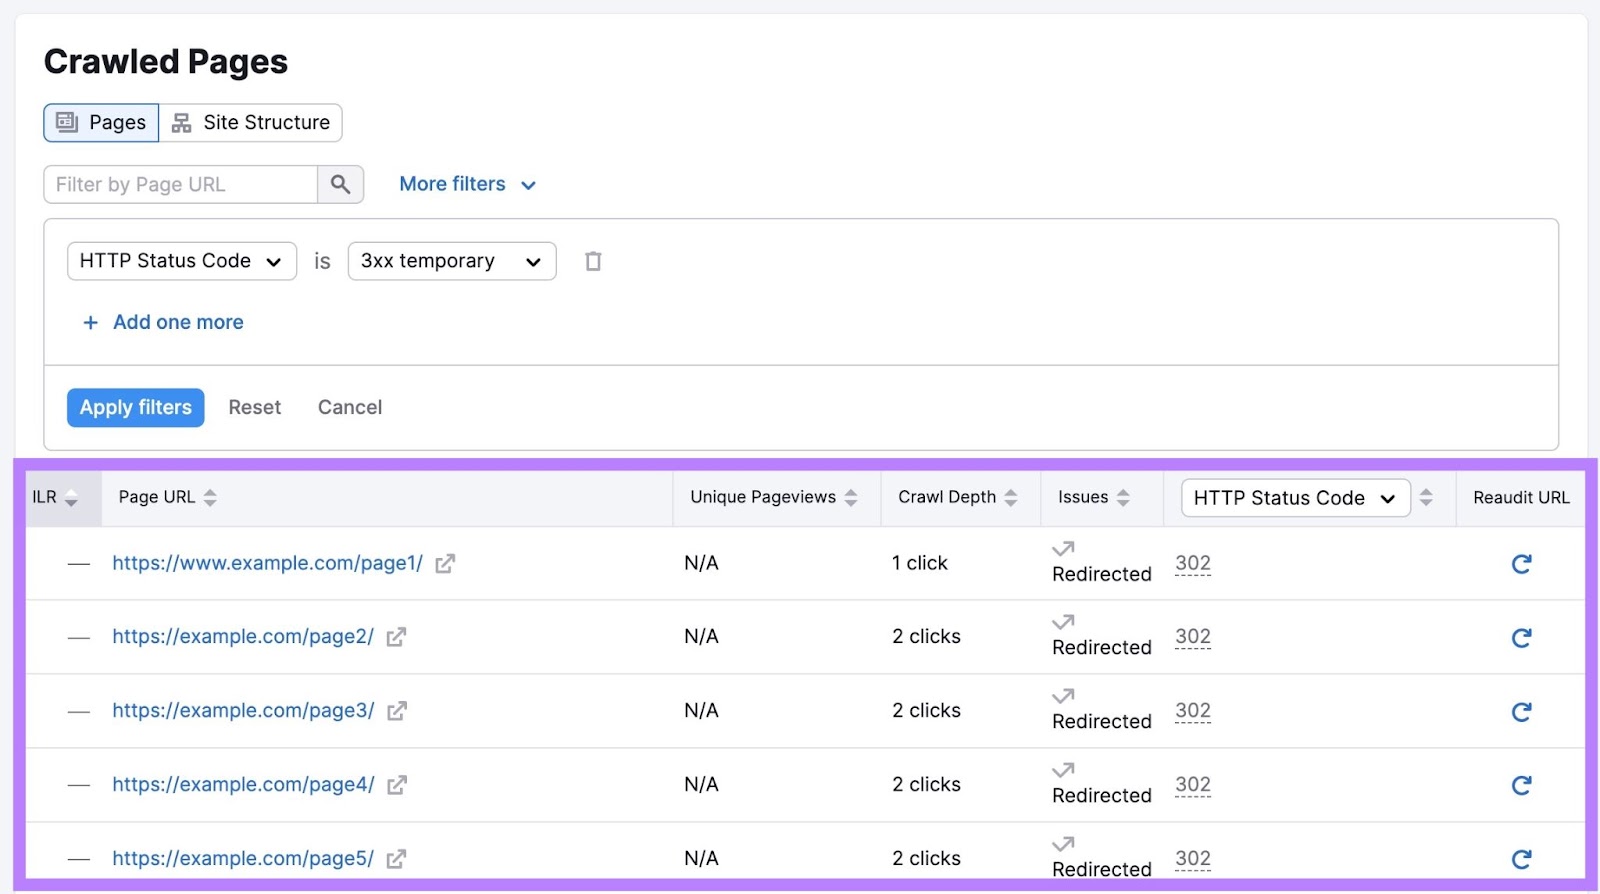
Go through these pages and fix the corresponding issues. To improve your site’s crawlability.
7 Tips for Crawl Budget Optimization
Once you know where your site’s crawl budget issues are, you can fix them to maximize your crawl efficiency.
Here are some of the main things you can do:
1. Improve Your Site Speed
Improving your site speed can help Google crawl your site faster. Which can lead to better use of your site’s crawl budget. Plus, it’s good for the user experience (UX) and SEO.
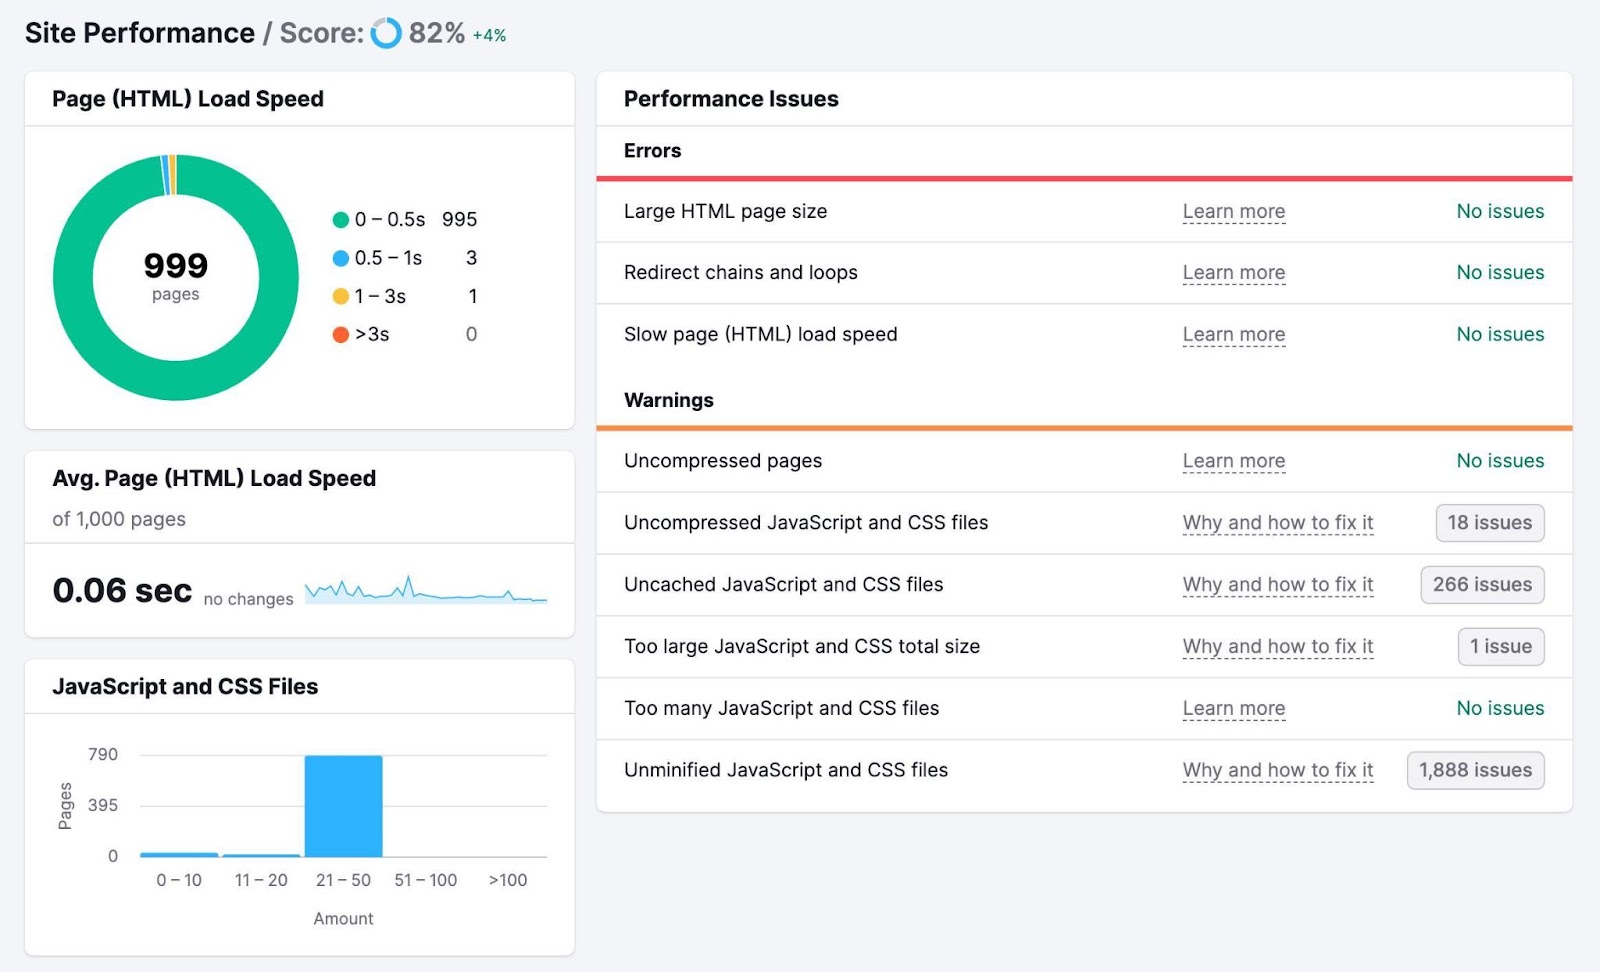
To check how fast your pages load, head back to the Site Audit project you set up earlier and click “View details” in the “Site Performance” box.
You’ll see a breakdown of how fast your pages load and your average page load speed. Along with a list of errors and warnings that may be leading to poor performance.
There are many ways to improve your page speed, including:
- Optimizing your images: Use online tools like Image Compressor to reduce file sizes without making your images blurry
- Minimizing your code and scripts: Consider using an online tool like Minifier.org or a WordPress plugin like WP Rocket to minify your website’s code for faster loading
- Using a content delivery network (CDN): A CDN is a distributed network of servers that delivers web content to users based on their location for faster load speeds
2. Use Strategic Internal Linking
A smart internal linking structure can make it easier for search engine crawlers to find and understand your content. Which can make for more efficient use of your crawl budget and increase your ranking potential.
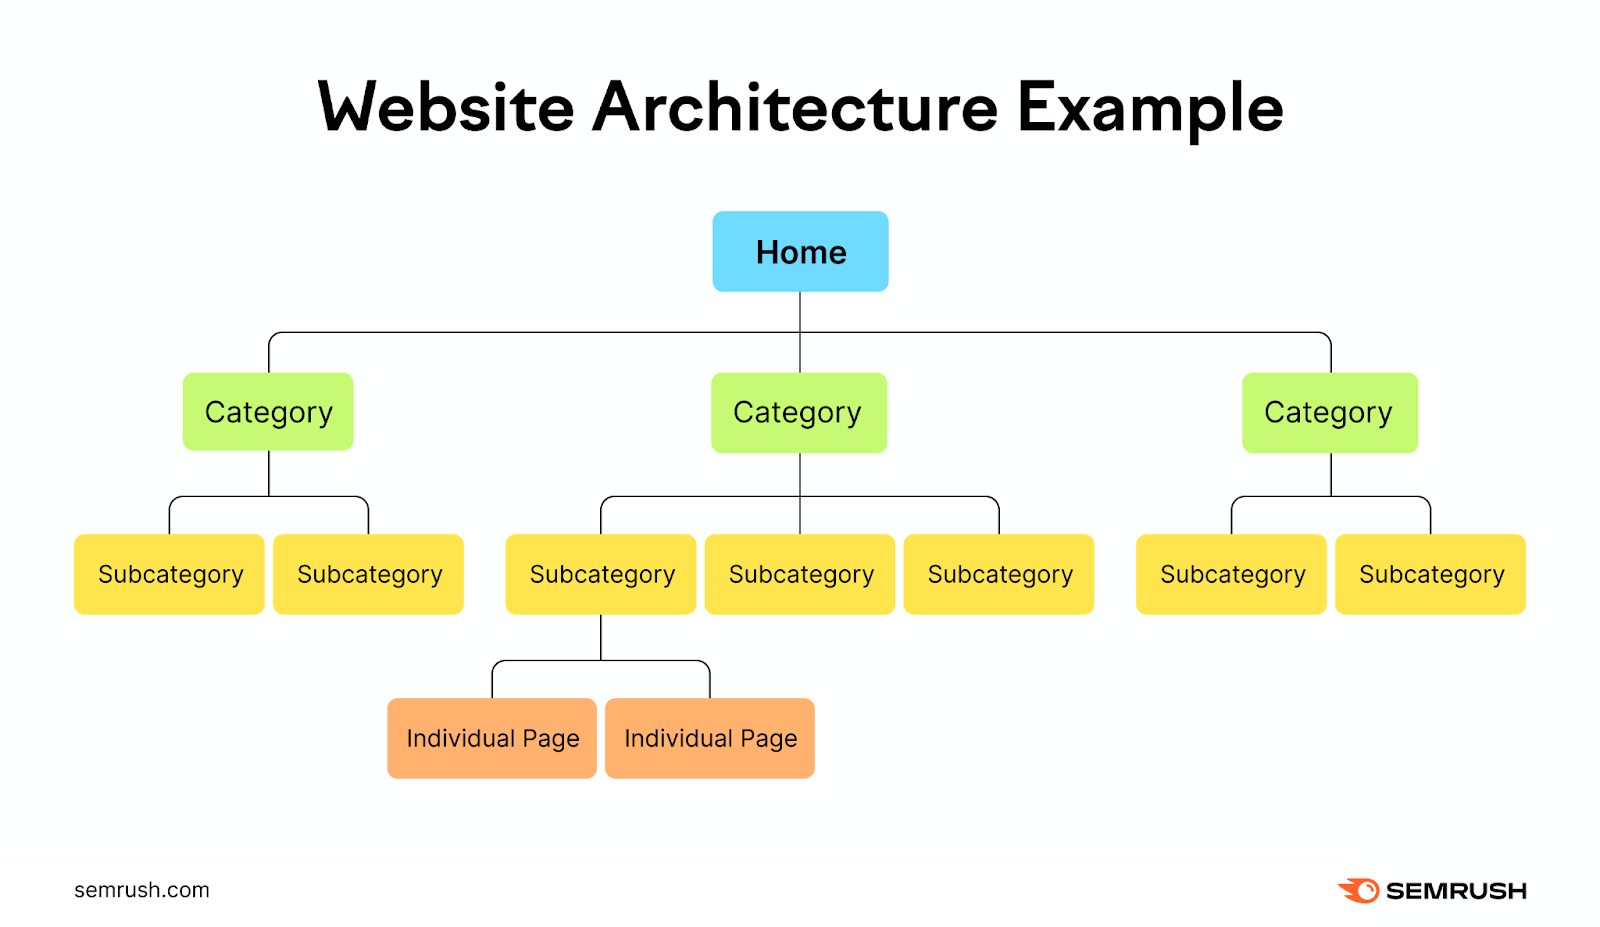
Imagine your website a hierarchy, with the homepage at the top. Which then branches off into different categories and subcategories.
Each branch should lead to more detailed pages or posts related to the category they fall under.
This creates a clear and logical structure for your website that’s easy for users and search engines to navigate.
Add internal links to all important pages to make it easier for Google to find your most important content.
This also helps you avoid orphaned pages—pages with no internal links pointing to them. Google can still find these pages, but it’s much easier if you have relevant internal links pointing to them.
Click “View details” in the "Internal Linking” box of your Site Audit project to find issues with your internal linking.
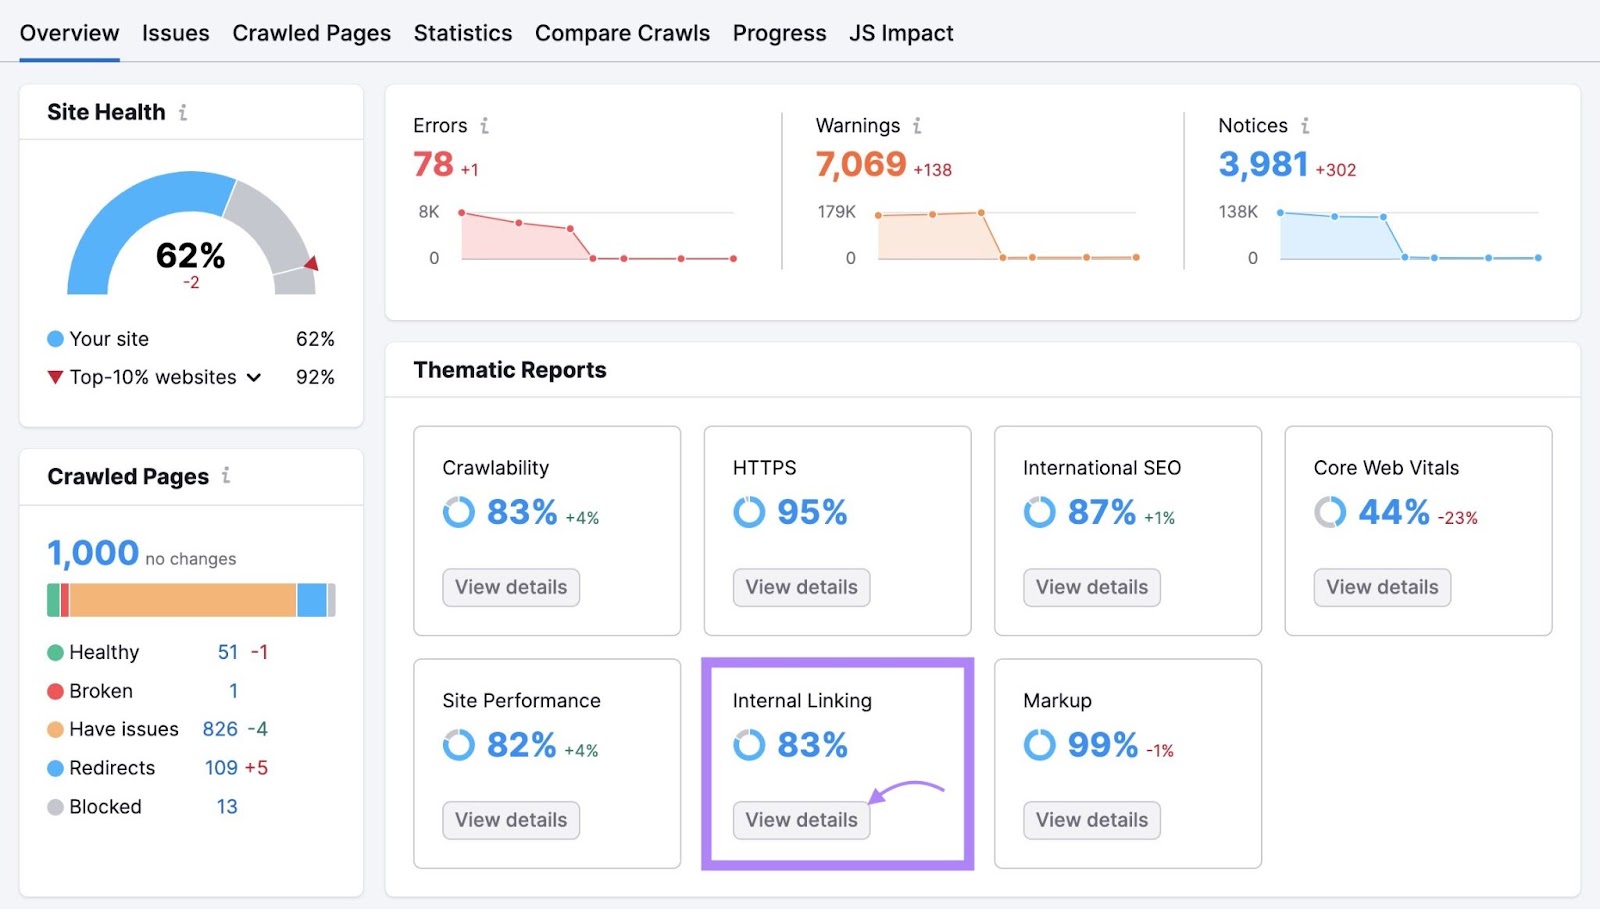
You’ll see an overview of your site’s internal linking structure. Including how many clicks it takes to get to each of your pages from your homepage.
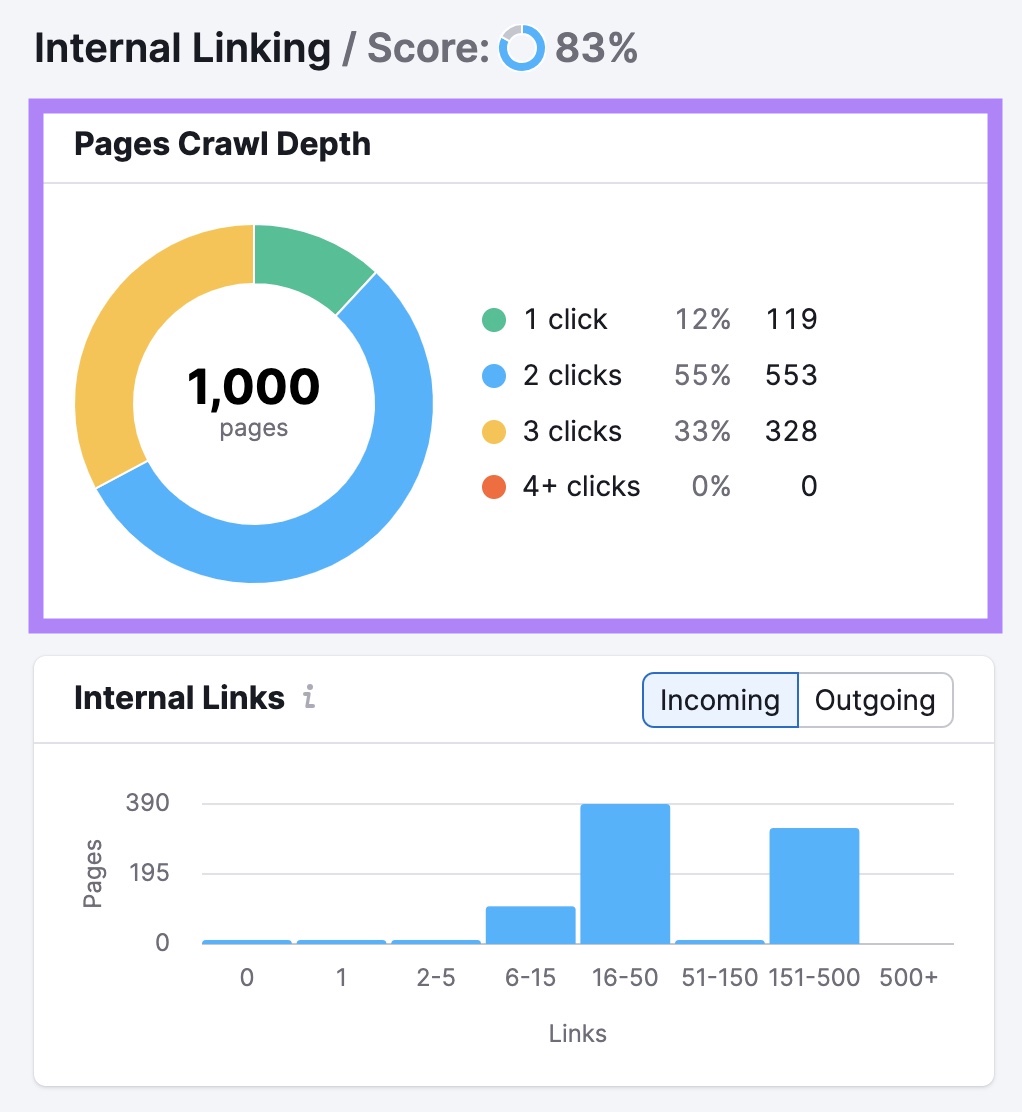
You’ll also see a list of errors, warnings, and notices. These cover issues like broken links, nofollow attributes on internal links, and links with no anchor text.
Go through these and rectify the issues on each page. To make it easier for search engines to crawl and index your content.
3. Keep Your Sitemap Up to Date
Having an up-to-date XML sitemap is another way you can point Google toward your most important pages. And updating your sitemap when you add new pages can make them more likely to be crawled (but that’s not guaranteed).
Your sitemap might look something like this (it can vary depending on how you generate it):
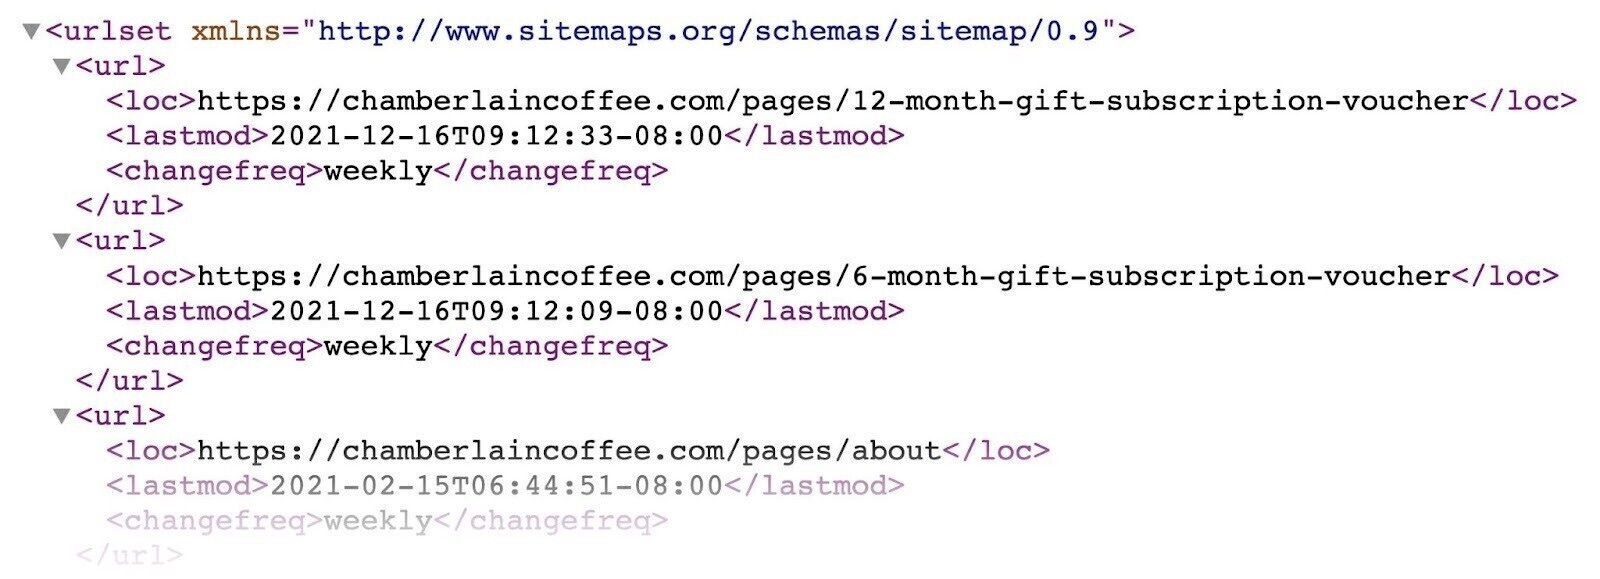
Google recommends only including URLs that you want to appear in search results in your sitemap. To avoid potentially wasting crawl budget (see the next tip for more on that).
You can also use the <lastmod> tag to indicate when you last updated a given URL. But it’s not necessary.
Further reading: How to Submit a Sitemap to Google
4. Block URLs You Don’t Want Search Engines to Crawl
Use your robots.txt file (a file that tells search engine bots which pages should and shouldn’t be crawled) to minimize the chances of Google crawling pages you don’t want it to. This can help reduce crawl budget waste.
Why would you want to prevent crawling for some pages?
Because some are unimportant or private. And you probably don’t want search engines to crawl these pages and waste their resources.
Here’s an example of what a robots.txt file might look like:

All pages after “Disallow:” specify the pages you don’t want search engines to crawl.
For more on how to create and use these files properly, check out our guide to robots.txt.
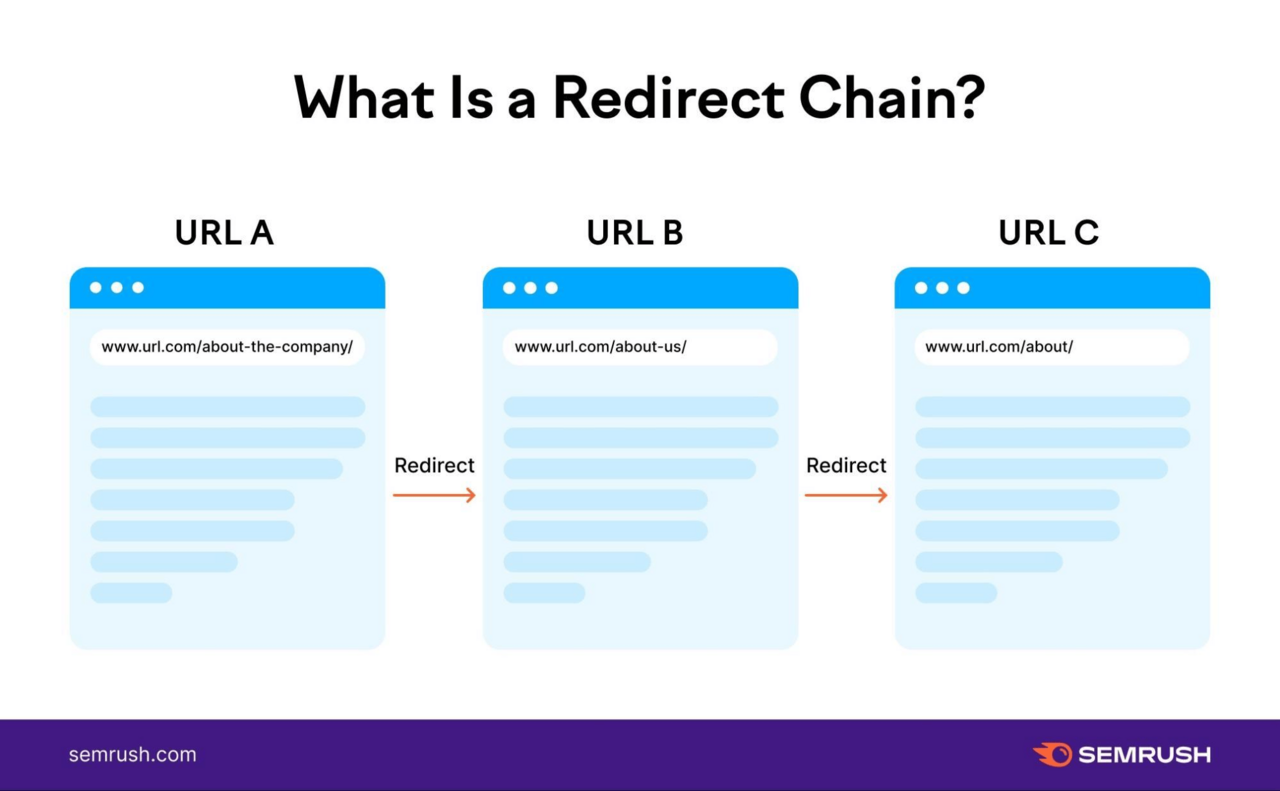
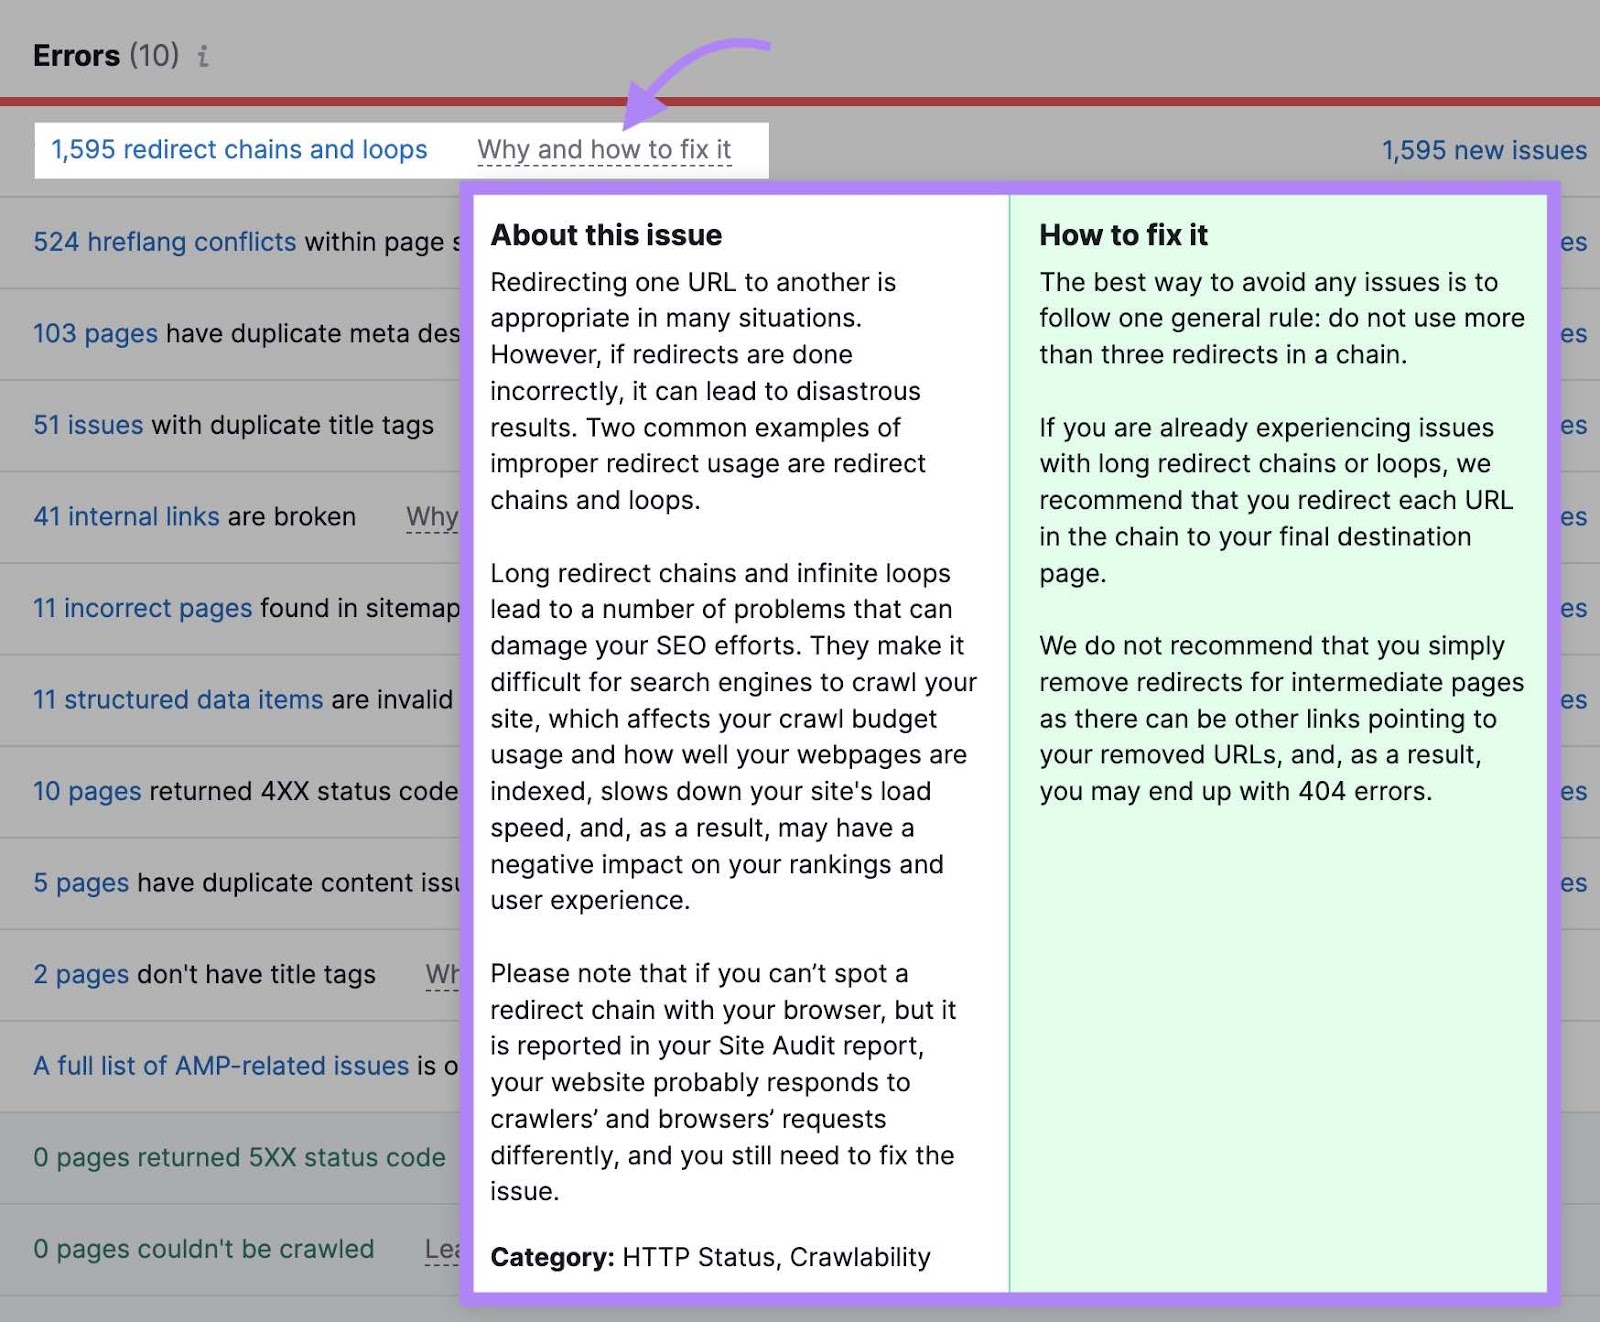
5. Remove Unnecessary Redirects
Redirects take users (and bots) from one URL to another. And can slow down page load times and waste crawl budget.
This can be particularly problematic if you have redirect chains. These occur when you have more than one redirect between the original URL and the final URL.
Like this:
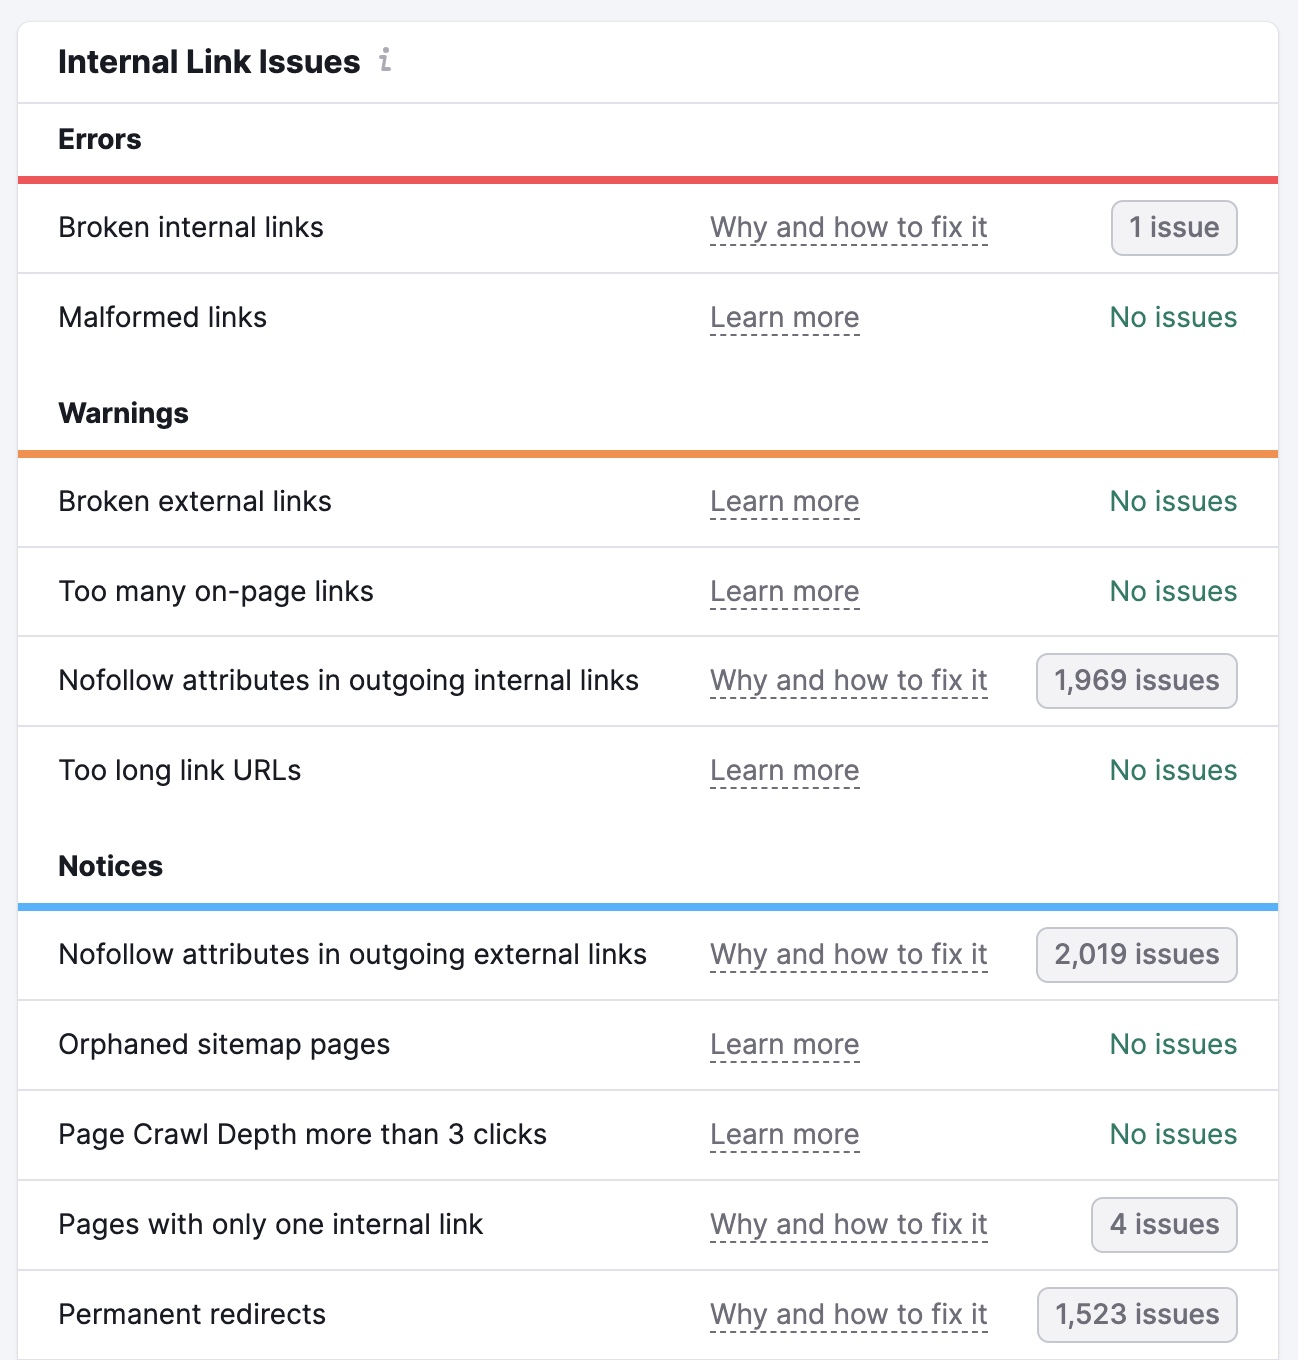
To learn more about the redirects set up on your site, open the Site Audit tool and navigate to the “Issues” tab.
Enter “redirect” in the search bar to see issues related to your site’s redirects.
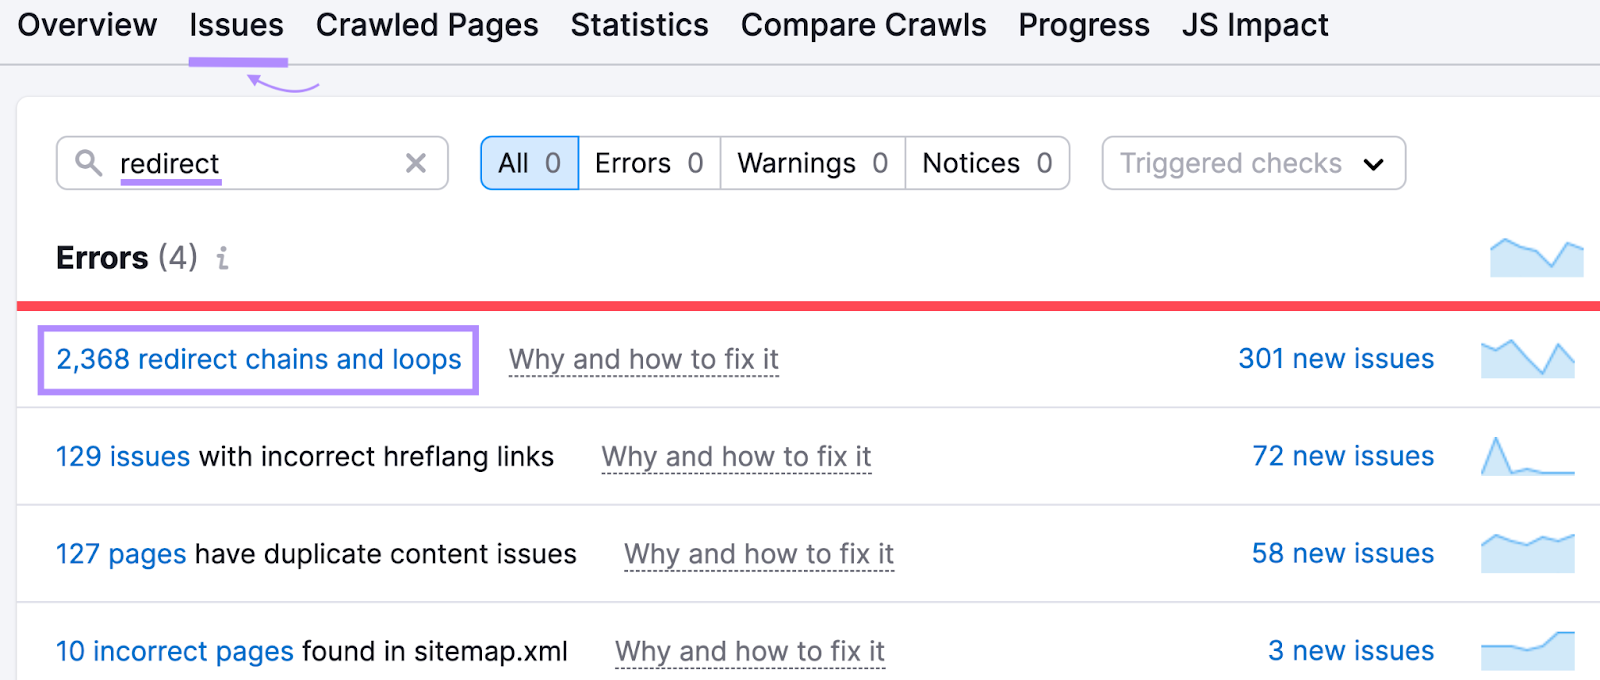
Click “Why and how to fix it” or “Learn more” to get more information about each issue. And to see guidance on how to fix it.
6. Fix Broken Links
Broken links are those that don’t lead to live pages—they usually return a 404 error code instead.
This isn’t necessarily a bad thing. In fact, pages that don’t exist should typically return a 404 status code.
But having lots of links pointing to broken pages that don’t exist wastes crawl budget. Because bots may still try to crawl it, even though there is nothing of value on the page. And it’s frustrating for users who follow those links.
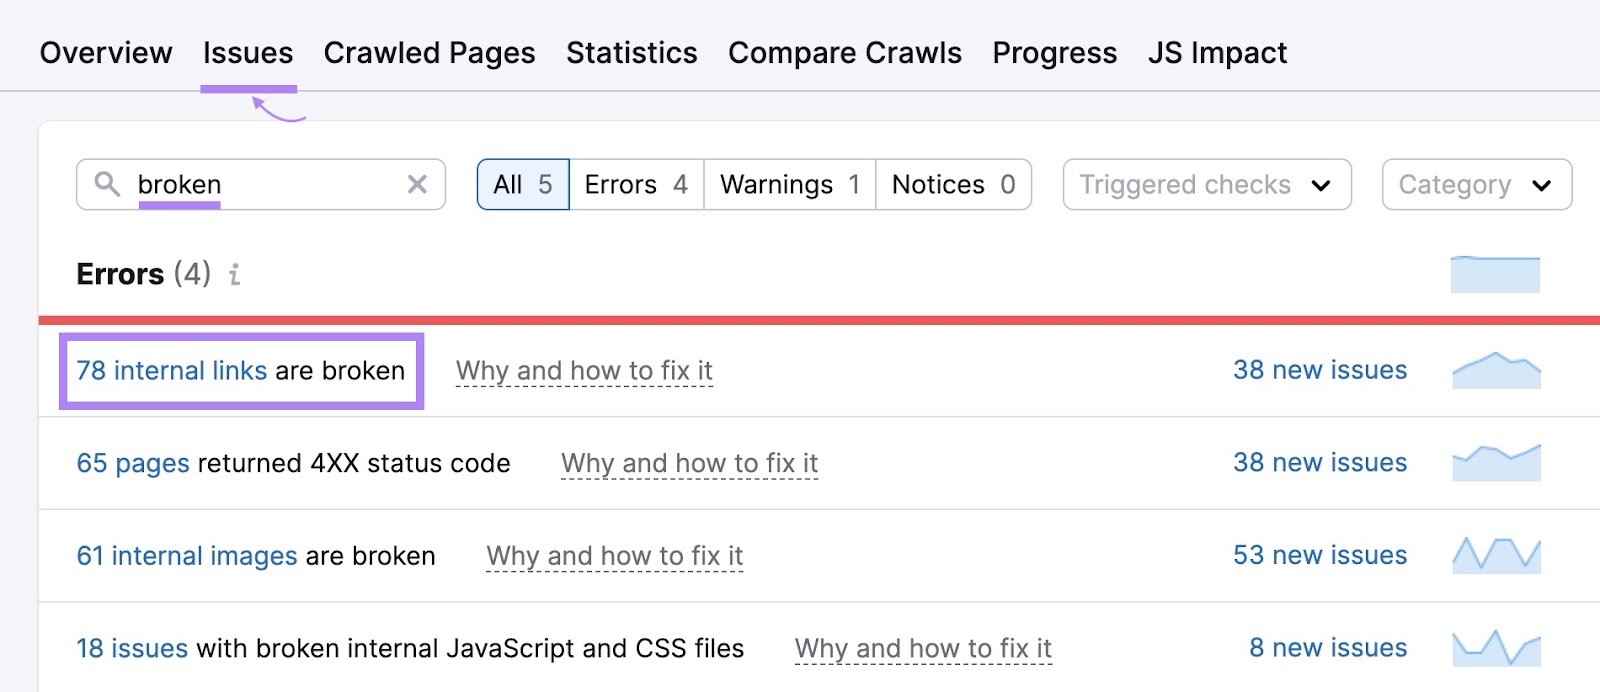
To identify broken links on your site, go to the “Issues” tab in Site Audit and enter “broken” in the search bar.
Look for the “# internal links are broken” error. If you see it, click the blue link over the number to see more details.
You’ll then see a list of your pages with broken links. Along with the specific link on each page that’s broken.
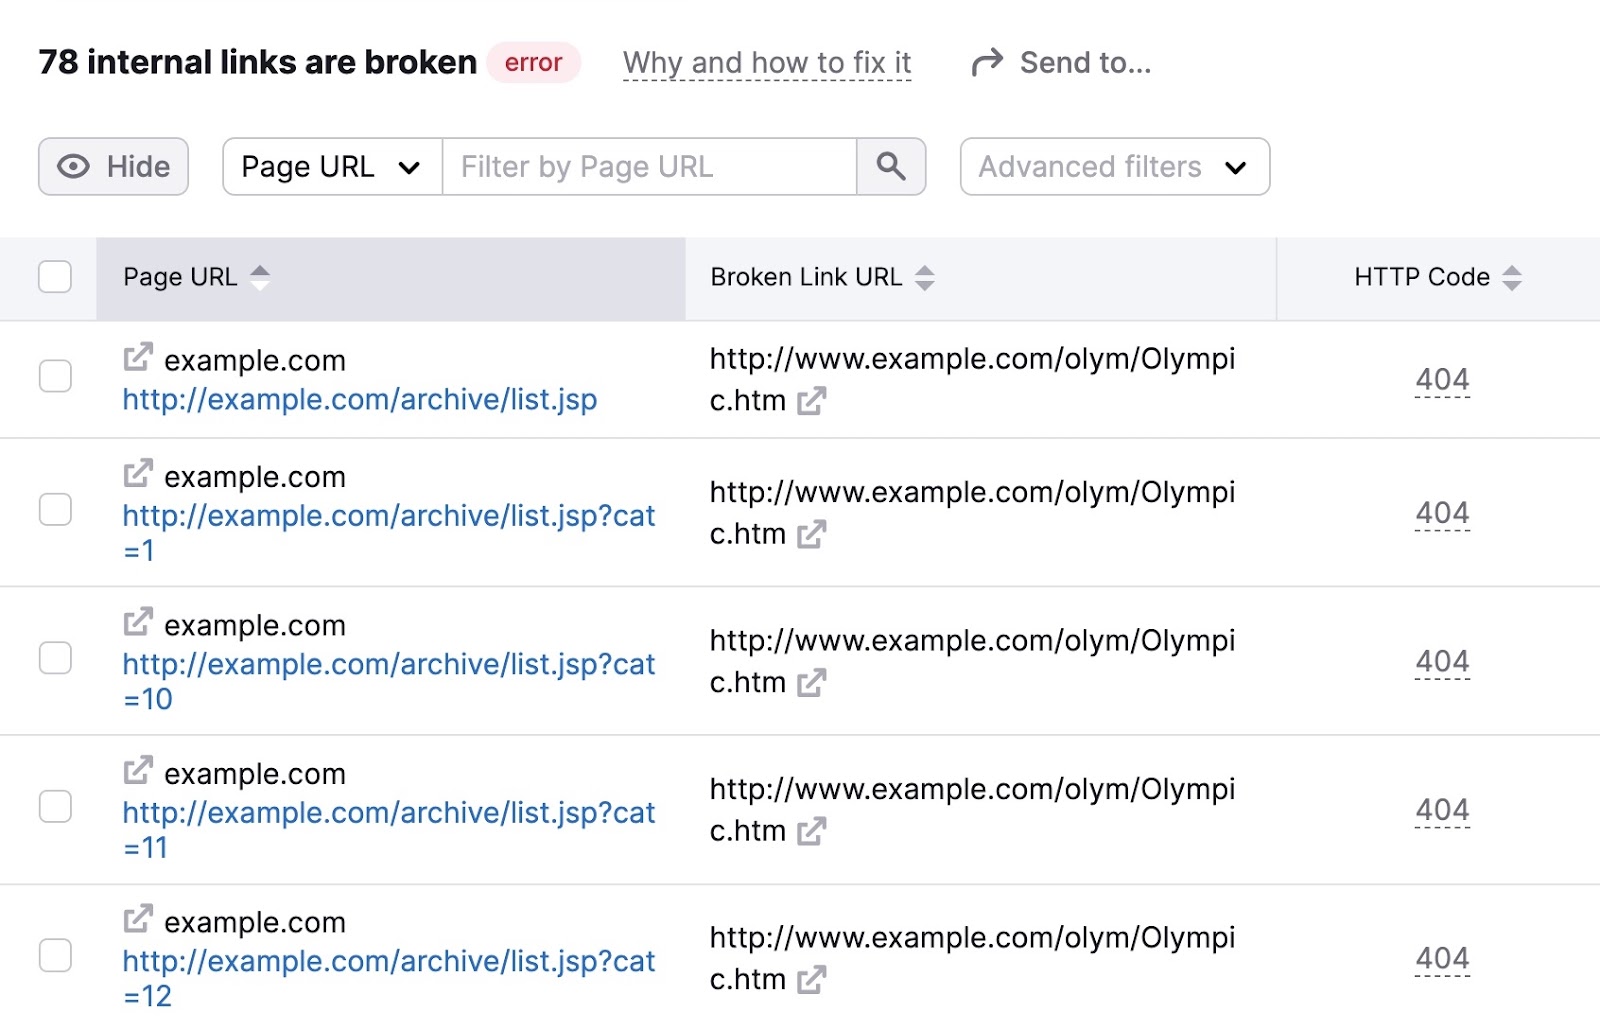
Go through these pages and fix the broken links to improve your site’s crawlability.
7. Eliminate Duplicate Content
Duplicate content is when you have highly similar pages on your site. And this issue can waste crawl budget because bots are essentially crawling multiple versions of the same page.
Duplicate content can come in a few forms. Such as identical or nearly identical pages (you generally want to avoid this). Or variations of pages caused by URL parameters (common on ecommerce websites).
Go to the “Issues” tab within Site Audit to see whether there are any duplicate content problems on your website.
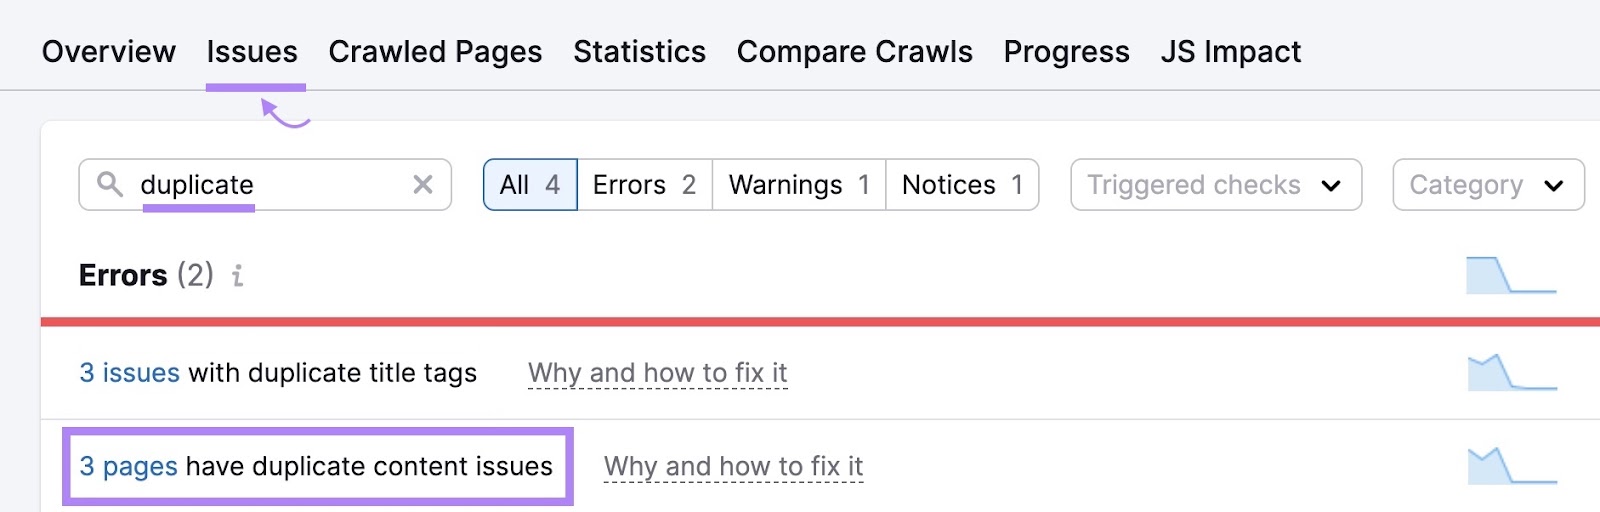
If there are, consider these options:
- Use “rel=canonical” tags in the HTML code to tell Google which page you want to turn up in search results
- Choose one page to serve as the main page (make sure to add anything the extras include that’s missing in the main one). Then, use 301 redirects to redirect the duplicates.
Maximize Your Crawl Budget with Regular Site Audits
Regularly monitoring and optimizing technical aspects of your site helps web crawlers find your content.
And since search engines need to find your content in order to rank it in search results, this is critical.
Use Semrush’s Site Audit tool to measure your site’s health and spot errors before they cause performance issues.