What Is Google Analytics?
Google Analytics is a free website analytics tool that helps marketers better understand their site’s overall performance.
Unlike Google Search Console, which provides detailed data about how users discover websites through Google organic (meaning unpaid) search, Google Analytics deals with all traffic sources. Including organic search, paid search, social media, and more.
And beyond telling you how your users arriveon your site, it has data that tells you what they do after they arrive. That includes which pages they view and what actions they take.
Google Analytics can also seem complicated and confusing at first. But it doesn't have to be.
In this guide, we’ll teach you the basics of Google Analytics and help you install it on your site.
Let’s start with a brief history.
Universal Analytics
Universal Analytics (UA) is no longer the current version of Google Analytics. But it is the version that made Google Analytics famous.
It became widespread across the digital marketing world after the beta version was released in 2012.
How widespread? The various versions of Google Analytics have a greater than 70% share of the web analytics software market, according to Statista.
Here’s what the dashboard looked like:
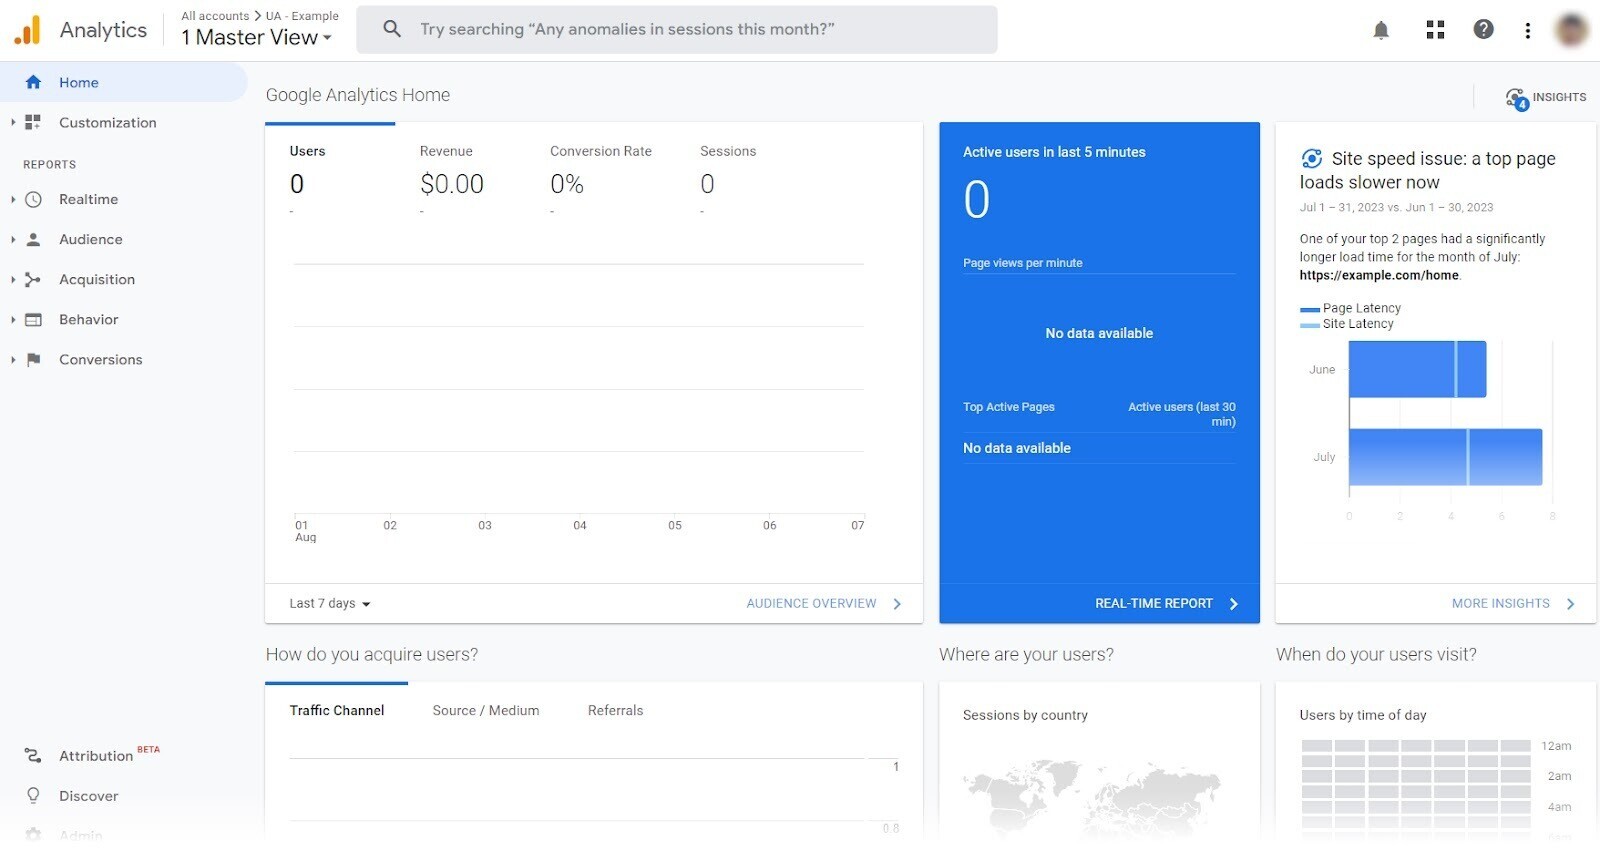
But you won’t see it these days.
That’s because Universal Analytics was set to stop processing new data in standard accounts on July 1, 2023. So marketers started adjusting to the new Google Analytics 4.
Google Analytics 4
Google Analytics 4 (commonly called GA4) is the new standard for the Google Analytics platform.
The platform was originally released as a beta version in 2019. And called the “App + Web” property.
The dashboard in GA4 looks like this:
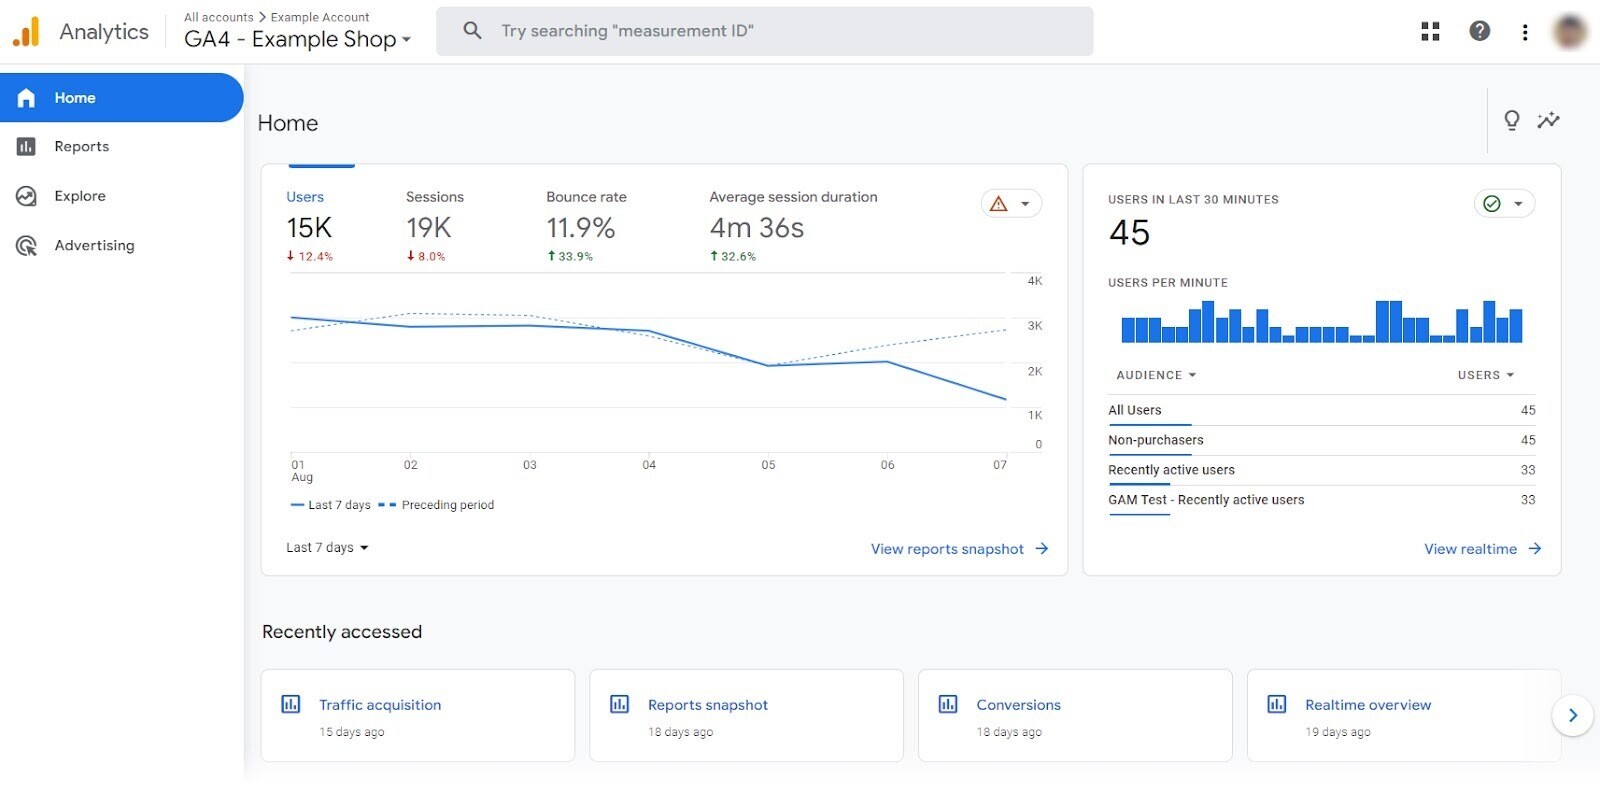
It doesn’t look all that different, does it?
But there are some fundamental differences between GA4 and UA. Especially for those who were accustomed to the prior version.
Differences Between GA4 and UA
Knowing these two differences between GA4 and UA will help you understand today’s Google Analytics better.
Difference 1: Event-Based Data
Google Analytics measures user interactions on a website. Each of those user interactions is called a “hit” and it becomes part of the data you can see in your Google Analytics reports.
GA4 collects all web interaction data as “events.” In other words, all hits in GA4 are collected as events.
Universal Analytics collected data through multiple hit types. You can see this in the table below, with the various UA hit types on the left and how they translate to GA4’s event-based data on the right.
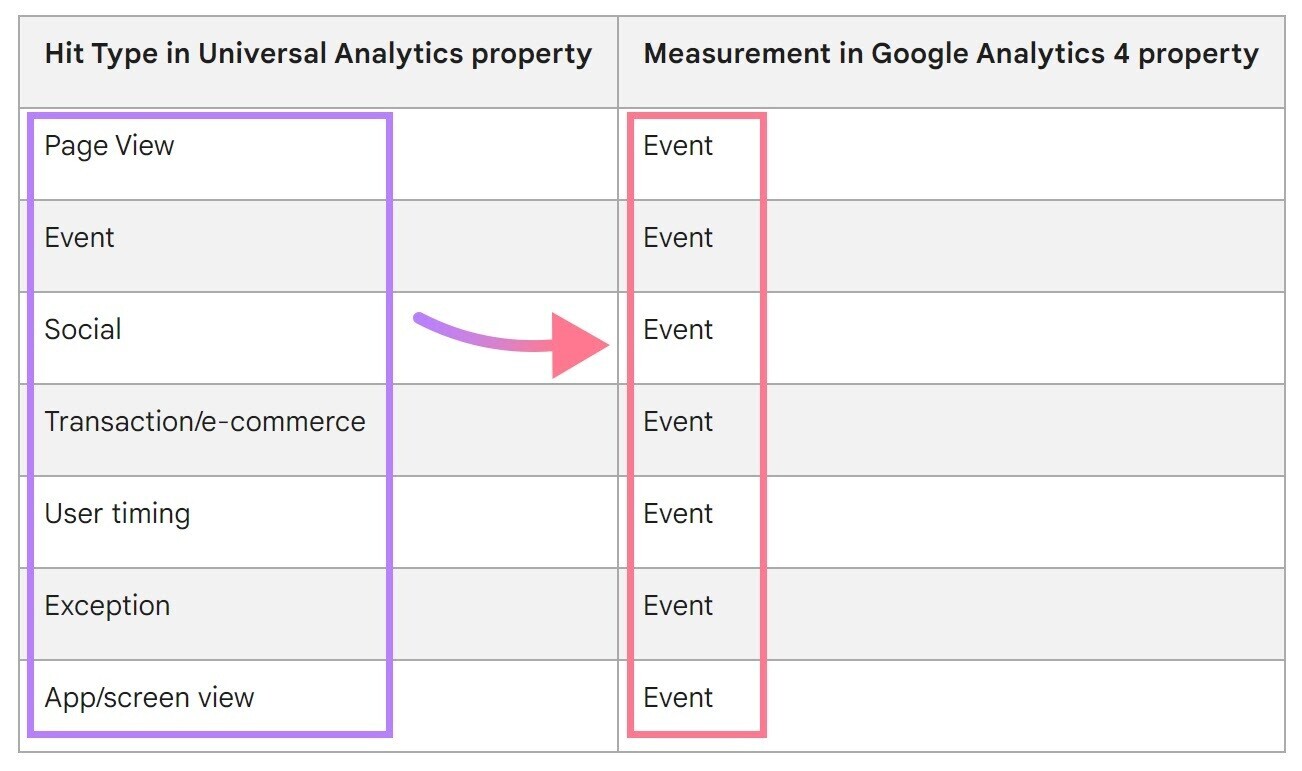
The event-based data model in GA4 means some metrics and reports are now different in Google Analytics. We’ll see this in greater detail when we review Google Analytics basics later in this guide.
Note: Differences like this have been so disorienting for some marketers that they’re exploring Google Analytics alternatives. But Google Analytics is still an incredibly useful and powerful tool for those who learn how to use it.
Difference 2: A New Account Structure and New Data Streams
Google Analytics 4 has a different account structure than UA and introduces the concept of a “data stream.”
Universal Analytics had an account, a property, and a view.
The account level was typically linked with an organization. The property level was linked with a specific digital property, like a website or an app. And the View level was where data was actually viewed.
GA4 has an account and a property level. But it doesn’t have any views.
The account level works the same as it did in UA. The property level is different.
Remember when we said that GA4 was initially released as something called the “App + Web” property?
That’s because Google Analytics can now combine data from a website and an app into a single, unified picture. Both the website and the app can have their own unique data streams that flow into a complete picture of user behavior within the GA4 property.
We’ll see how to set up a data stream when we get to the installation walkthrough below.
But first, let’s answer a critical question. What does Google Analytics actually do?
What Is Google Analytics Used For?
Google Analytics helps answer important questions about how your website (or app) is performing. So you can find ways to improve.
Note: We’re focusing exclusively on GA4 for the rest of this article. Because UA is no longer supported.
Here are some of the questions the platform can answer:
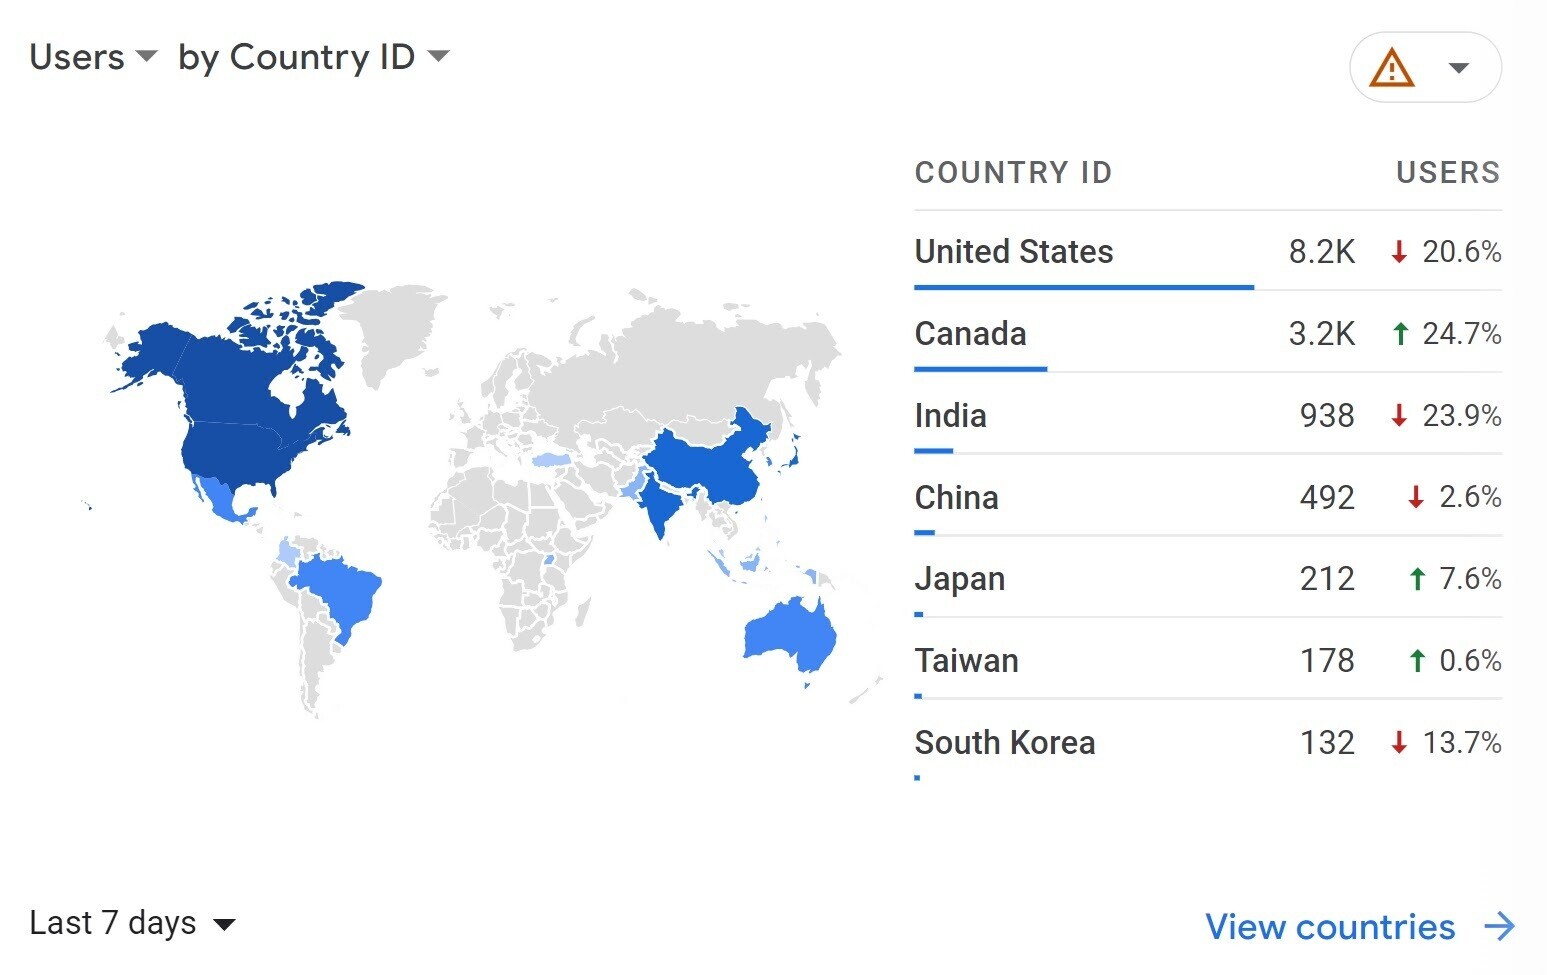
- Who was on your website? You can see what users’ interests are, which languages they speak, which cities they’re from, and which countries they’re from.
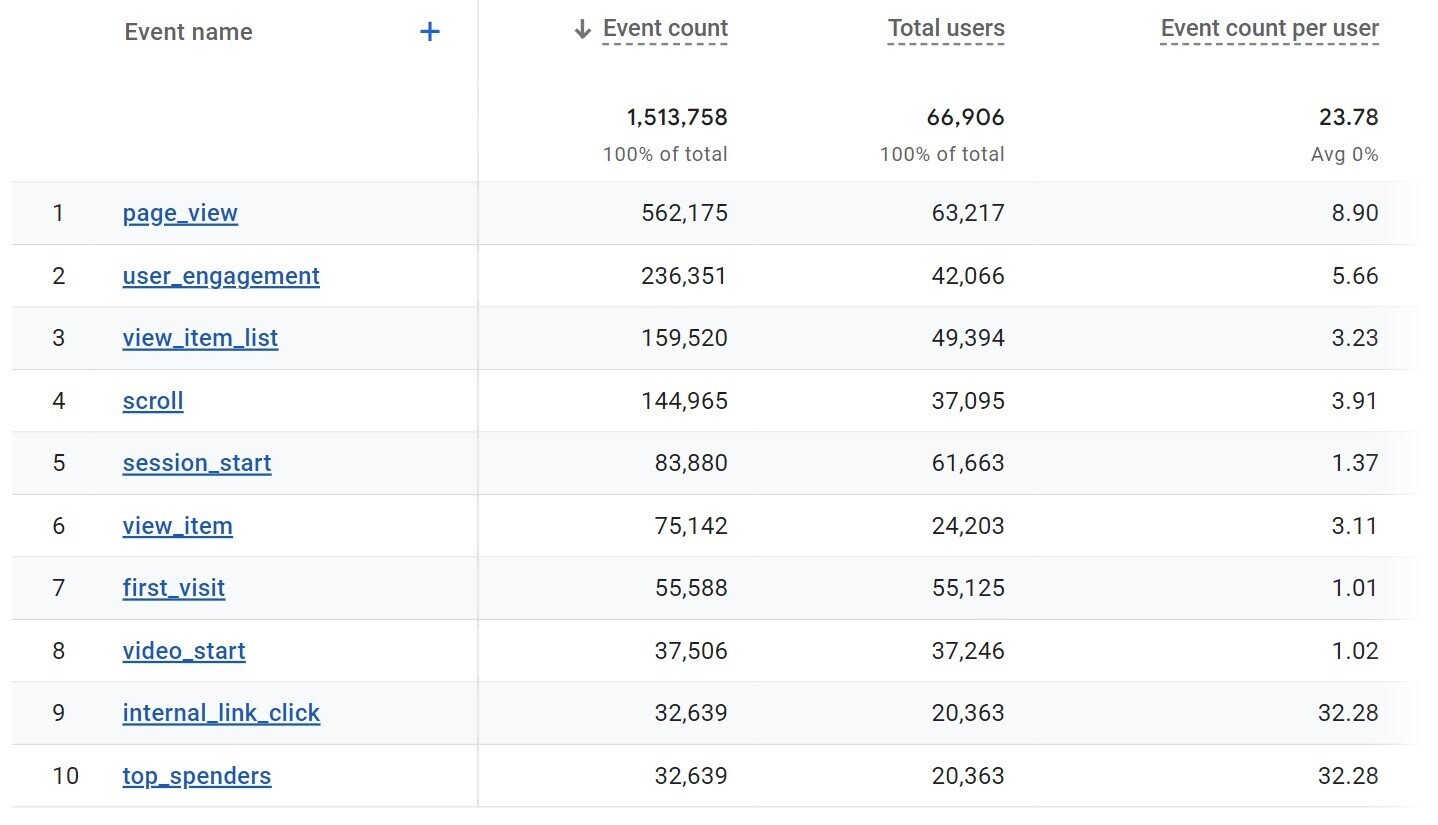
What happened on your website? You can see how many pages were viewed, how many links were clicked, how many videos were played, and much more. Google Analytics will show you how often these interactions occur.
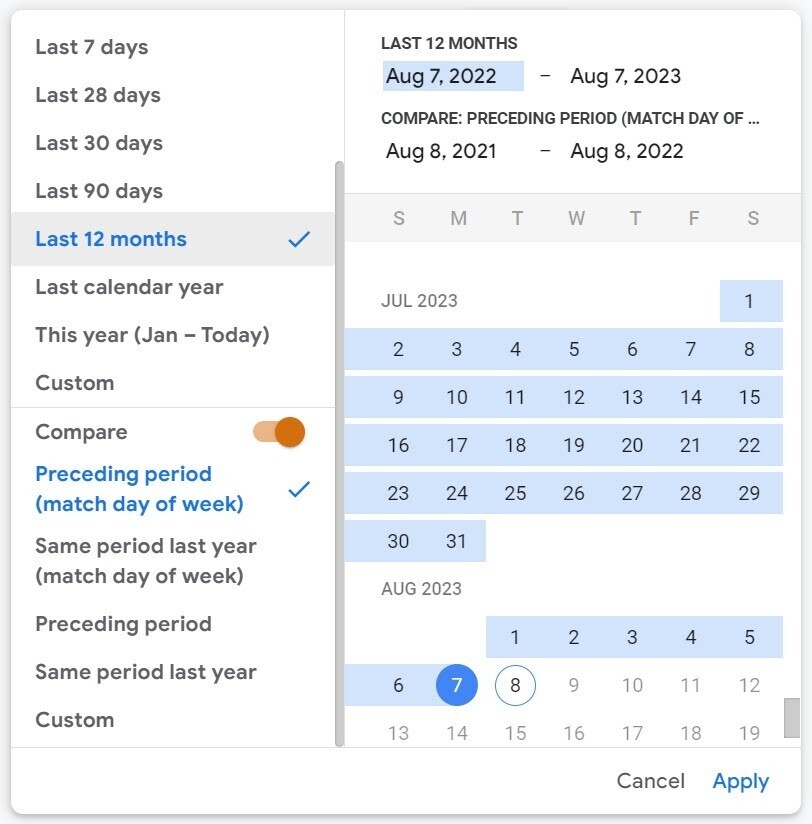
- When did different events happen? You can shift your date range to analyze relevant time frames. You can also compare performance across time frames to see year-over-year or month-over-month trends.
- Where did your visitors come from? You can see which sources contribute the most (and least) traffic to your site. Let’s look at the “Acquisition overview” report below. Look to the table on the far right and you can see that the vast majority of traffic comes from organic search (unpaid traffic from search engines). Organic social and email contribute a small percentage of traffic.
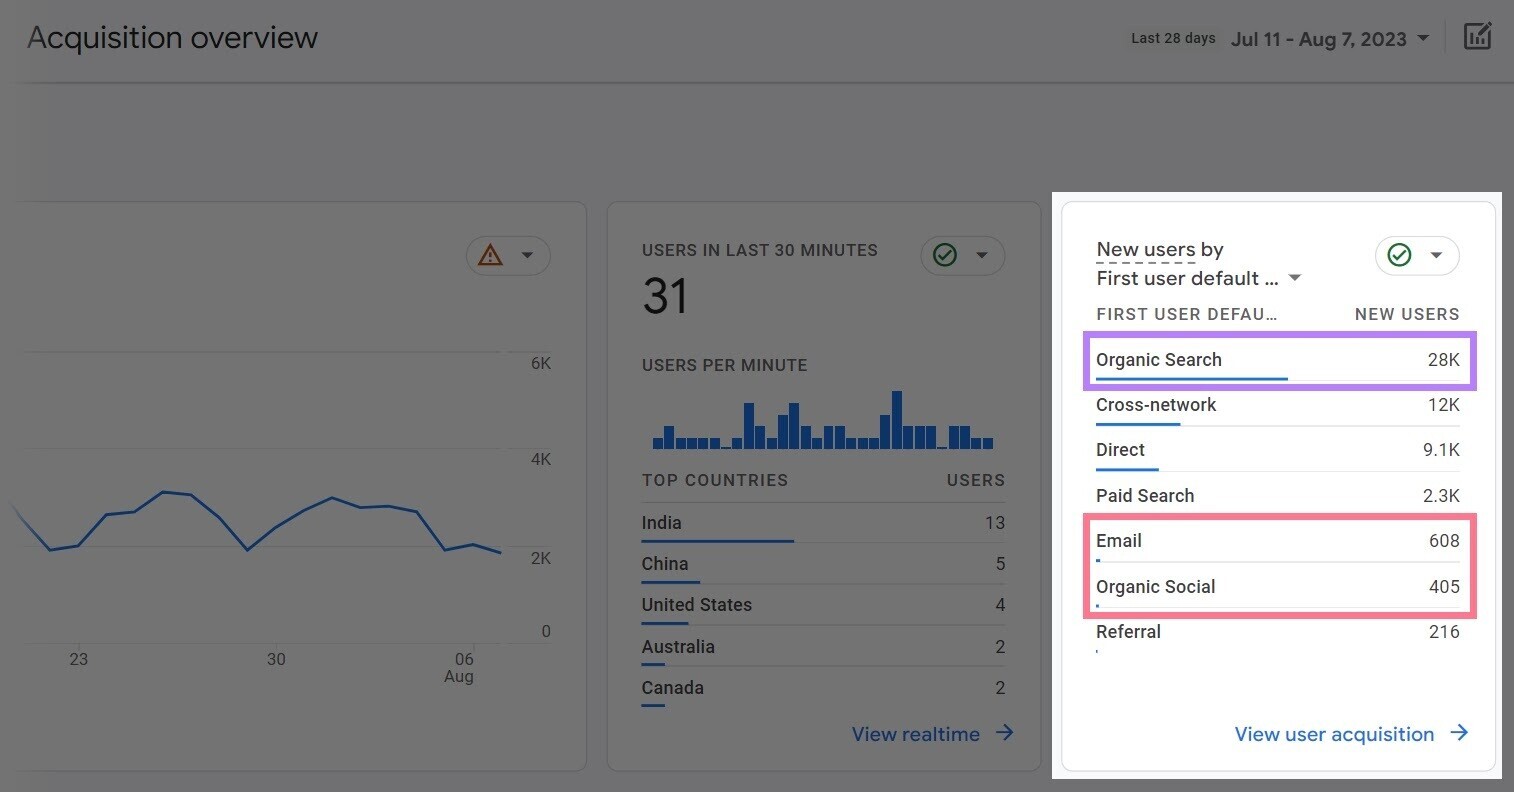
Pro tip: An organization with a traffic profile like this might choose to prioritize their keyword research to continue strengthening their organic search performance.
As you answer these questions, you’ll learn what works and what doesn’t. And you can use this to improve your results over time.
How Does Google Analytics Work?
Google Analytics works by collecting data from your website (or app) and then creating reports so you can analyze that data.
A small tracking code needs to be installed on the site to enable data collection.
Here’s an example of the Google Analytics tracking code.
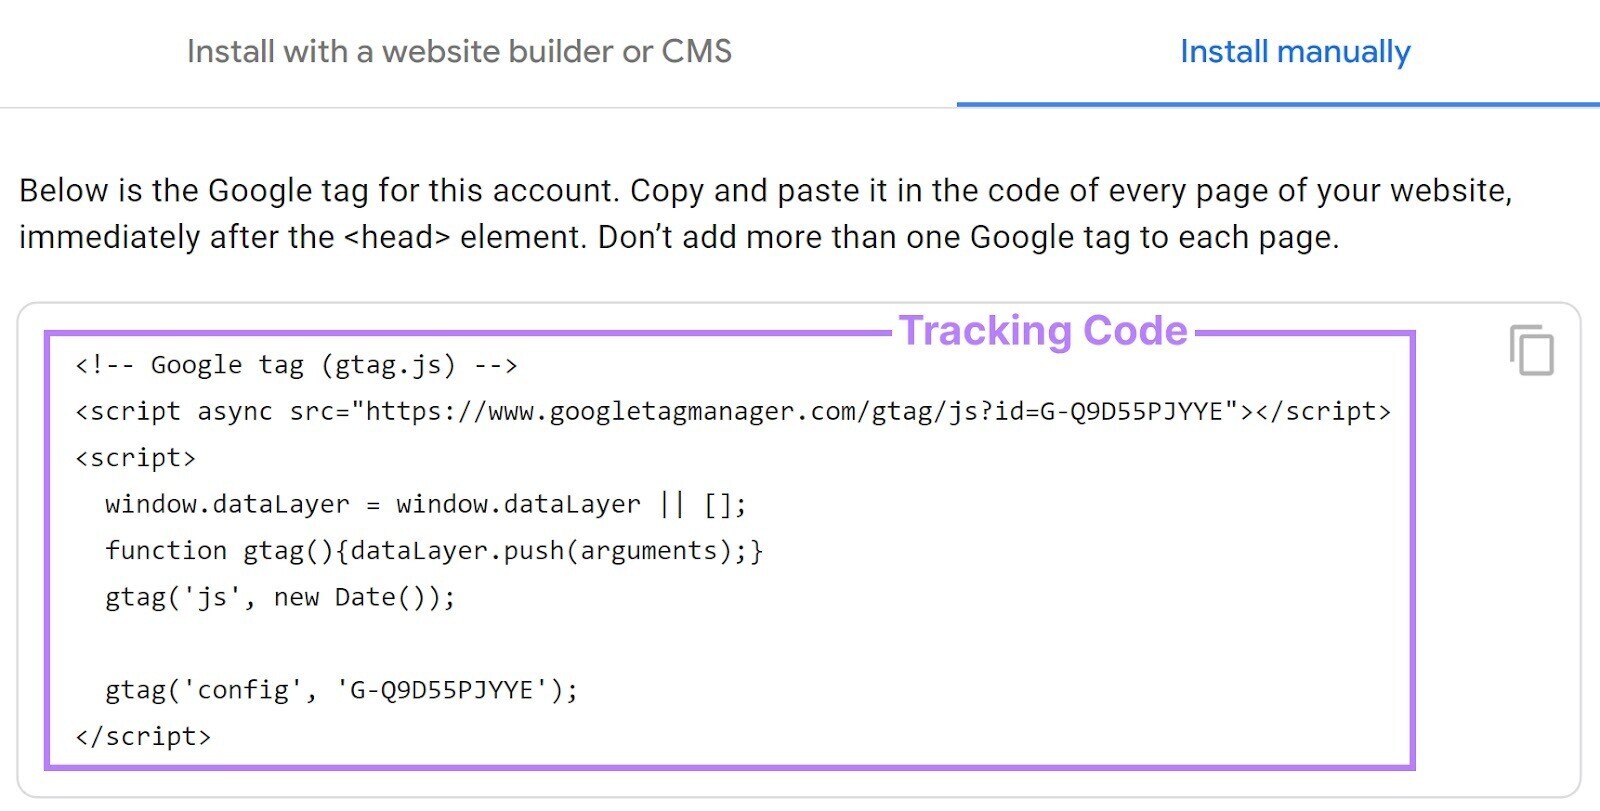
When a user arrives on a site with this tracking code installed, Google Analytics will place a cookie (a small file that collects information about the user) in that user’s web browser. This visitor activity is what you ultimately see in Google Analytics reports.
How does this data get there?
Let’s break it down into four steps moving from left to right. Like in the diagram below.
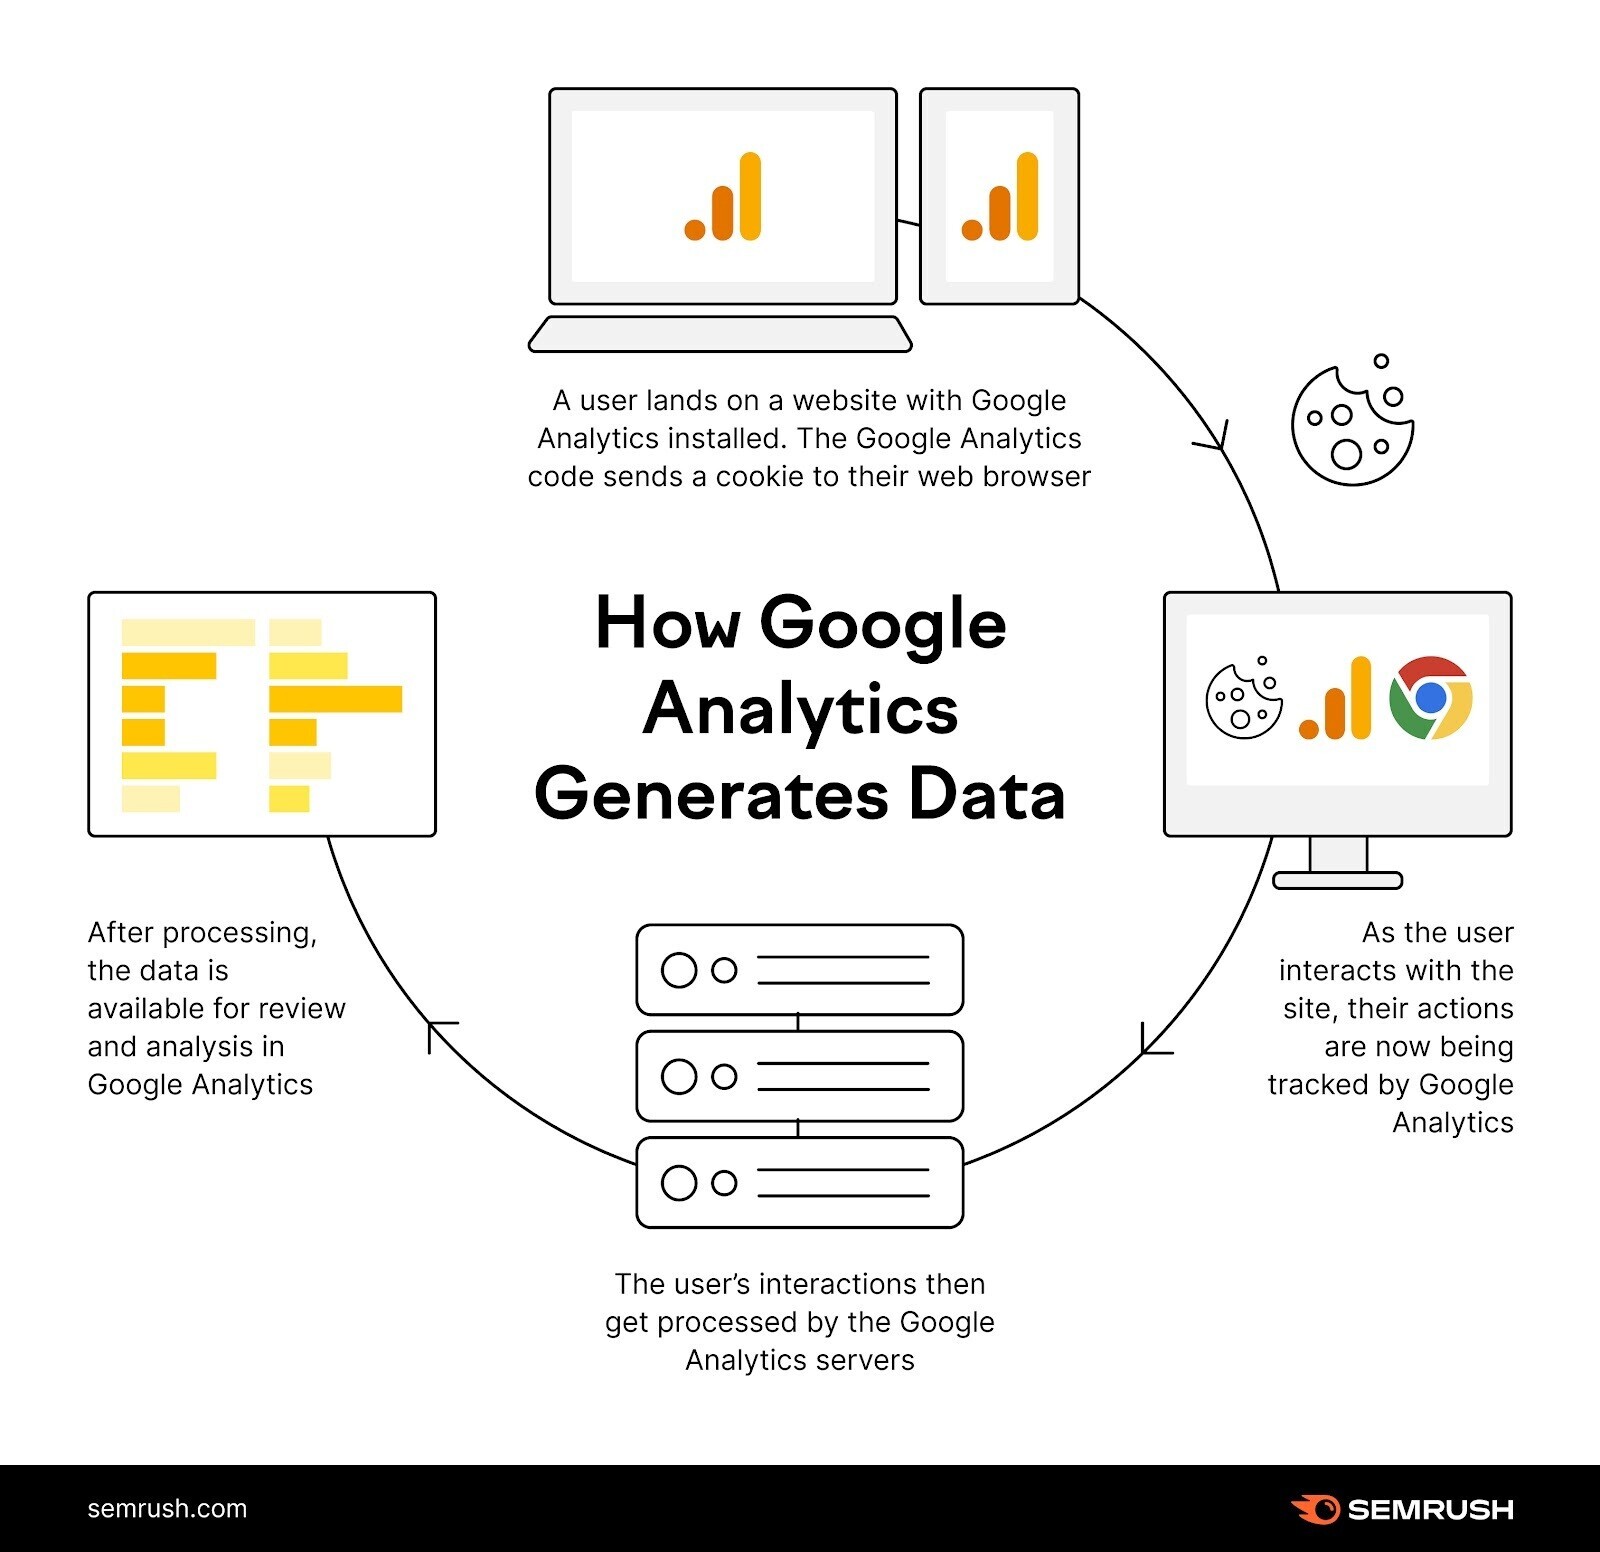
- Step 1: A user lands on a website with Google Analytics installed. The Google Analytics code sends a cookie to their web browser
- Step 2: As the user interacts with the site, their actions are now being tracked by Google Analytics
- Step 3: The user's interactions then get processed by the Google Analytics servers
- Step 4: After processing, the data is available for review and analysis in Google Analytics
Now, let’s set up Google Analytics on your site.
How to Set up Google Analytics
Installing Google Analytics is a two-part process.
The first part is creating a Google Analytics 4 property. Which generates your unique tracking code.
The second part is installing that tracking code on your website.
We’ll start this Google Analytics how-to by walking through setting up your account.
Create a Google Analytics Account
First, sign in to Google Analytics with your Google account.
If you’ve never used Google Analytics before, you’ll see a screen like this.

Click “Start measuring” and proceed to Step 1 below.
If you have used Google Analytics before (with the email address you’ve used to log in), you won’t see this same welcome screen. If that is your situation, click on the gear icon in the bottom left of your screen to access the admin area.
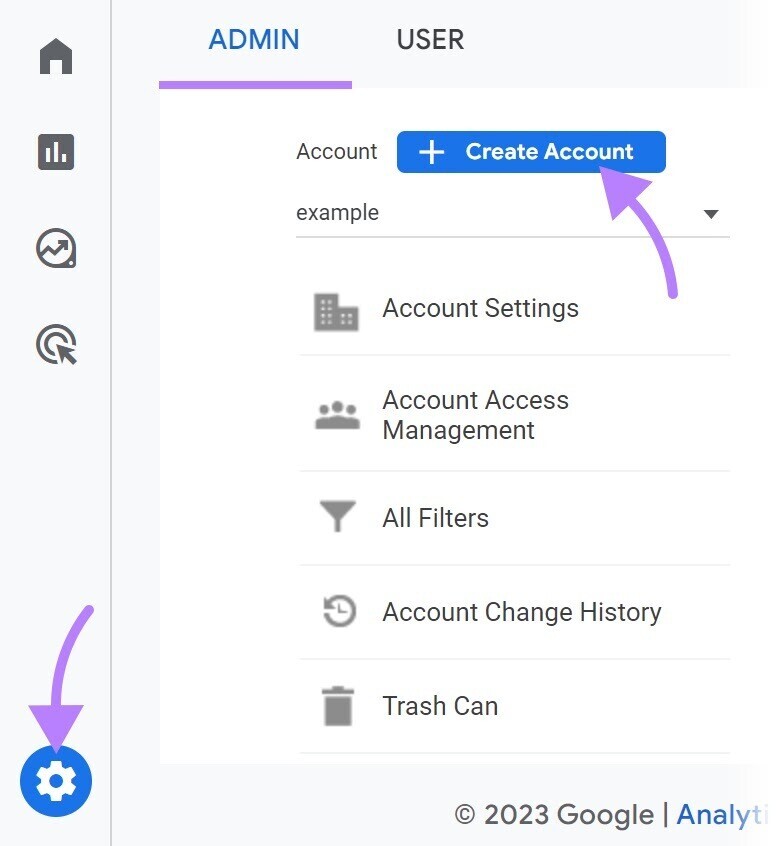
Then click “Create Account” and proceed to Step 1 below.
1. Set up Your Account
First, give your account a name.
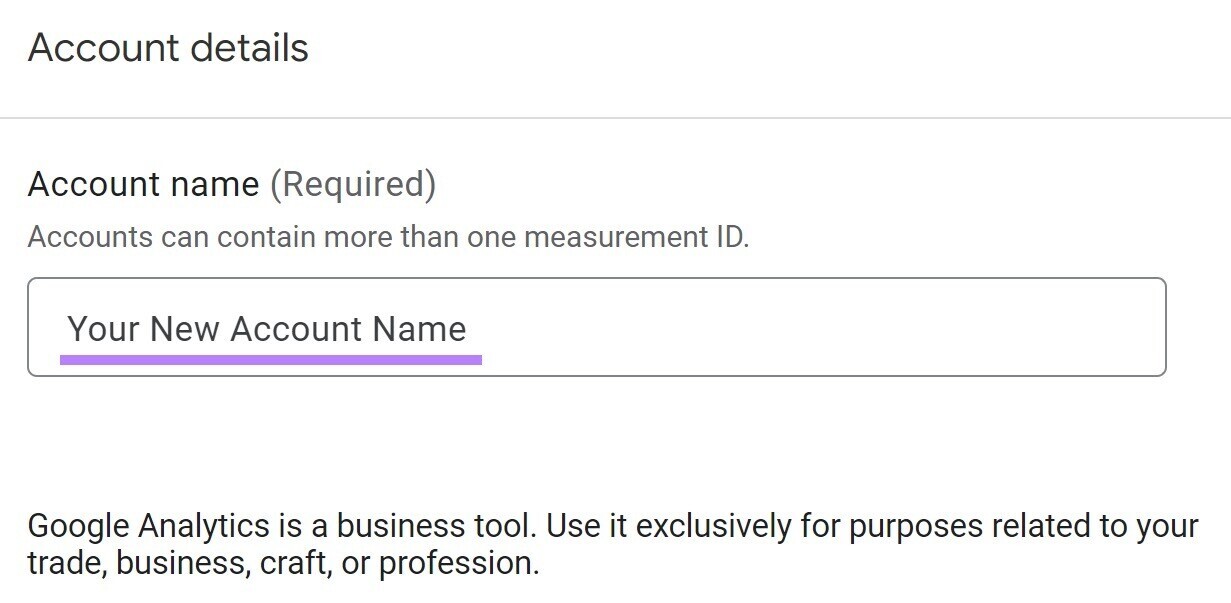
You can choose whatever name you want. But it’s a good idea to use your business’s name. So it’s easy to recognize.
You can also choose what information you want to share with Google at this step. Such as “Technical support” (who might be able to help with a technical problem in the future) and “Account specialists” (who might contact you for sales purposes in the future).
Then, click “Next”.
2. Create Your GA4 Property
Now, give your property a name.
Note: Remember that the property level is where the data lives in Google Analytics. If you have multiple websites, you can have multiple properties that exist in a single account.
Once again, you can choose whatever name you want. It’s not a bad idea to use your website’s domain name.
You’ll also select your reporting time zone and your currency.
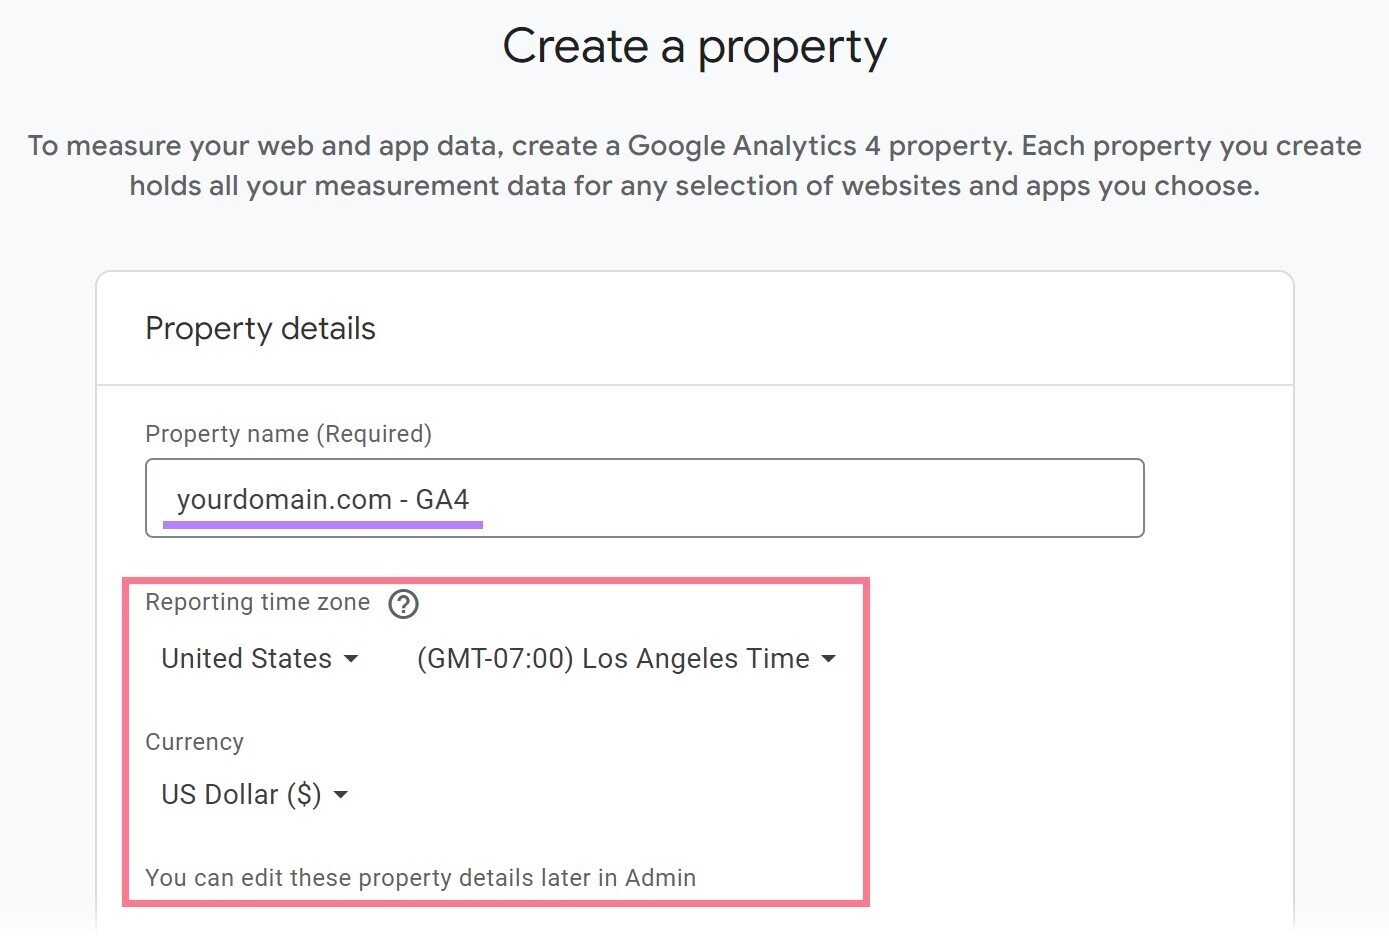
After making your selections, click “Next.”
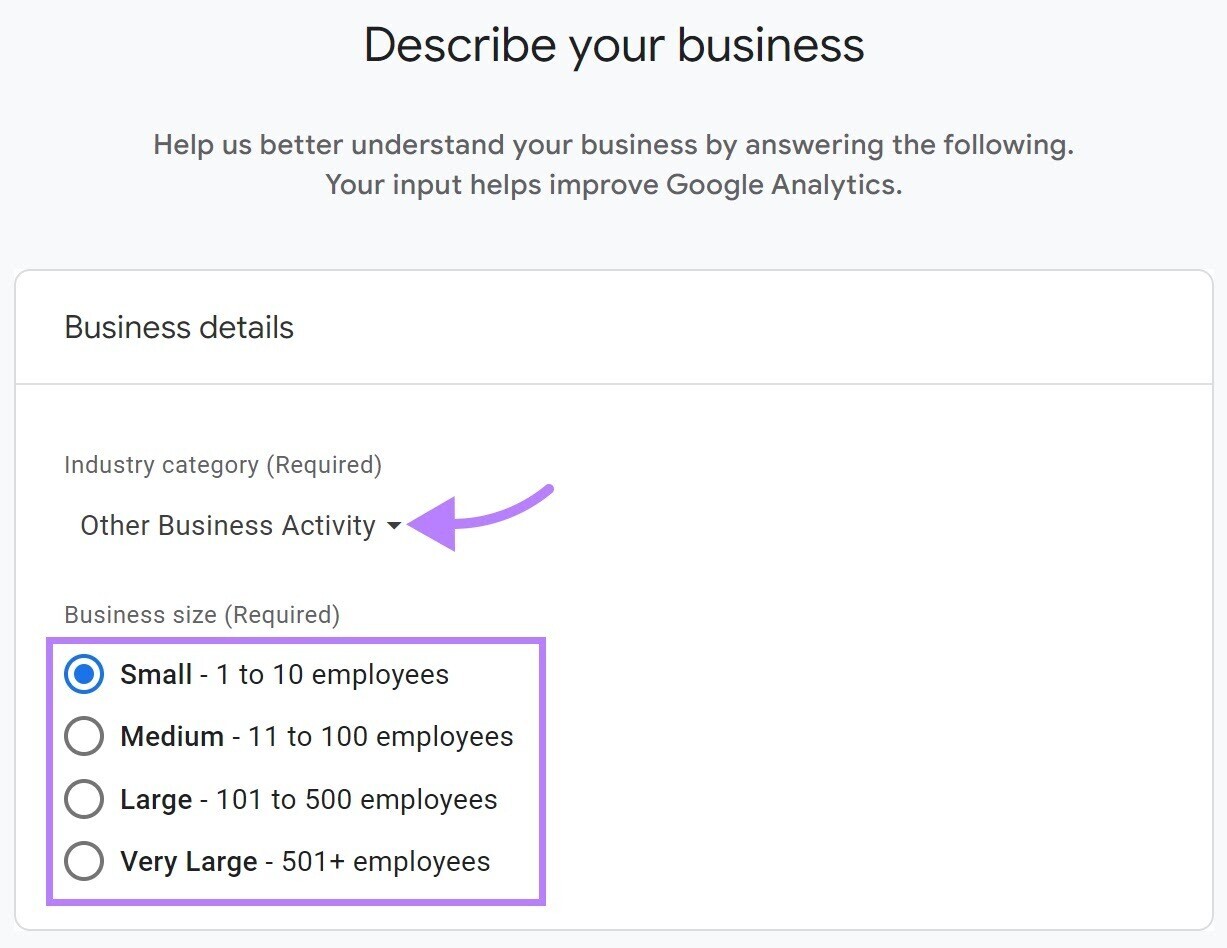
3. Provide Your Business Information
Now, choose the industry category that seems like the closest fit using the drop-down. If nothing matches, you can choose “Other Business Activity.”
And select your business size.
Then, click “Next.”
4. Select Your Business Objective and Accept Terms of Service
The selection you make here determines what reports will be pre-loaded in your Google Analytics property.
If you’re not sure, it’s fine to choose “Get baseline reports.” You can always add additional reports in the future.
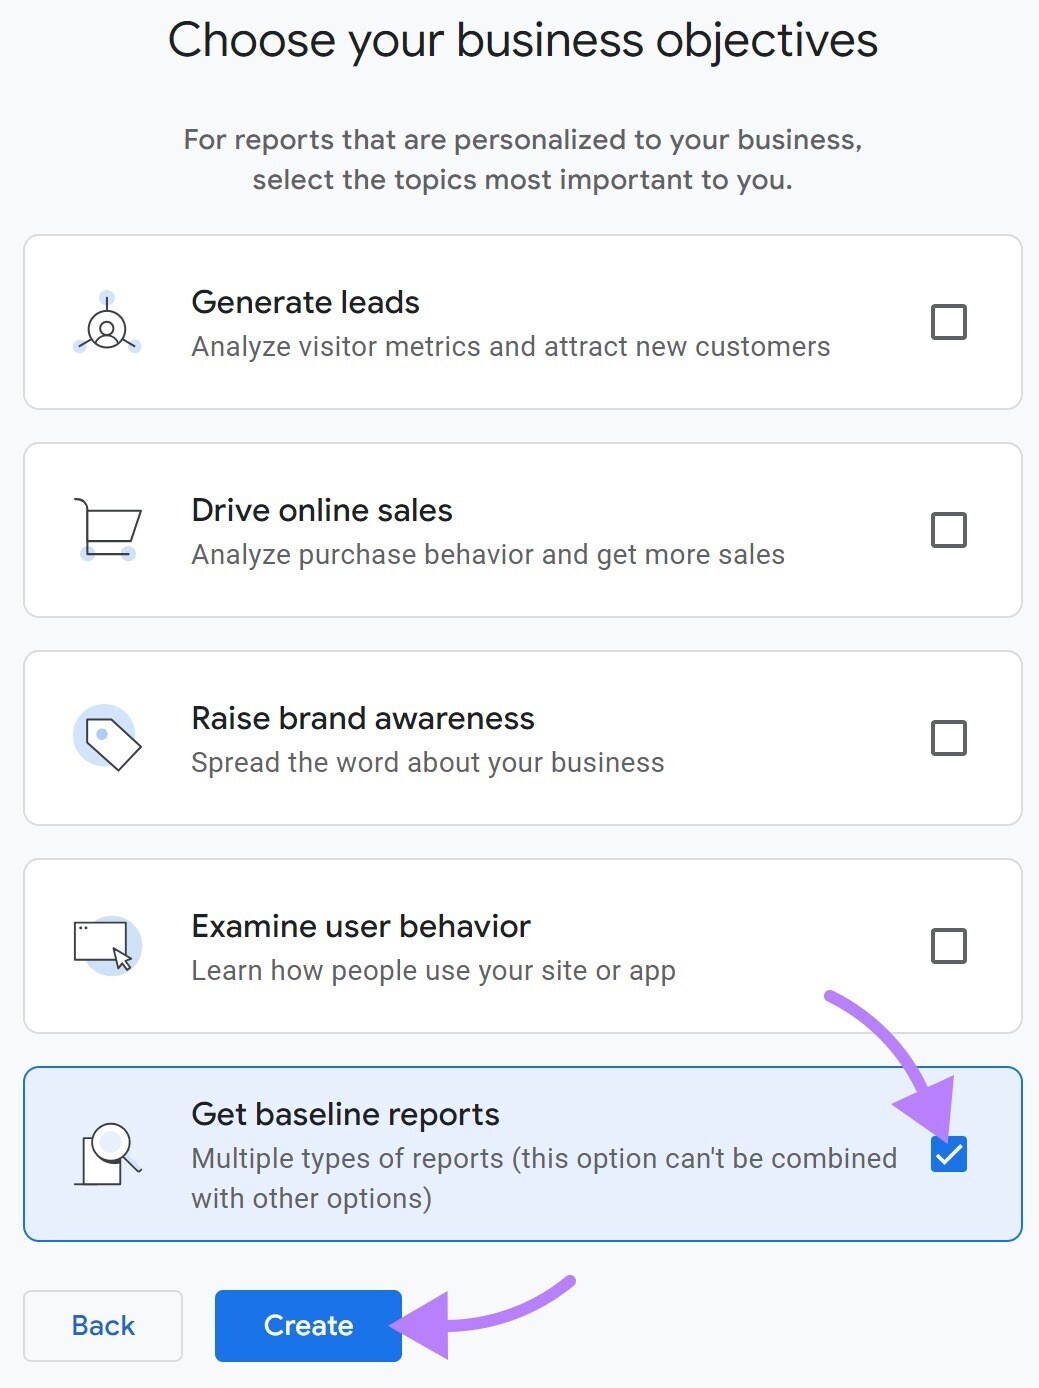
Then, click “Create.”
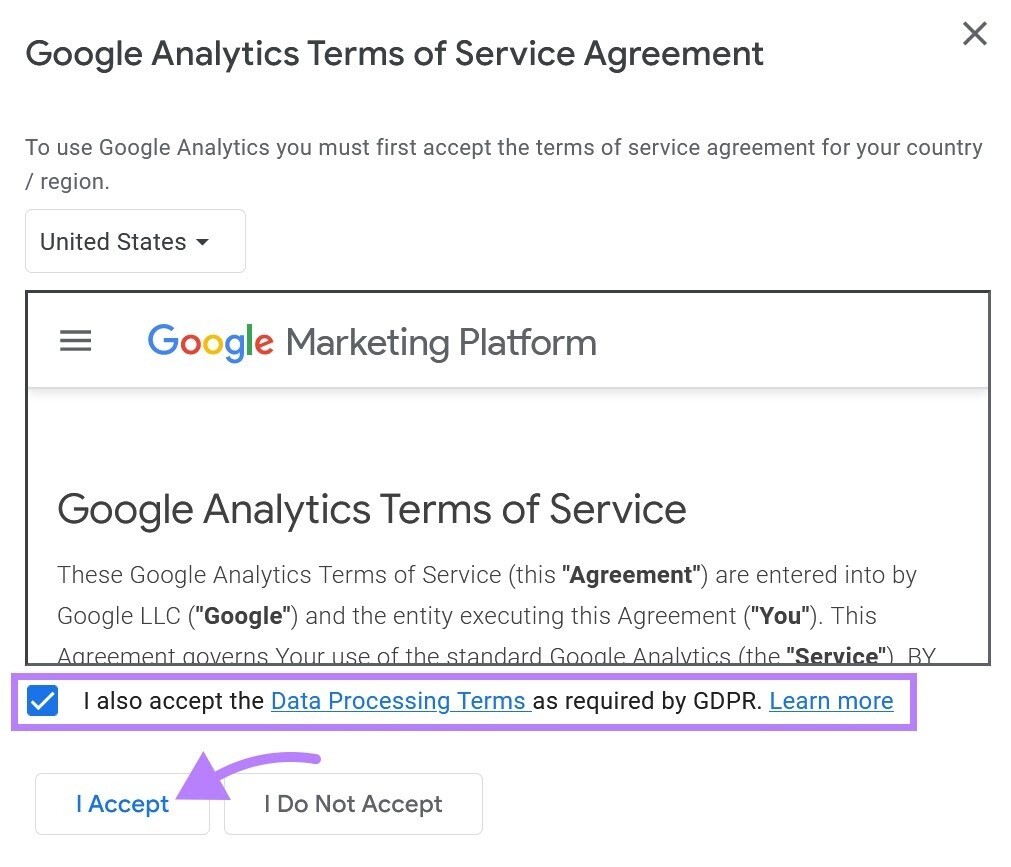
You’ll now need to accept the Google Analytics terms of service to move forward.
After reviewing, accept the data processing terms and click “I Accept.”
5. Set up Your Data Stream
You’re now ready to start collecting data and you can set up your data stream. The data stream is what sends data into your Google Analytics property.
Choose the type of platform you’re working on.
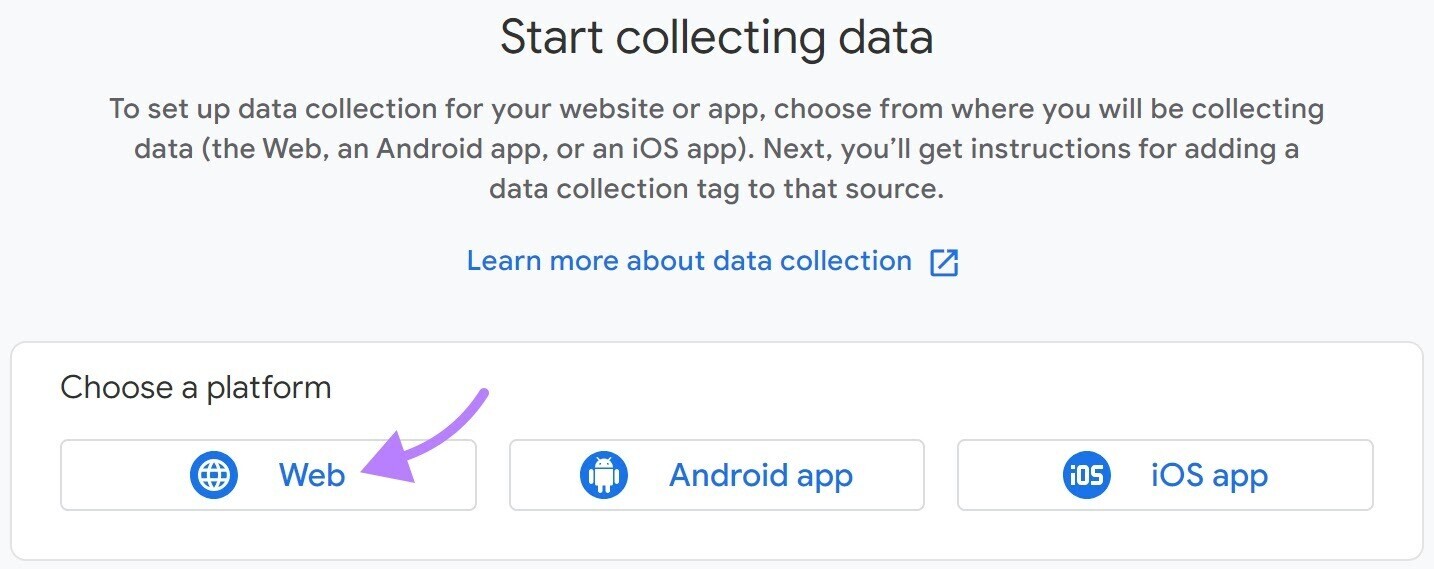
Choose “Web” if you’re working on a website. You can now set up your web data stream and you’ll see a section that looks like this:
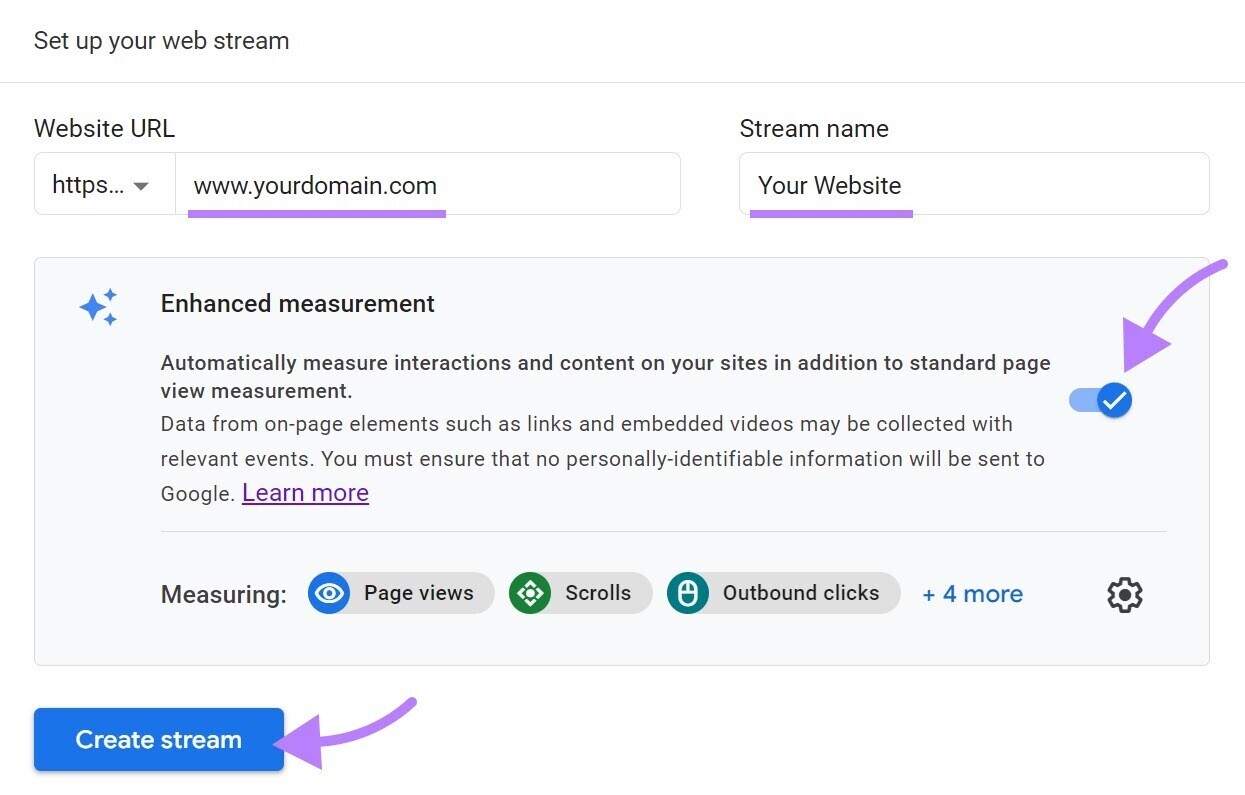
There are three things to do here:
- Enter your website URL
- Give your data stream a name. You can choose any name you’d like. If your domain name is www.widgetcorp.com, you might choose Widget Corp Website as your stream name.
- Ensure the blue toggle bar is turned on for “Enhanced measurement”—this allows you to track certain interactions like file downloads, external link clicks, and embedded video plays without doing custom work
Now, it’s time to install your tracking code so your data stream will start flowing data into GA4.
Install Google Analytics
You’re now ready to install Google Analytics on your website.
After your stream is configured in GA4, you’ll see a screen with a “MEASUREMENT ID” field that’s unique to your property. And a “View tag instructions” button.

Once you click the button, you’ll be given three installation options:
- You can install the code manually on your website
- You can install the code with a plugin or integration, if applicable
- You can use Google Tag Manager to install the code
Pro tip: If you already have Google Tag Manager running on your site, the third option is likely the easiest. You can use the installation instructions in this Google Tag Manager guide.
We’re going to go with the manual option.
How to Install GA4 Manually
To start the installation, click the “View tag instructions” button from your data stream.
Now, click the linked header text to “Install manually.” This is the tracking code that will run GA4.
Click the “copy” icon to copy it to your clipboard.
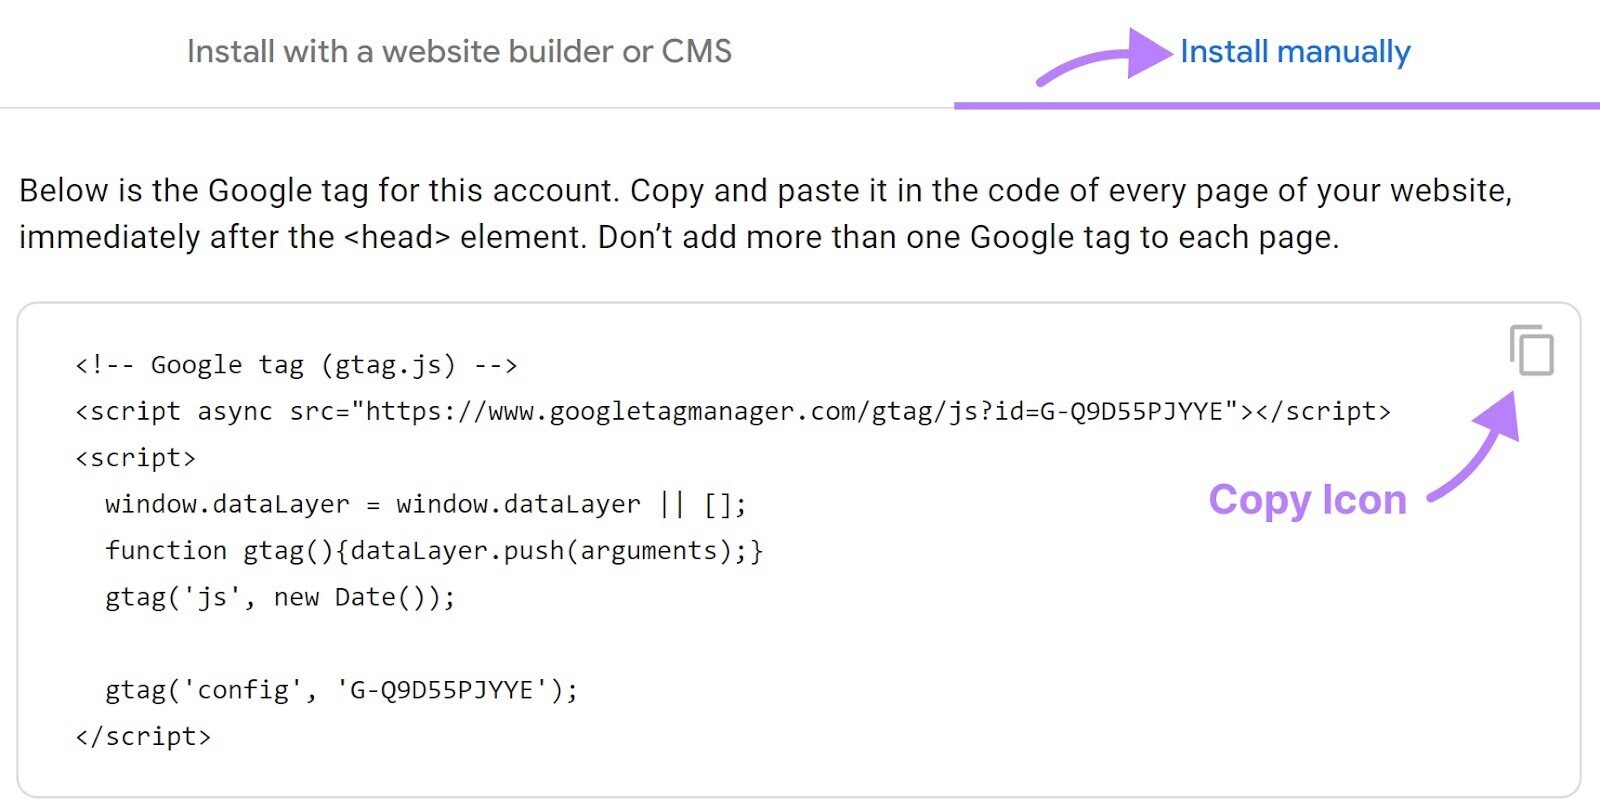
Now, go to your website and paste the code high in the <head> section of the page.
Pasting the code high in the <head> section will help the tag fire properly and ensure you get the most accurate data.
Note: If you’re not comfortable modifying your website code, ask a developer for help. Also, some WordPress plugins will allow you to modify your header without directly editing website template files.
Congratulations—Google Analytics 4 is now running on your website!
Google Analytics Basics
Data is flowing into your Google Analytics property.
But what data, exactly?
Google Analytics data shows information about visitors and their interactions that take place on your website.
Here’s an overview of the main data categories:
- Users
- Views
- Sessions
- Events
- Conversions
Let’s see how it all works.
Users
A user is an individual who visits your website.
Google Analytics uses cookies to help track the number of these unique individuals who visit your site. You can see this in the data table below.
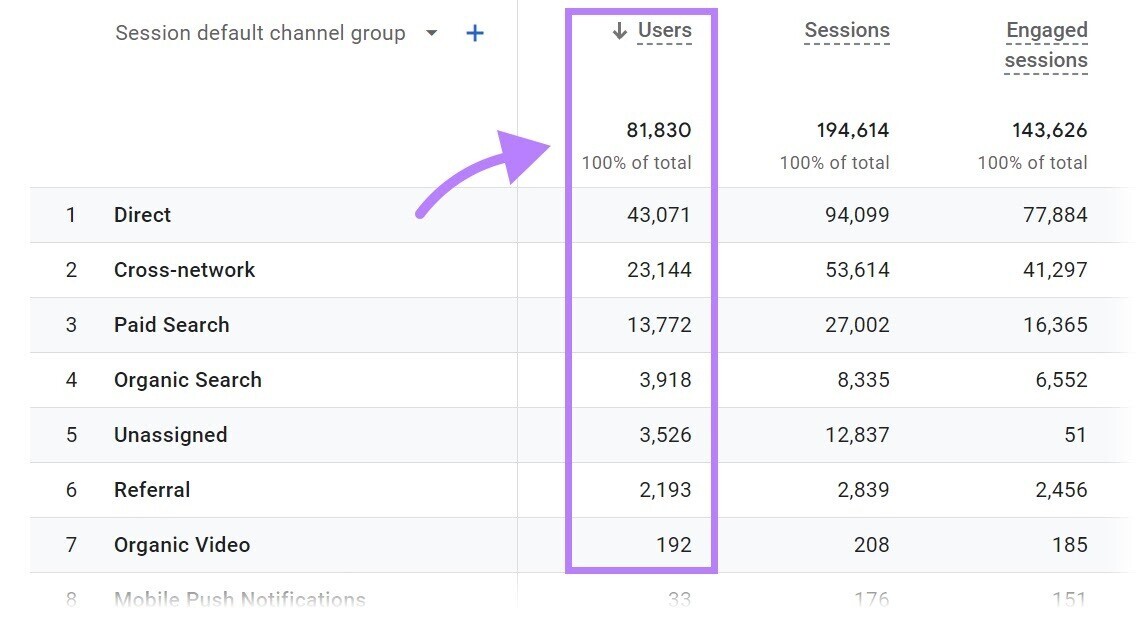
But when you use Google Analytics, you are doing more than simply counting users. You can analyze the behavior of those users. Such as what specific pages they view.
Views
Google Analytics records a view each time a user views a page on your site.
If a user views a page, leaves, and then comes back to that same page in a few minutes, that counts as two views.
Here, you can see a data table containing a list of top pages by views.
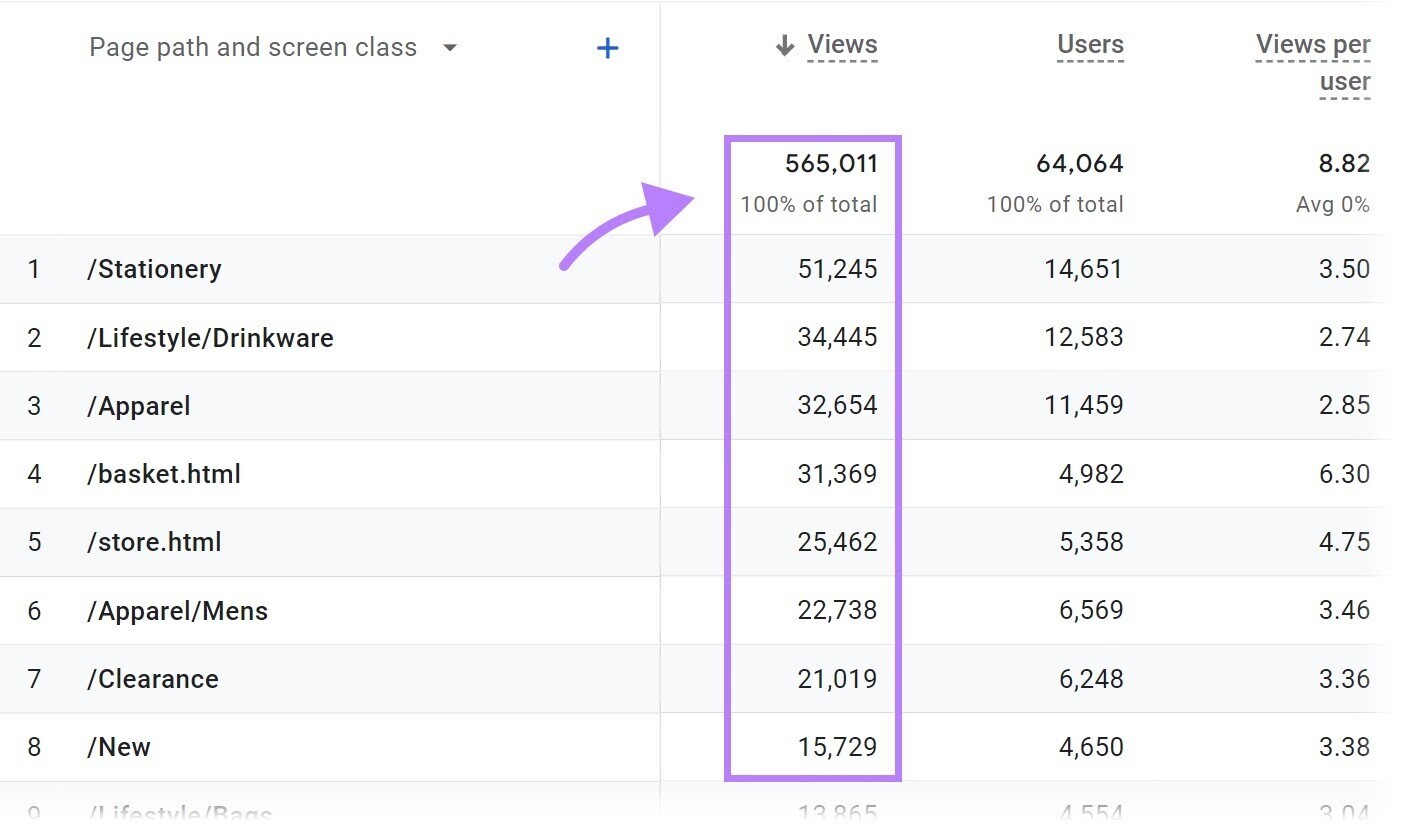
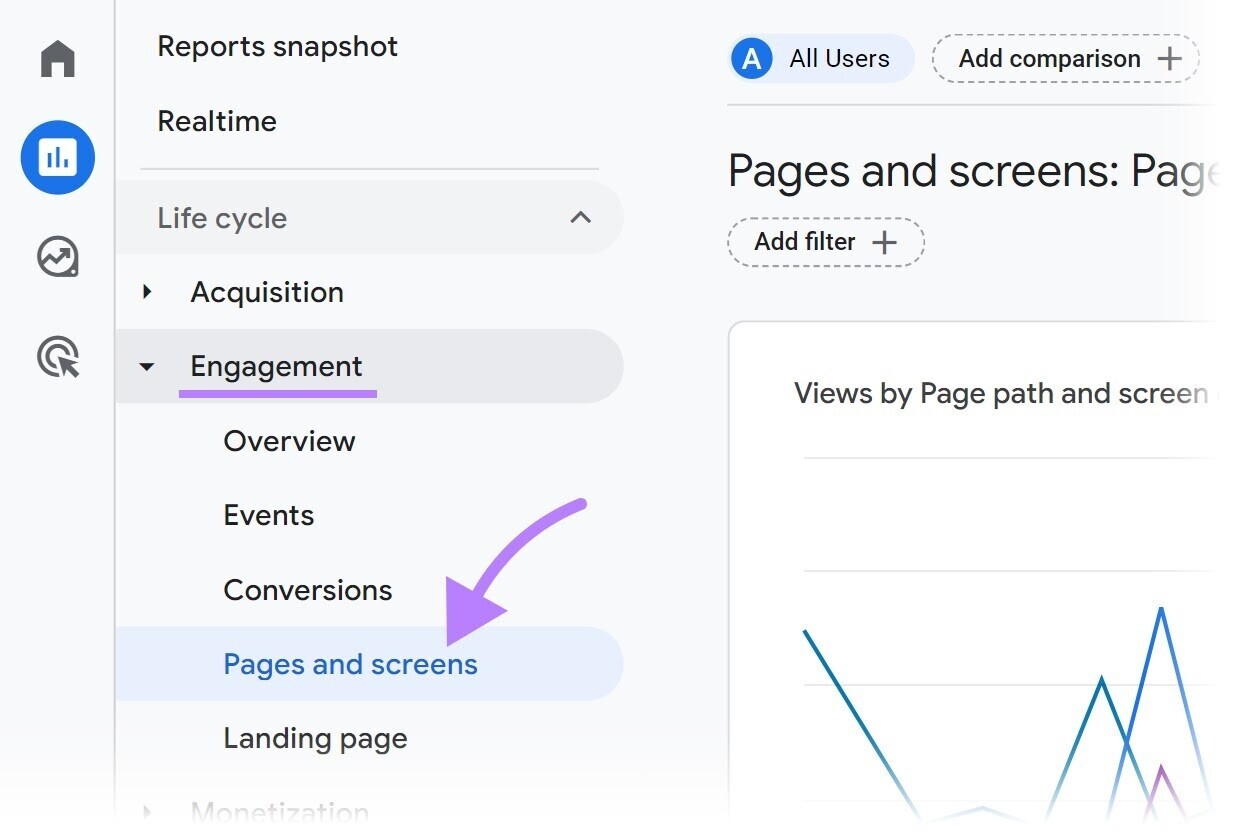
Pro tip: You can easily see this same report in your own GA4 property. Simply click “Reports” in the left-hand navigation, and then select “Pages and screens” within the “Engagement” reporting area.
Sessions
A session is another name for a user’s visit to (not just a view of) your website. A user can have one or more sessions on your site.
During a session, a user can perform a number of actions. Like viewing a page, downloading a file, playing a video, clicking a link, or completing a form.
Google Analytics associates each of these interactions with a unique session identifier. So you can understand which interactions took place during a session.
Google Analytics ends a session after the visitor leaves the site or after 30 minutes of inactivity.
The partial data table below shows a Google Analytics property that had 27,053 sessions during the specified time period.
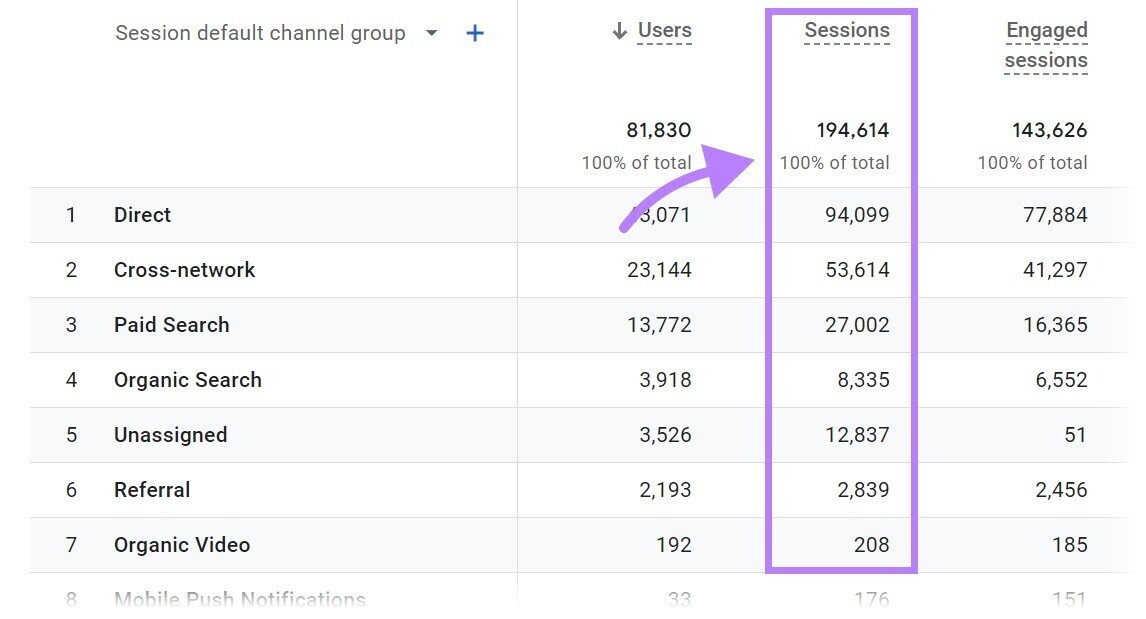
Note: The number of sessions should never be lower than the number of users. That’s because you can’t have a visit (a “session”) without a visitor (a “user”).
Events
During a session, a user may interact with your site in a number of ways. They might download a file, play a video, scroll down the page, click a link, or complete a form. These interactions are known as events.
Google Analytics can record events like scrolls, session starts, clicks, and more. Like in this image:
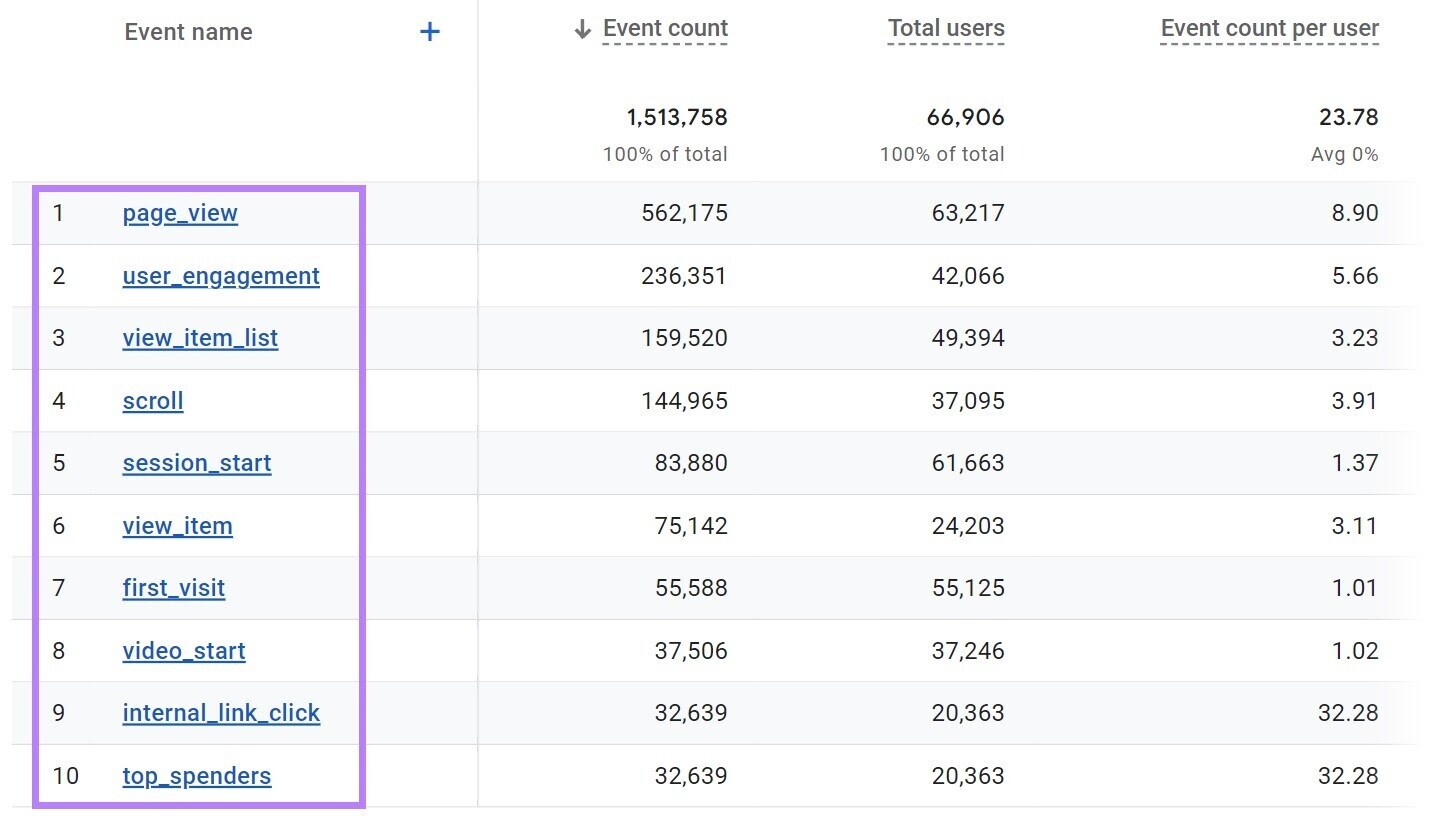
When it comes to events, there are four basics to understand:
- All website interactions are tracked as events. But there are different kinds of events, and they’re treated differently.
- Google Analytics will track some events by default. Some of those cannot be turned off. They are called “automatically collected events.”
- As long as you kept the toggle for “Enhanced measurement” turned on during the setup phase, you are also tracking enhanced measurement events by default. You can turn some of these off at any time if they aren’t a fit for your measurement needs. Here’s a link to Google’s resource if you want to learn more right now.
- You can also track some events through your own setup work. Google will provide a recommended name for you to use for some of these events. Google calls these “recommended events.” Any other events you create are called “custom events.” Recommended events and custom events are similar in that you need to do all the work to create them.
Note: Some custom events can be created within the Google Analytics interface, while other custom events require the help of Google Tag Manager. This is a key benefit of using Google Tag Manager with Google Analytics.
Conversions
Conversions are the most important actions that users take on your website.
If you run an ecommerce website, your most important conversion is likely a purchase. If you run a lead generation website, your most important conversion might be a contact form submission.
But you first need to identify which specific events should be counted as conversions you want to track. In GA4, the simplest way to create conversions is from events that already exist.
That means you’ll want to do this in the future after your GA4 property has recorded specific events. You can even create that event data yourself by performing the desired action on your site.
Let’s imagine you want to track the file download event (called file_download) as a conversion. This event will be tracked by default through enhanced measurement.
Here’s what to do.
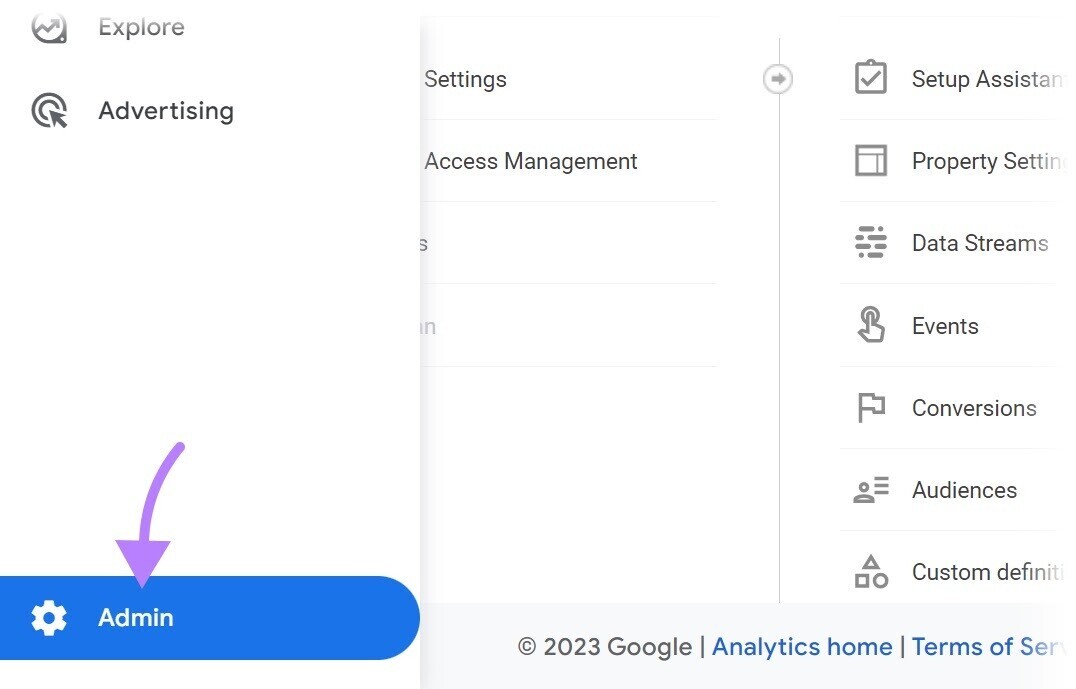
Click “Admin” in the bottom left of the Google Analytics interface.
Within the property settings in the middle of the screen, click on “Events”.
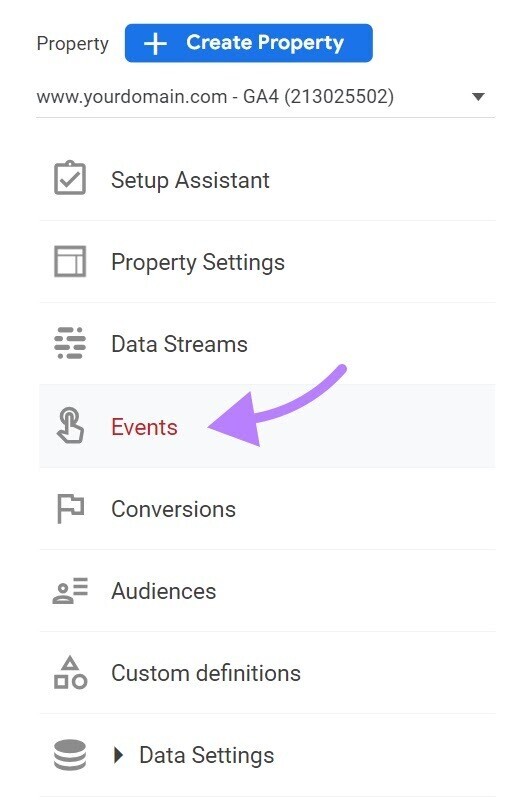
Now, you’ll see a list of all events that have been tracked in Google Analytics.
Find the file_download event. Use the toggle on the right side of the screen to “Mark as conversion.”

You’ve now created a conversion.
Note: You can still get value from Google Analytics if you don’t set up conversions. Although it does help when it comes to evaluating your site content and traffic channels.
How to Use Google Analytics
Now that you understand the basics, you’re ready to start using Google Analytics.
Let’s go over how you can use the platform to analyze metrics for important pages and how to refine your marketing strategy based on the results.
Analyze Important Pages with Google Analytics
GA4 makes it easy to see information about your best- and worst-performing content.
Let’s use the “Pages and screens” report to do this.
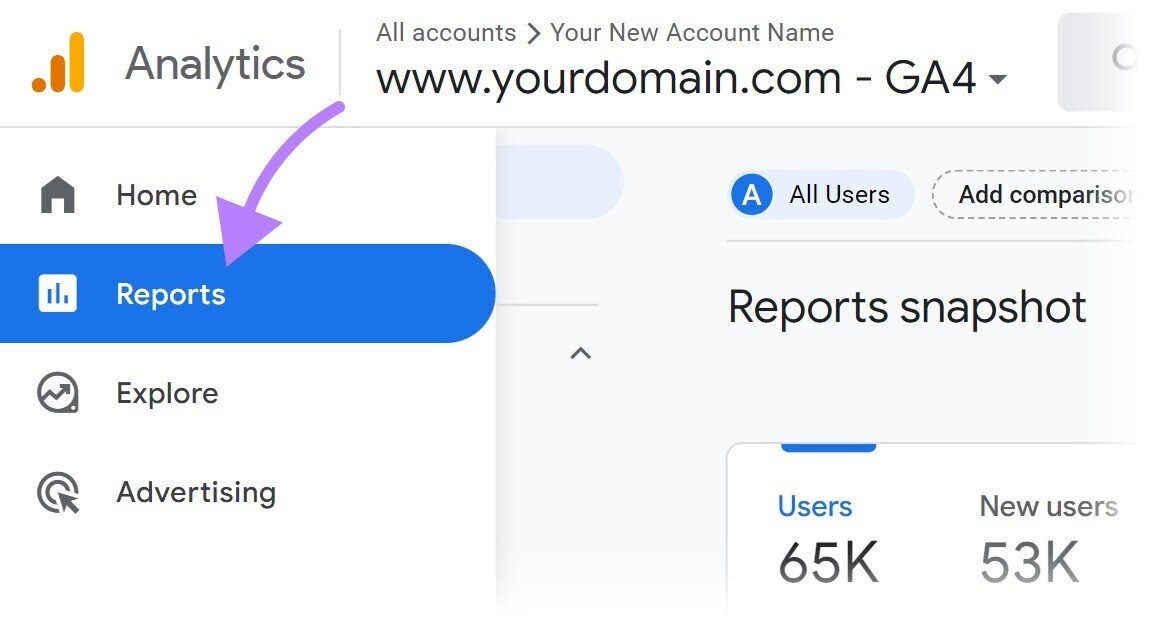
Click on “Reports” in the left-hand navigation.
Now, expand the “Engagement” reporting area and click on “Pages and screens.”
You’ll see a list of your most-viewed pages with the data sorted in descending order based on total views in the “Views” column.
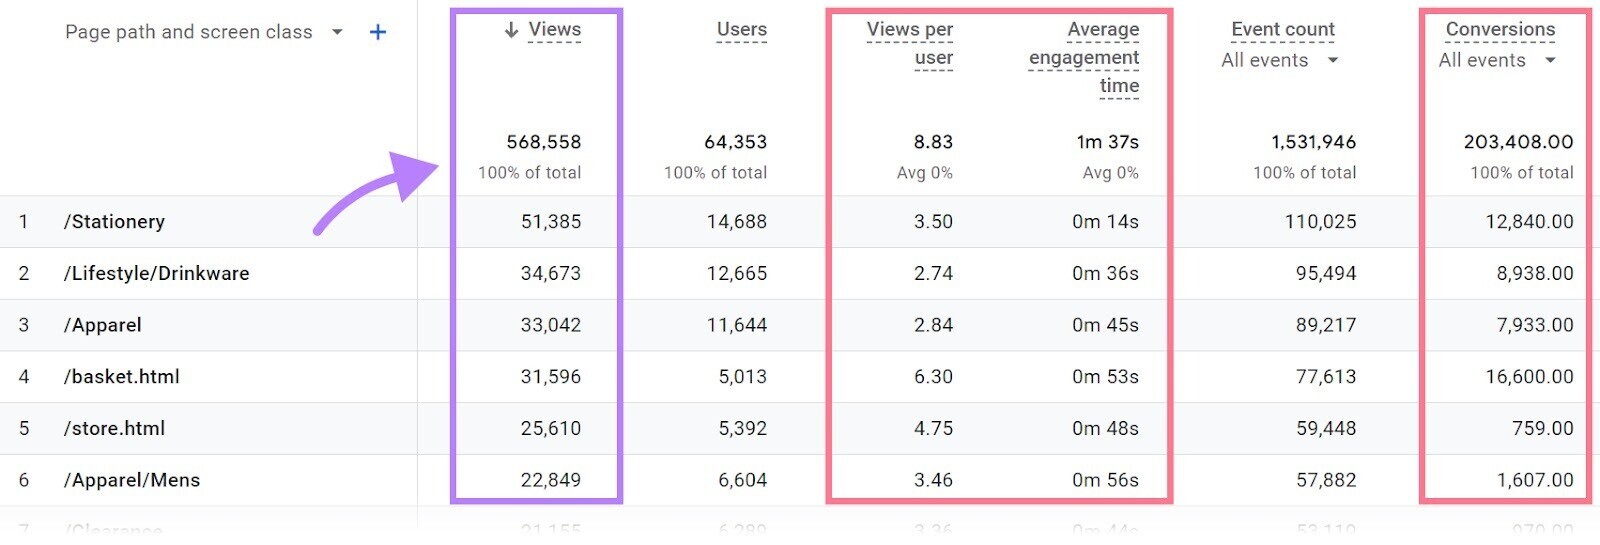
You can also analyze these engagement metrics to understand performance:
- Views per user: The average number of times each user views the page
- Average engagement time: The average length of time the page was in focus in the web browser
- Conversions: The number of conversions coming from each page
Pro tip: Clicking on the arrow immediately to the left of a column headers in a report will sort the data based on that specific Google Analytics metric.
Now let’s see how you can use Google Analytics to analyze your traffic and improve overall performance.
Refine Your Marketing Strategy Based on Performance
GA4 will show you which marketing channels are driving the best performance so you can focus on what is most important and work to fix what is not working.
For this, let’s use the “Traffic acquisition.”
We’ll stay within the “Reports” area.

Expand the “Acquisition” reporting area and click on “Traffic acquisition.”
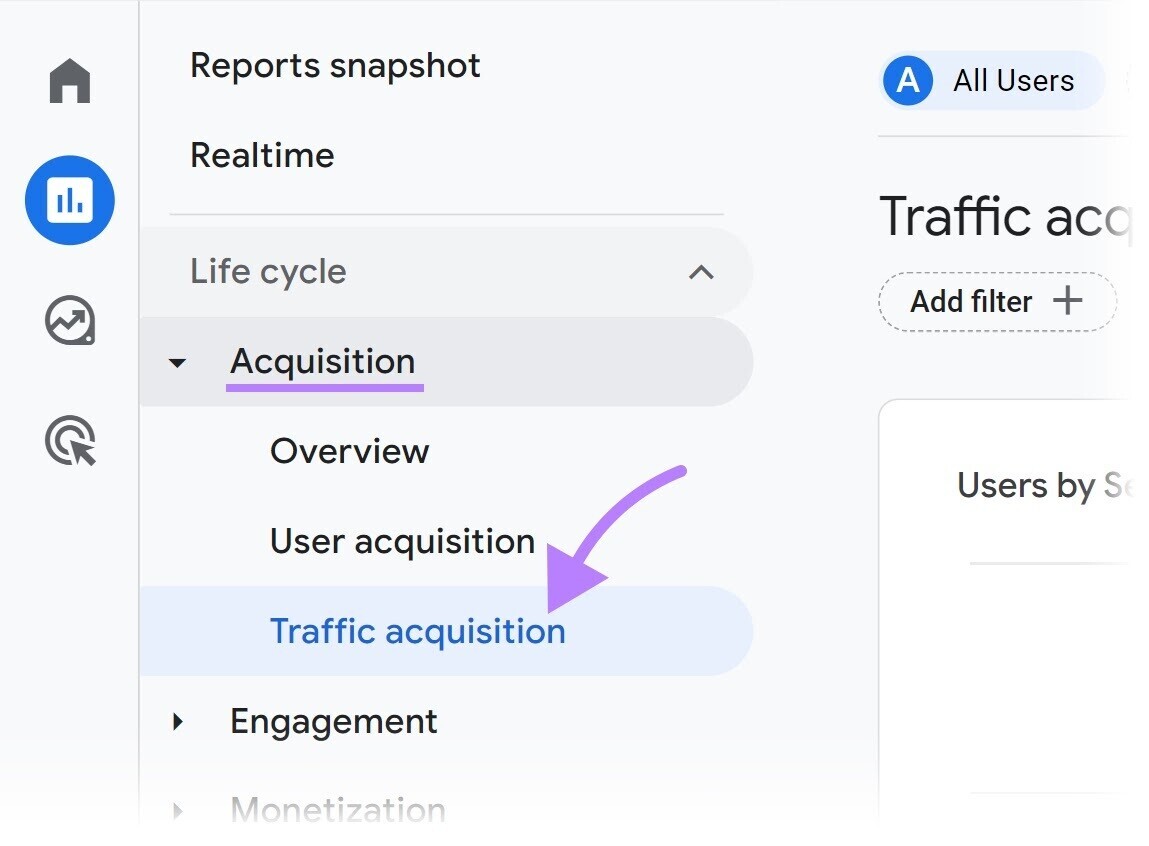
You’ll see a breakdown of how your website acquires traffic. Based on channels like organic search, direct (users who came directly to your site), referral (users who came to your site from another site), etc.
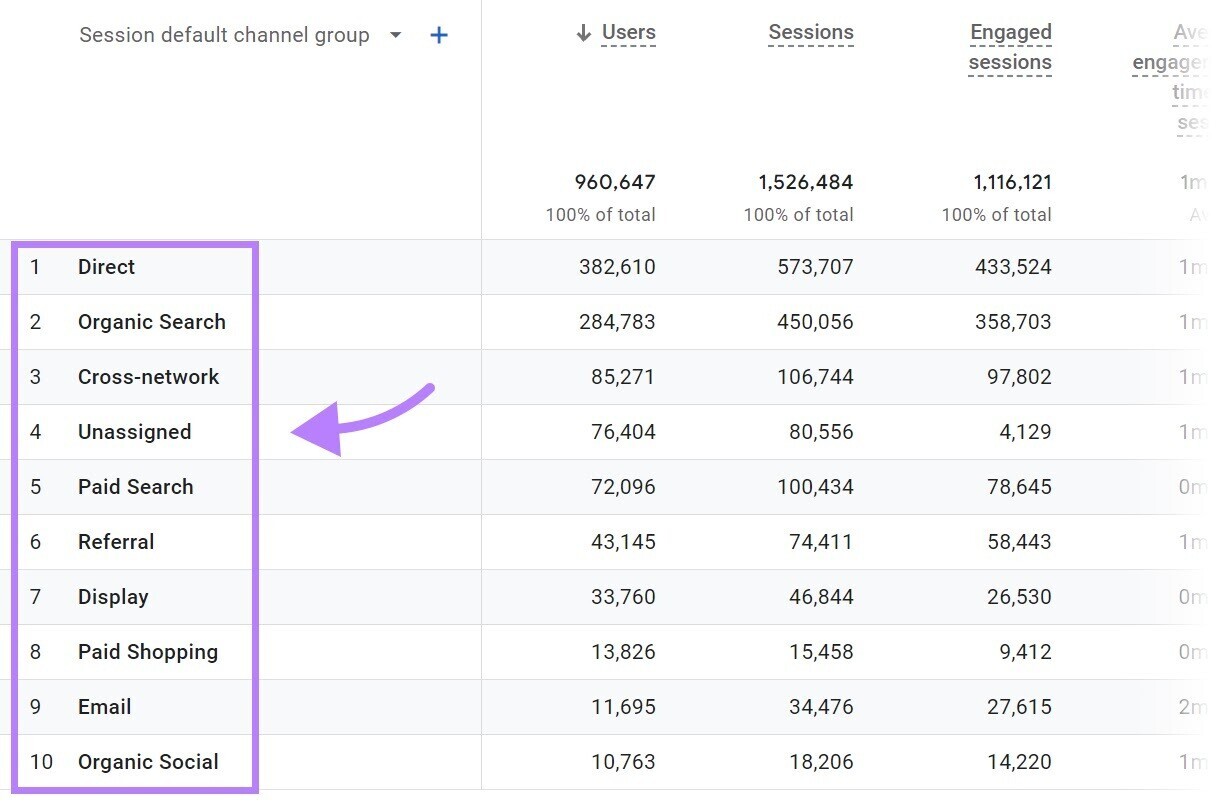
You can analyze these acquisition metrics to understand channel performance and learn how you might refine your marketing strategy.
Here’s one way that could work.
You can see that organic search is your most important traffic channel. It drives the majority of traffic and is responsible for the most conversions. Organic social, on the other hand, drives very little traffic and hasn’t had a single conversion.
Let’s say you decide that organic social could be an opportunity for growth. A great place to start would be to look at which organic search landing pages are driving the most traffic and conversions. Perhaps you could create a social campaign focused on the content on these top pages and create a series of engaging posts that would help drive traffic to those pages.
Here’s another idea:
You can see that paid search has a relatively high number of conversions but a lower engagement rate than organic search. You might hypothesize that the CTAs in your paid search ad copy are working well.
How could you leverage them in new ways?
You could use them as inspiration for in-page banners in your organic content to drive more conversions from pages that your readers are already engaging with.
Google Analytics Tutorials
You’ve already learned a lot about Google Analytics. And there are additional tutorials that will further accelerate your learning.
You can start with these Google tutorials.
You’ll be able to choose your own path based on your specific needs. The “Analytics for beginners and small businesses” path has helpful resources for those who are just beginning.
Click “Get started” under that section.
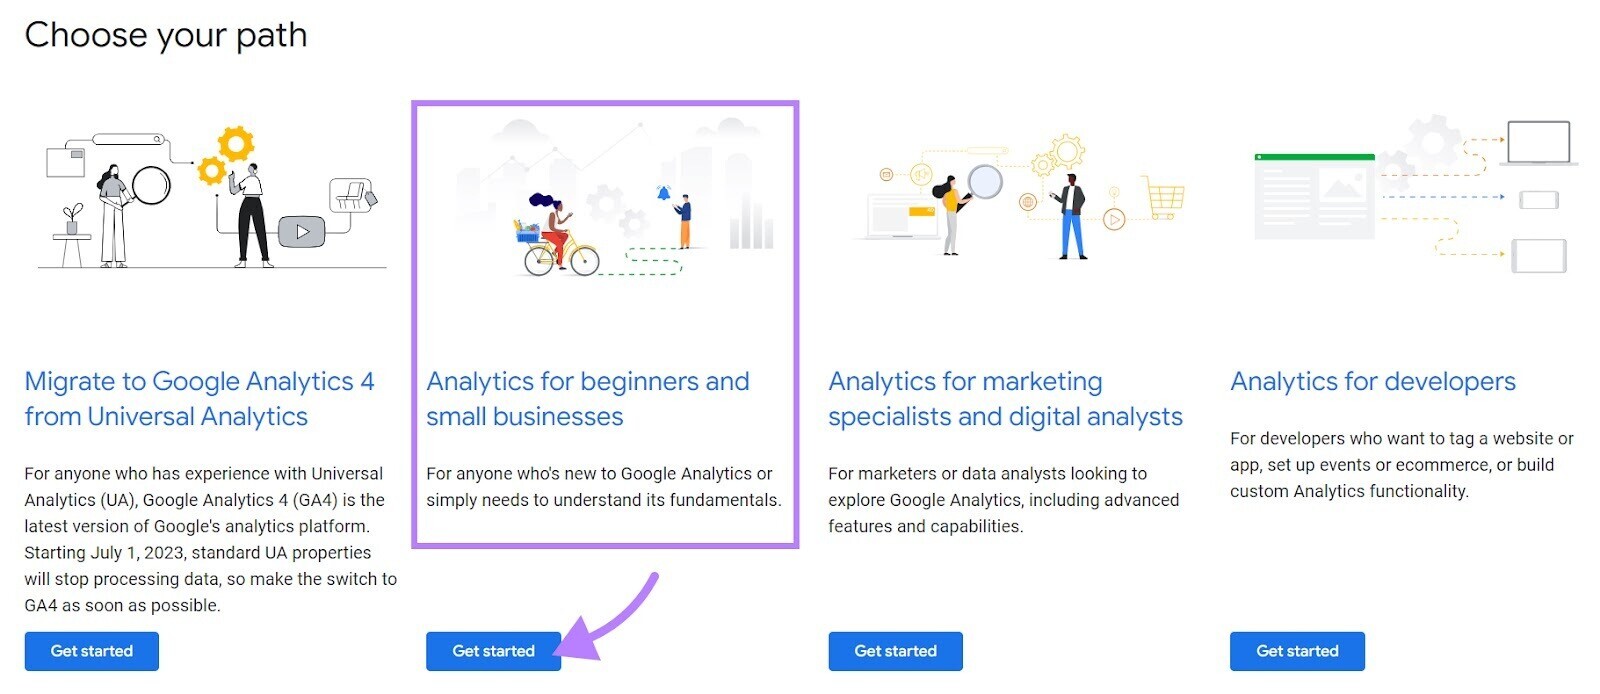
From here, you’ll be able to choose a specific training.
If you’ve been following along, you’ve already set up a property.
Reviewing part two, “Find your way around Analytics,” is a good bet.
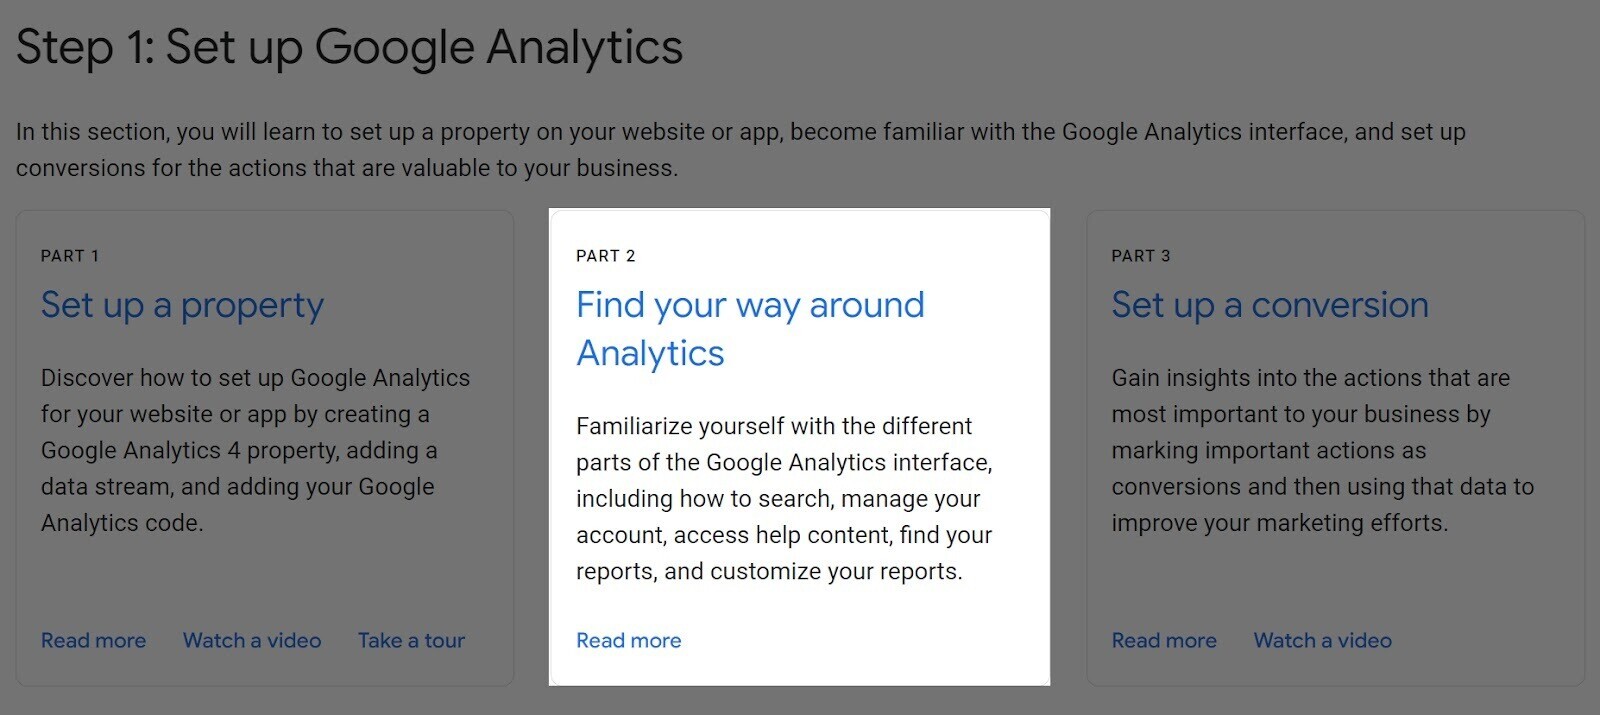
Here, you’ll learn how to customize your reports. Which is a helpful next step.
You can even test your knowledge with the certification track in Google’s Skillshop. Just search for “Google Analytics certification” within Skillshop to find it.
But the certification is optional. And many Google Analytics beginners get more long-term value from the platform by using it regularly to analyze user behavior and traffic performance.
You can amplify your analytical insights by comparing your performance with your competitors.
Analyze Competitor Performance with Traffic Analytics
As you begin to understand your website performance, you’ll likely want to know how your top competitors are performing.
But your competitors aren’t offering to share their Google Analytics data with you, are they?
Traffic Analytics solves that challenge by modeling competitor data based on the actual user behavior of over 200 million real but anonymized internet users. You get a clear picture of your top competitors’ web traffic so you can see how your own site performance compares.
Here’s how to use it.
Go to the Traffic Analytics tool and enter the domain name. The tool will suggest additional relevant competitors after you type the first two.
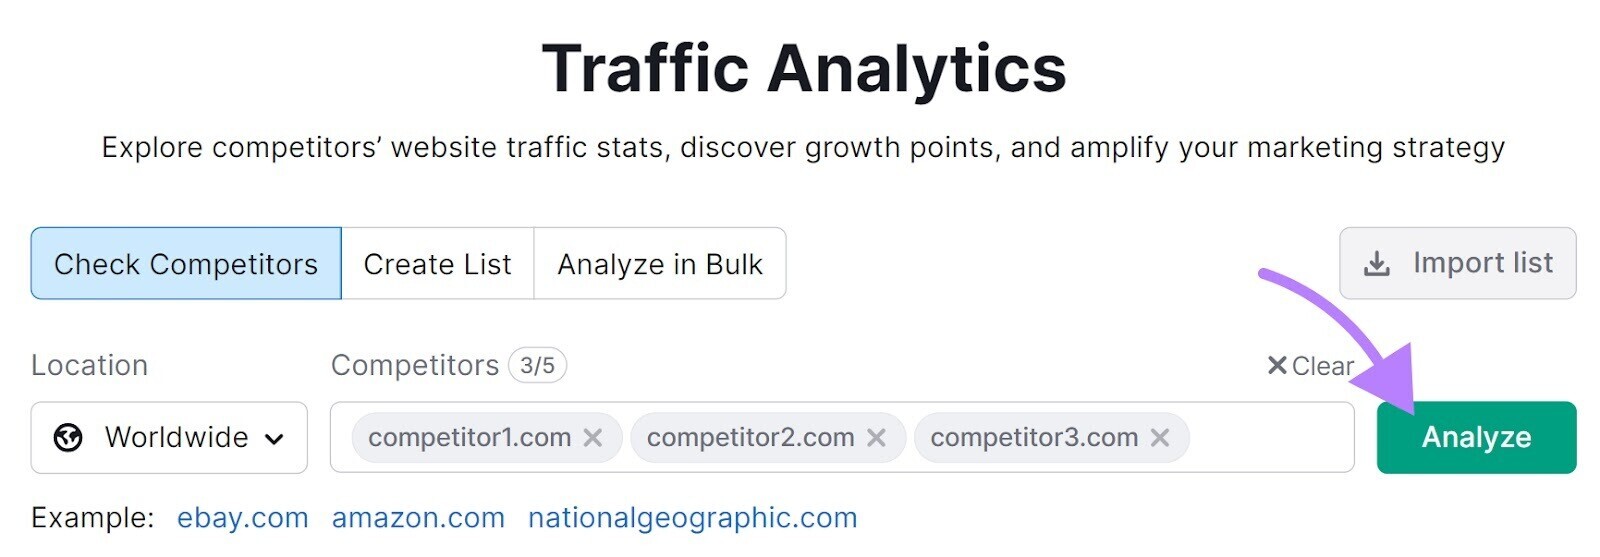
Click “Analyze.”
You’ll see data on visits (equivalent to sessions in Google Analytics), unique visitors (users), and pages / visit. You can also see who is trending up and who is trending down.

And that’s just the Overview section of the report.
You can dive deeper into audience statistics and top pages to see what’s working for them. With it, you can learn from their top performers and refine your own strategy.
Ready to try out Semrush supercharge your analytics insights? Start your free trial today.
